平成 25 年度 卒業研究論文
拡張現実(
AR)を用いた 3D シミュレーションアプリの開発
Kinect で実現するナチュラルユーザーインターフェース
-近畿大学工学部 情報システム工学科
情報メディアコース
1010960077 太田雄介
目次
1. 研究の背景と目的...1
1.1 Kinect の概要...2
1.1.1 Kinect の仕組み...2
1.1.2 Kinect の原理...2-3 1.1.3 “Kinect for Windows”と”Xbox 360 Kinect”...3
1.2 Kinect の実用例...3
2. 開発環境...3-4 2.1 Kinect for Windows SDK...4
2.2 WPF アプリケーション...4-5 2.2.1 GUI(.xaml)...5 2.2.2 ロジック(.xaml.cs)...5 3. KinectClosetSimulation システム外部設計...5 3.1 MainWindow.xaml ...5 3.2 MainWindow.xaml.cs...6 4. KinectClosetSimulation システム内部設計...6 4.1 MainWindow.xaml...6 4.2 MainWindow.xaml.cs...7 4.2.1 MainWindow.xaml.cs >> MainWindow...7-9 4.2.2 MainWindow.xaml.cs >> WindowLoaded...9-11 4.2.3 MainWindow.xaml.cs >> WindowClosing...11 4.2.4 MainWindow.xaml.cs >> ColorFrameReady...11-14 4.2.5 MainWindow.xaml.cs >> SkeletonFrameReady...14-18 4.2.6 MainWindow.xaml.cs >> ChangeImageSource...18-19 5. 今後の課題...20 6. まとめ...20 7. 謝辞...20 8. 参考文献...21 9. 付録...22-29
1.研究の背景と目的
Natural User Interface(NUI)は,人間の五感や,人間が自然に行う動作によって機械を操作する 方法である.NUI は Wii リモコンに始まり,2010 年に米 Microsoft 社の Kinect がゲーム機 X box 用 のセンサーとして発売され、2013 年 11 月 25 日にはさらに機能が追加された”Kinect v2 Developer Preview” が世界中に公開された(一般発売は 2014 年予定)[1]。また,同年7 月 22 日には米 LeapMotion 社が指先によるジェスチャー入力を可能にする”Leap Motion Controller”[2]を発売して おり、今日のモーションセンサ技術の発展は,従来は不可能であったユーザー・インターフェー ス(User Interface : UI)を可能にしている.
コンピュータを操作する際のデータ入力の操作は,よりユーザに優しいものに移り変わってき ている.元々は全ての操作をキーボードからのコマンド入力(Character-based User Interface : CUI) によって行ってきたものが,ビジュアルな画面上でマウスなどのポインティングデバイスによっ て基礎的な操作を行う(Graphical User Interface : GUI)ことができるまでに進化した.そして Kinect のように直感的な人間の動作で操作できるインターフェースは,Natural User Interface (NUI)と呼 ばれ,次世代のUI として注目されている.本研究では Kinect の特徴を活かした拡張現実(AR)空 間を構築し,これまで実現できなかった効果を生み出す視覚的シミュレーションアプリを開発す ることを目的とする. ■ ユーザ要求 本研究で用いるKinect は,何も持たず,何にも触れずに体の動きや声でコンピュータと情報の やり取りを行うNUI を実現することができるので,あらゆる分野(後述 1.2)に応用され今後も 更なる発展が期待されるデバイスの 1 つである.従って、Kinect を利用したアプリケーションの ユーザとしては,直感的で思い通りに操作が可能であることだけではなく,これまでには実現で きなかった効果を生み出し、それらによって新鮮な感覚を体験することも自然な要求である. AR アプリケーションが広く普及するためには,用途によって様々に異なるユーザの要求に対 し最適な機能を備えている必要がある.例えば,仮想世界を眼前の光景に融合するアプリケー ションのユーザとしては,いつでもAR を利用することができる環境が整っており,手軽な操作 で実行可能であることが自然な要求である.言い換えれば、現段階の Kinect のシステムでは, ユーザが「いつでも利用することができる」「手軽な操作で実行可能な」機能を実現することは 難しい.従って本研究では,ユーザが実際に使用したい時や場所に然るべき機能を備えたシステ ムが常備してあることが理想であり,それを想定した上で開発する必要がある. ■ 制作内容 服屋には服の種類だけでなく,それぞれのサイズや色など数多くのバリエーションの服が並べ られている.これらの服の中から客が納得して購入するまで試着を繰り返すのは,多くの手間や 時間がかかるだけでなく商品である服自体が汚れたり傷んでしまう可能性がある.そこでKinect を用いてバーチャル試着を行うことができれば,手軽に何度も購入予定の服を着るシミュレー ションをすることができる.また,試着室に入る必要もなくなるので,同行者や店員と話しなが ら試着を楽しむことが出来る.
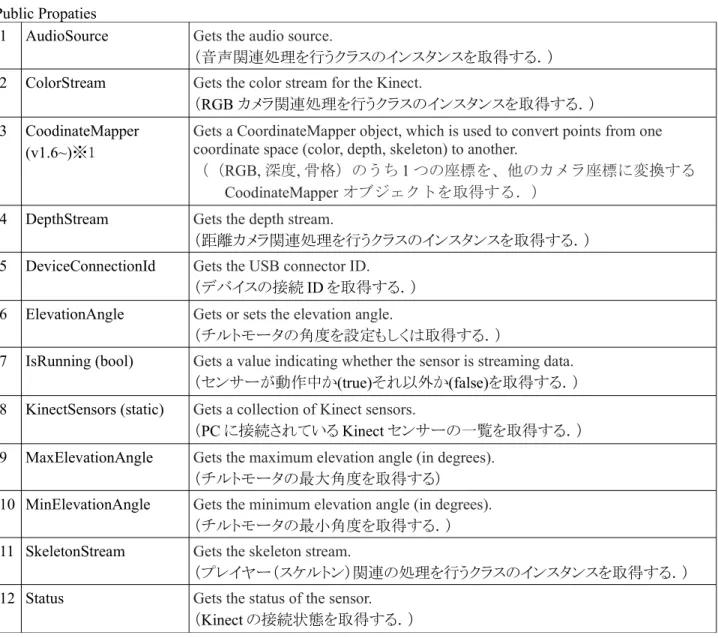
1.1 Kinect の概要 Kinect(キネクト)とは,Microsoft 社が発売してい るXbox360 用の新デバイスのことであり,ユーザーは Kinect の前で物理コントローラーを使わずにゲーム操 作を行うことが出来る.この操作をを可能にしている のは,Kinect 本体に搭載されている RGB カメラ・近 赤外線プロジェクタ・近赤外線カメラ(深度セン サー)・ 4 つのマイクアレイ・チルトモーターであり, カラー情報やプレイヤーの身長・骨格・三次元的位置 を認識,追跡しモーションキャプチャーを合成するこ とが出来る.また,マイクを搭載しているため,音源 位置特定・音声認識をすることも出来るので,声によ るゲーム操作も可能にしている.[3]
現在Microsoft 社は,Kinect を Windows 上で動作させるための Kinect for Windows SDK を一般公 開しており,Windows(Windows7 以降)上で Kinect を用いたアプリケーションの開発が可能と なっている. 1.1.1 Kinect の仕組み[4] Kinect の内部には以下が搭載されている. ・近赤外線プロジェクタ ・近赤外線カメラ(深度カメラ) (解像度最大 640×480) ・RGB カメラ(解像度最大 1280×960) ・マイクアレイ(×4) ・チルトモーター Kinect の下部にはマイクアレイがあり,4 本の個別マイクから構成される.1 本は近赤外線プロ ジェクターの左に,他の 3 本はカラーカメラの右側に等間隔で配置されている. 1.1.2 Kinect の原理[3] レーザー光源の位置から水平方向にずれた位置でカメラにより観察を行うと, レーザー光が 照射されている被写体までの距離(奥行き) z が変わると, カメラ画像内で物体に照射された 光点の位置が水平方向に距離 x ずれる. この依存関係 z = f(x) を利用することで,x を計測して z を求めることができる(光切断法).カメラ画像内のすべて物体の奥行き z を同時に求めるため には、2 次元のランダムドットパターンΣPij を照射して, そのカメラ画像と元々のランダム ドットパターンの一部 Pij との相互相関を計算して, そのピークを求めることで,カメラ画像 内で Pij が照射された位置を特定できる. これにより,カメラ画像内の部分毎に水平方向のずれ x が決まるので,カメラ画像の奥行き z を求めることができる. この手法は照射されたランダム ドットパターンを観測して, そのある部分の光源を特定できるので Light Coding 技術と呼ばれ ている。 Kinect 内部にマイクが 4 つある理由は,それぞれのマイクで収集した音声を分析することで音 の位相から音源の位置を割り出すためである.音源位置は左右に±50°の範囲で検出可能であり, 図 -1 Kinect カメラ 図 -2 Kinect の内部 [3]
複数のプレイヤーがKinect の前にいたとき誰が発声しているのかを判別できる.(上限 7 人)ま た,マイクにはエコー・キャンセラ機能があり,発する声とソフトウェア内の音源は分離する.
1.1.3 “Kinect for Windows”と”Xbox 360 Kinect”[4]
Kinect for Windows SDK からは,Kinect for Windows センサーだけでなく Xbox 360 Kinect セン サーによって開発することも出来る.しかし,Xbox 360 Kinect センサーを使用する場合には以下 の点に注意しなければならない.
・開発目的であれば,Xbox 360 Kinect センサーでも利用可能だが,商用利用することは出来ない. ・Xbox 360 Kinect センサーでは近接モード(Near Mode)はサポートしない.
・Kinect for Windows センサーと Xbox 360 Kinect センサーは完全互換ではない.
1.2 Kinect の実用例 Kinect は様々な分野で活躍できる可能性を秘めている. ・医療現場 : 手術中の執刀医が患者の情報をコンピュータ上で閲覧する際,従来は衛生状態を 保つために自らの操作が不可能であるため,情報の即時提示が困難なことや,集中力低下のリス クがあったが,Kinect を用いて片手または声だけで容易に操作をすれば,衛生状態を保ちながら 執刀医が直感的に操作をすることができるようになる.[5] ・リハビリテーション : 患者がKinect を用いたリハビリテーションを行えば,直感的な操作で 比較的簡単にできる上,患者自身のモチベーションの維持が期待できる.[6] 2. 開発環境[4] [8] ■ ハードウェア要件
・OS: Microsoft Windows 7,8 または Microsoft Windows Embedded Standard 7
Kinect を動作させる Kinect for Windows SDK は Windows7 以前の OS には対応していない.本研究 では Windows7 を使用する. ・CPU: デュアルコア 2.66GHz 以上(推奨) Kinect はハードウェアですべての処理を行うわけではなく,PC 側でも処理を行うのである程度の スペックを求められる.今回の研究ではデュアルコア 3.30GHz のプロセッサを用いる. ・メモリ: 2GB 以上の RAM (推奨は 4GB 以上) ・USB 2.0 ポートに接続された Kinect センサー ・グラフィック・ボード: DirectX 9.0 以上をサポート ■ ソフトウェア要件
インストール
・Kinect for Windows SDK1.5(ソフトウェア開発キット)
32bit にも 64bit にも対応しているが,本研究ではプログラミングに Visual Studio C# 2010 Express を使用するため 32bit 版を利用する.
・Microsoft Visual C# 2010 Express (32bit)
既述のNUI ライブラリに命令を出すための統合開発環境.Microsoft Visual C# 2010 Express は 32bit のみである.
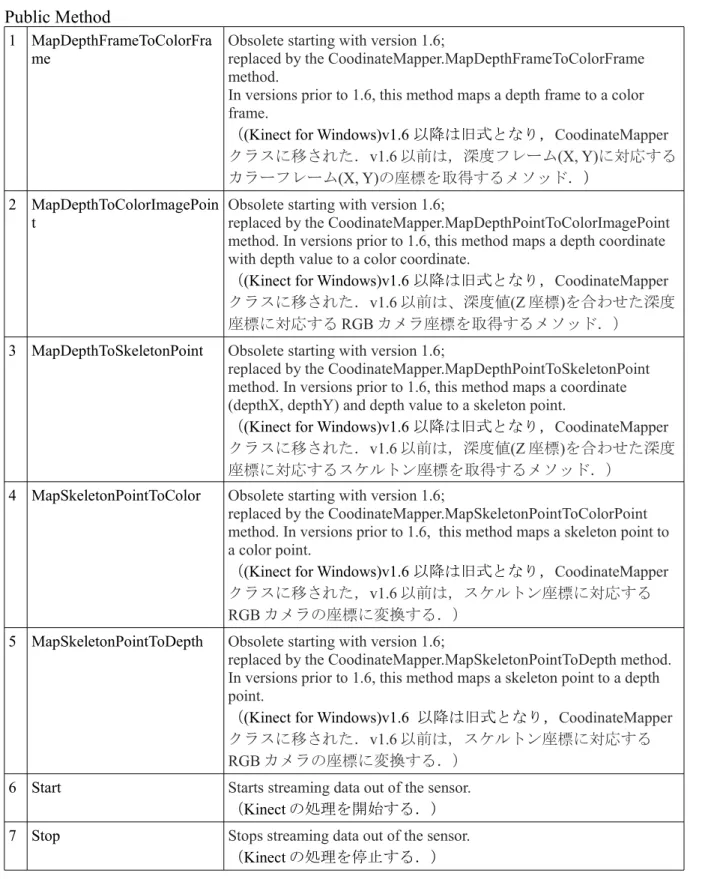
2.1 Kinect for Windows SDK [8]
図-3(SDK の仕組み)
Microsoft 社は Windows 上で Kinect の開発ができる SDK として,Kinect for SDK の β 版を 2011 年6 月にリリースした.Kinect for Windows SDK によって,Kinect の全ての機能を利用すること が出来るようになった.2012 年 2 月に正式版がリリースされた.Kinect for Windows SDK を使用 することで,WPF アプリケーション,WinForms アプリケーション,XNA アプリケーションでプ ログラミングすることが出来る.本研究では,WPF アプリケーションを用いて開発する.
2.2 WPF アプリケーション[9]
WPF(Windows Presentation Foundation) は,XAML 言語(Extensible Application Markup Language)と C#を始めとする,ロジックを記述するプログラミング言語を用いて,見た目(デザイン)に関す る部分はXAML 言語,ロジックは C#で記述するという,アプリケーションの見た目に関する部 分をロジックと完全に切り離して考えることが出来るGUI 開発ライブラリのことである.XAML コードと,それに付随するC#(C++, Visual Basic)の分離コードは,ビルド時に 1 つのクラスに 合成され,コンパイルされる.
(図-4 画像参照元: http://www.atmarkit.co.jp/ait/articles/1005/14/news105.html)
2.2.1 GUI(.xaml)
XAML ファイルは,オブジェクトに対応づけるための XML 要素を記述する.NET Framework3.0 を基盤としたマークアップ言語であり,そこで定義されている表示要素をウィンドウに配置して レイアウトを指定する.また特定の入力要素の値を変数と結びつけたり(データバインディン グ),オブジェクトの相互関係を定義したり,イベント処理を設定することが出来る. 2.2.2 ロジック(.xaml.cs) XAML ファイルがオブジェクトに対応づけるための XML 要素を記述する為のファイルである のに対し,ロジックを記述するファイルではクラスを作成することによってその指定したXML 要素にUI 要素を付け加えることが出来る. 3. KinectClosetSimulation システム外部設計 服画像を 3 種類用意し,認識されたプレイヤーが右腕を,肘を曲げずに高く上げると,プレイ ヤーの肩に合わせて服が描画され,更にもう一度右腕を降ろした状態から肘を曲げずに高く上げ ると、また違う服が描画される. 3.1 MainWindow.xaml XAML ファイルは,開発するアプリケーションのレイアウトを主に担当するので,各要素の配置, サイズを視覚的に確認しながら進めていくことが出来る. 図 -5 XAML ファイル
3.2 MainWindow.xaml.cs XAML ファイルでは出来ない細かい処理はロジック(.xaml.cs)ファイルで行う. 4. KinectClosetSimulation システム内部設計 4.1 MainWindow.xaml 既述のように,XAML ファイルは主にレイアウトを担当するが, Loaded="WindowLoaded"のよ うにイベント処理をするための準備もこのファイルで行う. <Window x:Class="KinectClosetSimulation.MainWindow" xmlns="http://schemas.microsoft.com/winfx/2006/xaml/presentation" xmlns:x="http://schemas.microsoft.com/winfx/2006/xaml"
Title="MainWindow" Height="350" Width="525" Loaded="WindowLoaded" Closing="WindowClosing" Left="0" Top="0"HorizontalAlignment="Left" IsManipulationEnabled="True" SizeToContent="WidthAndHeight" VerticalAlignment="Top"WindowStartupLocation="CenterScreen"> <Viewbox>
<Grid>
<Canvas Width="640" Height="480">
<Image Name="Image" Width="640" Height="480" />
<Image x:Name="CLOTHE" Source="Images\SpaceSuit2.png" RenderTransformOrigin="0.5, 0.5"
Canvas.Left="100" Canvas.Top="100" Stretch="None"/> </Canvas> </Grid> </Viewbox> </Window>
表 1 MainWindow.xaml
図 -6 実行結果4.2 MainWindow.xaml.cs
4.2.1 MainWindow.xaml.cs >> MainWindow ■ KinectSensor
private KinectSensor kinectSensor ;
public class Kinectsensor (Kinect for Windows v1.5 ~)
Represents a Kinect sensor. (Kinect の機能にアクセスするためのクラスやイベントを保持す る。)
Public Propaties
1 AudioSource Gets the audio source.
(音声関連処理を行うクラスのインスタンスを取得する.) 2 ColorStream Gets the color stream for the Kinect.
(RGB カメラ関連処理を行うクラスのインスタンスを取得する.) 3 CoodinateMapper
(v1.6~)※1
Gets a CoordinateMapper object, which is used to convert points from one coordinate space (color, depth, skeleton) to another.
((RGB, 深度, 骨格)のうち 1 つの座標を、他のカメラ座標に変換する CoodinateMapper オブジェクトを取得する.)
4 DepthStream Gets the depth stream.
(距離カメラ関連処理を行うクラスのインスタンスを取得する.) 5 DeviceConnectionId Gets the USB connector ID.
(デバイスの接続ID を取得する.) 6 ElevationAngle Gets or sets the elevation angle.
(チルトモータの角度を設定もしくは取得する.)
7 IsRunning (bool) Gets a value indicating whether the sensor is streaming data.
(センサーが動作中か(true)それ以外か(false)を取得する.) 8 KinectSensors (static) Gets a collection of Kinect sensors.
(PC に接続されている Kinect センサーの一覧を取得する.) 9 MaxElevationAngle Gets the maximum elevation angle (in degrees).
(チルトモータの最大角度を取得する) 10 MinElevationAngle Gets the minimum elevation angle (in degrees).
(チルトモータの最小角度を取得する.) 11 SkeletonStream Gets the skeleton stream.
(プレイヤー(スケルトン)関連の処理を行うクラスのインスタンスを取得する.) 12 Status Gets the status of the sensor.
(Kinect の接続状態を取得する.)
Public Method
1 MapDepthFrameToColorFra me
Obsolete starting with version 1.6;
replaced by the CoodinateMapper.MapDepthFrameToColorFrame method.
In versions prior to 1.6, this method maps a depth frame to a color frame.
((Kinect for Windows)v1.6 以降は旧式となり,CoodinateMapper クラスに移された.v1.6 以前は,深度フレーム(X, Y)に対応する カラーフレーム(X, Y)の座標を取得するメソッド.)
2 MapDepthToColorImagePoin t
Obsolete starting with version 1.6;
replaced by the CoodinateMapper.MapDepthPointToColorImagePoint method. In versions prior to 1.6, this method maps a depth coordinate with depth value to a color coordinate.
((Kinect for Windows)v1.6 以降は旧式となり,CoodinateMapper クラスに移された.v1.6 以前は、深度値(Z 座標)を合わせた深度 座標に対応するRGB カメラ座標を取得するメソッド.)
3 MapDepthToSkeletonPoint Obsolete starting with version 1.6;
replaced by the CoodinateMapper.MapDepthPointToSkeletonPoint method. In versions prior to 1.6, this method maps a coordinate (depthX, depthY) and depth value to a skeleton point.
((Kinect for Windows)v1.6 以降は旧式となり,CoodinateMapper クラスに移された.v1.6 以前は,深度値(Z 座標)を合わせた深度 座標に対応するスケルトン座標を取得するメソッド.)
4 MapSkeletonPointToColor Obsolete starting with version 1.6;
replaced by the CoodinateMapper.MapSkeletonPointToColorPoint method. In versions prior to 1.6, this method maps a skeleton point to a color point.
((Kinect for Windows)v1.6 以降は旧式となり,CoodinateMapper クラスに移された,v1.6 以前は,スケルトン座標に対応する RGB カメラの座標に変換する.)
5 MapSkeletonPointToDepth Obsolete starting with version 1.6;
replaced by the CoodinateMapper.MapSkeletonPointToDepth method. In versions prior to 1.6, this method maps a skeleton point to a depth point.
((Kinect for Windows)v1.6 以降は旧式となり,CoodinateMapper クラスに移された.v1.6 以前は,スケルトン座標に対応する RGB カメラの座標に変換する.)
6 Start Starts streaming data out of the sensor.
(Kinect の処理を開始する.) 7 Stop Stops streaming data out of the sensor.
(Kinect の処理を停止する.)
表 3 KinectSensor class Public method
Public Events
1 AllFramesReady Event that fires when new frames are available for each of the sensor's active streams.
(全てのストリームで,フレームが更新された時に起動するイベント) 2 ColorFrameReady Event that fires when a new color frame is available in the ColorStream.
(カラーストリームで、カラーフレームが更新された時に起動するイベン ト)
3 DepthFrameReady Event that fires when a new depth frame is available in the DepthStream.
(深度ストリームで、深度フレームが更新された時に起動するイベント) 4 SkeletonFrameReady Event that fires when a new skeleton frame is available in the SkeletonStream.
(スケルトンストリームで、スケルトンフレームが更新された時に起動す るイベント)
表 4 KinectSensor class Public Events
4.2.2 MainWindow.xaml.cs >> WindowLoaded カラー・骨格ストリームの有効化,バッファの初期化,新しいインスタンスの初期化,イベン トの発生などの,新しい服を描画するための準備を行う. ■ WriteableBitmap 指定したパラメータを使用して,WriteableBitmapSource クラスの新しいインスタンスを初期化し, ターゲットに画像を書き込み・更新するためのBitmapSource を提供する.WriteableBitmap オブ ジェクトはSystem.Windows.Media.Imaging 名前空間に含まれ,画像のピクセルデータの頻繁な更 新に対処するために作成されている.WriteableBitmap を作成するときは画像のプロパティ(RGB カメラの幅,RGB カメラの高さ,Bitmap の水平値,Bitmap の垂直値,Bitmap のピクセルフォー マット,Bitmap の Bitmap パレット)を定義し,WriteableBitmap オブジェクトにメモリを一度割 り当てれば,後は必要に応じてピクセルデータが更新される.public partial class MainWindow : Window {
private KinectSensor kinectSensor ;
private WriteableBitmap writeableBitmap ;
…
//新しいインスタンスを初期化
this.writeableBitmap = new WriteableBitmap(this.kinectSensor.ColorStream.FrameWidth, this.kinectSensor.ColorStream.FrameHeight, 96.0, 96.0, pixelFormats.Bgr32, null); …
}
public class WriteableBitmap
Provides a BitmapSource that can be written to and updated.
Constructor
1
WriteableBitmap(BitmapSource)Initialize a new instance of the WriteableBitmap class using
the given BitmapSource.
(指定した
BitmapSource
を使用して,WriteableBitmapクラ スの新しいインスタンスを初期化する.)BitmapSource
初期化に使用するBitmapSource
2
WriteableBitmap(Int32, Int32, Double,Double, pixelFormat, BitmapPalette)
Initialize a new instance of the WriteableBitmap class using
the specified parameters.
(
指定したパラメータを使用して,WriteableBitmap
クラスの 新しいインスタンスを初期化する.)Int32
Bitmap の幅
Int32
Bitmap の高さ
Double
Bitmap の水平ドット/インチ
Double
Bitmap の垂直ドット/インチ
pixelFormat
Bitmap の pixelFormat
BitmapPalette Bitmap の BitmapPalette
表 5 WriteableBitmap class WriteableBitmap Constuctors
XAML ファイル内の Image オブジェクトの Source プロパティに,プロジェクトのソリューショ ンエクスプローラ内にあるimages フォルダにまとめて入れておいた,ターゲット上に表示する 画像ファイルへのパスを設定しておく.そしてWriteableBitmap クラスの新しいインスタンスを 初期化したら新たに画像を描画する.
MainWindow.xaml.cs
…
this.writeableBitmap = new WriteableBitmap(this.kinectSensor.ColorStream.FrameWidth, this.kinectSensor.ColorStream.FrameHeight, 96.0, 96.0, pixelFormats.Bgr32, null); //images フォルダ内の画像を描画 this.Image.Source = this.writeableBitmap; … MainWindow.xaml …
<Image x:Name="CLOTHE" Source="Images\SpaceSuit2.png" RenderTransformOrigin="0.5, 0.5"
Canvas.Left="100" Canvas.Top="100" Stretch="None"/>
… 4.2.3 MainWindow.xaml.cs >> WindowClosing Kinect の処理を終了するためのイベント.
this.KinectSensor.Stop();
表 6WindowClosing
4.2.4 MainWindow.xaml.cs >> ColorFrameReady RGB カメラでカラー画像を表示するためのイベント. ■ ColorImageFrameusing (ColorImageFrame colorImageFrame = e.OpenColorImageFrame()) {
if (colorImageFrame != null) {
colorImageFrame.CopyPixelDataTo(this.colorPixels);
this.writeableBitmap.WritePixels(new Int32Rect(0, 0, this.writeableBitmap.PixelWidth, this.writeableBitmap.PixelHeight),this.colorPixels, this.writeableBitmap.PixelWidth * sizeof(int), 0); }
}
public class ColorImageFrame
It provides access to the dimensions, format and pixel data for a color frame.
Public Properties
Format Gets the format for the color data, which includes the data type, frame rate, and the resolution.
(カラーフレームのフォーマット(フレームレート、座標)を取得・設定) PixelDataLengt
h
Gets the total length of the pixel data buffer.
(ピクセルデータのバイト長を取得)
表 7 ColorImageFrame class ColorImageFrame Properties
Public Method CopyPixelDataTo (
byte[] )
Copies a frame of color data to a pre-allocated array of bytes. The array size must be equal to the ColorImageFrame.PixelDataLength Property.
(フレームごとのRGB ピクセルデータを取得する.PixelDataLength Property で取得したバイト長分の長さが確保されたbyte の配列でなければならな い.)
表 8 ColorImageFrame class ColorImageFrame Method
■ ColorImageFrameReadyEventArgs
private void ColorFrameReady(object sender, ColorImageFrameReadyEventArgs e) {
using (ColorImageFrame colorImageFrame = e.OpenColorImageFrame()) {
… }
}
public class ColorImageFrameReadyEventArgs
The event arguments provided in a KinectSensor.ColorFrameReady event when a frame of color data is ready.
(RGB カメラのフレーム更新を行う時の ColorImageFrame に渡される引数を提供する.)
Public Method※2
OpenColorImageFrame() Gets the most recent frame of color data.
(新しいフレームの RGB カメラの情報を取得する.)
表 9 ColorImageFrameReadyEventArgs class ColorImageFrameReadyEventArgs Method
※2 このメソッドで取得した ColorImageFrame は using でくくるか,Dispose を明示的に呼び出す 必要がある.
MainWindow.xaml.cs …
private void ColorFrameReady(object sender, ColorImageFrameReadyEventArgs e) {
//新しい ColorImageFrame の RGB カメラの情報を取得する
using (ColorImageFrame colorImageFrame = e.OpenColorImageFrame()) { if (colorImageFrame != null) { //フレームごとの RGB ピクセルデータを取得する。 colorImageFrame.CopyPixelDataTo(this.colorPixels); //※3 WriteableBitmap.WritePixels : ビットマップの指定した領域内のピクセルを更新 する。
this.writeableBitmap.WritePixels(new Int32Rect(0, 0, this.writeableBitmap.PixelWidth, this.writeableBitmap.PixelHeight),this.colorPixels, this.writeableBitmap.PixelWidth * sizeof(int), 0); } } } … ※3 WriteableBitmap.WritePixels Method WriteableBitmap.WritePixels( Int32Rect sourceRect , //① Array pixels, //② Int32 stride, //③ Int32 offset, //④ ); this.writeableBitmap.WritePixels( new Int32Rect(0,0,this.writeableBitmap.PixelWidth, this.writeableBitmap.PixelHeight), this.colorPixels, //private byte[] colorPixels; this.writeableBitmap.PixelWidth * sizeof(int), 0 ); 表
10
WriteableBitmap.WritePixels Method
ビットマップの指定した領域内のピクセルを更新する.①Int32Rect
は、更新するWriteableBitmapSource
の四角形であり,パラメータは,X座標,Y座標,幅,高さから成る.座標は(0, 0),幅と高さはビットマップの幅を取得する
WriteableBitmap. PixelWidth,及びビットマップの高さ
を取得するWriteableBitmap.PixelHeight
から指定する.②Array
は、ビットマップの更新に使用する ピクセル配列であり,表11
のようにKinectSensor
から画像情報を受け取るために,初期化されてフ レームのPixelDataLength
分の長さが確保されたbyte
配列のバッファ”colorPixels”を指定する.private KinectSensor kinectSensor; private byte[] colorPixels;
… if (null != this.kinectSensor) {
… //バッファの初期化
this.colorPixels = new byte[this.kinectSensor.ColorStream.FramePixelDataLength]; …
}
表
12
colorPixels
③stride は、「ピクセル 1 行分の byte 数」のことである.stride 値を求めるには,画像の幅にピク セルあたりのbyte 数を掛ける必要がある.④ offset は,入力バッファの offset のことで,基準点 からの差(距離)で表した値のことであるが,本研究では画像のピクセル全てを置き換えるため, 常に0 となる. 4.2.5 MainWindow.xaml.cs >> SkeletonFrameReady スケルトンフレームの更新イベントである.RGB カメラのフレーム更新イベントと同様に OpenSkeletonFrame()でフレームデータを取得し,有効であればターゲットが指定された条件を満 たし次第,描画を行う. ■SkeletonFrame
using (SkeletonFrame skeletonFrame = e.OpenSkeletonFrame()) {
if (skeletonFrame != null) {
skeletons = new Skeleton[skeletonFrame.SkeletonArrayLength]; skeletonFrame.CopySkeletonDataTo(skeletons);
} }
public class SkeletonFrame
Contains a per-frame buffer for skeleton data streamed out of a sensor. Also provides access to the floor clipping plane and the number of skeletons tracked.
(KinectSensor が放出したスケルトンデータのフレームごとのバッファ,クリッピング平面,ト ラッキングしているターゲットの数)
Public Properties
Floor ClipPlane Gets or sets the clip plane of the floor in the form of a four-component vector: (x, y, z, w).
(3DCG をレンダリングするクリッピング平面の情報を取得・設定す る)
FrameNumber Gets or sets the frame number.
(フレーム番号を取得・設定する)
SkeletonArrayLength Gets the total length of the skeleton data buffer for this SkeletonFrame.
(スケルトン配列の長さを取得する)
表 13 SkeletonFrame class Public Properties
Public Method
CopySkeletonDataTo(
skeletonData
)
Copies skeleton data to an array of Skeletons, where each Skeleton contains a collection of the joints.
(ターゲットのスケルトン座標のデータを取得する.)
表 14 SkeleletonFrame class Public Properties
■SkeletonFrameReadyEventArgs
private void SkeletonFrameReady(object sender, SkeletonFrameReadyEventArgs e) { …}
Public class SkeletonFrameReadyEventArgs
The event arguments provided in a KinectSensor.SkeletonFrameReady event when a frame of skeleton data is ready. (スケルトンのフレーム更新を行う時の SkeletonFrameReady に渡される引数を提供す る.)
Public Method ※3
OpenSkeletonFrame() Opens a SkeletonFrame object, which contains one frame of skeleton data.
(新しいスケルトンフレームのスケルトンデータの情報を取得する.) 表 15 SkeleletonFrame class Public Method
※3 このメソッドで取得した SkeletonFrame は、using でくくるか,Dispose を明示的に呼び出す必 要がある.
M
ainWindow.xaml.cs
private void SkeletonFrameReady(object sender, SkeletonFrameReadyEventArgs e) {
Skeleton[] skeletons = new Skeleton[0];
using (SkeletonFrame skeletonFrame = e.OpenSkeletonFrame()) {
if (skeletonFrame != null) {
skeletons = new Skeleton[skeletonFrame.SkeletonArrayLength]; skeletonFrame.CopySkeletonDataTo(skeletons);
} }
if (skeletons.Length != 0) {
foreach (Skeleton skel in skeletons) { if (skel.TrackingState == SkeletonTrackingState.Tracked) { ColorImagePoint shoulderRightPoint = kinectSensor.MapSkeletonPointToColor(skel.Joints[JointType.ShoulderRight].Position, ColorImageFormat.RgbResolution640x480Fps30); ColorImagePoint shoulderLeftPoint = kinectSensor.MapSkeletonPointToColor(skel.Joints[JointType.ShoulderLeft].Position, ColorImageFormat.RgbResolution640x480Fps30); float rightArmLift = skel.Joints[JointType.ElbowRight].Position.Y -
skel.Joints[JointType.ShoulderRight].Position.Y; float leftArmLift = skel.Joints[JointType.ElbowLeft].Position.Y - skel.Joints[JointType.ShoulderLeft].Position.Y; if (weared) { //右腕が「下がって」いる状態 if (rightArmLift < 0) { CLOTHE.Visibility = Visibility.Visible; Canvas.SetLeft(CLOTHE, shoulderLeftPoint.X - 65.0); Canvas.SetTop(CLOTHE, shoulderRightPoint.Y - 50.0); isRightArmLifted = false; } } if (!isRightArmLifted) { //右腕が「上がって」いる状態 if(rightArmLift > 0) { ChangeImageSource(); //服の 像画 Source 変更 weared = true; isRightArmLifted = true; } } }
} } } ・スケルトンの座標をRGB カメラの座標に変換する if (skeletons.Length != 0) {
foreach (Skeleton skel in skeletons) { if (skel.TrackingState == SkeletonTrackingState.Tracked) { ColorImagePoint shoulderRightPoint = kinectSensor.MapSkeletonPointToColor(skel.Joints[JointType.ShoulderRight].Position, ColorImageFormat.RgbResolution640x480Fps30); ColorImagePoint shoulderLeftPoint = kinectSensor.MapSkeletonPointToColor(skel.Joints[JointType.ShoulderLeft].Position, ColorImageFormat.RgbResolution640x480Fps30); } } } 表 16 スケルトンの座標をRGB カメラの座標に変換する ■RGB カメラの解像度・フレームレート
ColorImageFormat colorimageFormat = ColorImageFormat.RgbResolution640x480Fps30; public enum ColorImageFormat (ColorImageFormat 列挙子)
Image formats for a ColorImageFormat Each image format contains the data type, the resolution, and the frame rate. (データタイプ(解像度、フレームレート)を含むRGB カメラのフォーマット) ColorImageFormat Members
RawYuvResolution640x480Fps15 Raw YUV data1) whose resolution is 640 x 480 and frame rate is 15 frames
per second.
(解像度は640×480、1 秒あたり 15 フレーム更新する YUV フォーマット)
RgbResolution1280x960Fps12 RBG data whose resolution is 1280 x 960 and frame rate is 12 frames per second.
(解像度は1280×960、1 秒あたり 12 フレーム更新する RGB フォーマット)
RgbResolution640x480Fps30 RBG data whose resolution is 640 x 480 and frame rate is 30 frames per second.
(解像度は640×480、1 秒あたり 30 フレーム更新する RGB フォーマット)
YuvResolution640x480Fps15 YUV data whose resolution is 640 x 480 and frame rate is 15 frames per second.
(解像度は640×480、1 秒あたり 15 フレーム更新する YUV フォーマット)
Undefined The format is not defined. (フォーマットが未定義)
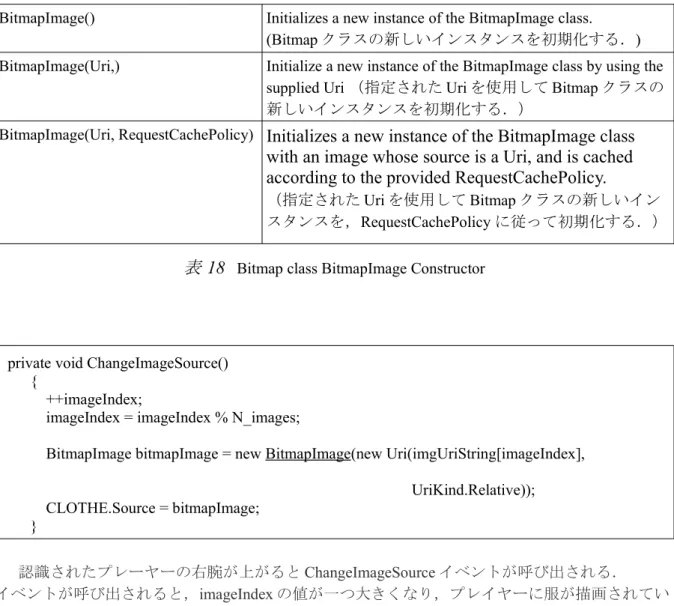
float rightArmLift = skel.Joints[JointType.ElbowRight].Position.Y - skel.Joints[JointType.ShoulderRight].Position.Y; if (weared) { //右腕が「下がって」いる状態 if (rightArmLift < 0) { CLOTHE.Visibility = Visibility.Visible; Canvas.SetLeft(CLOTHE, shoulderLeftPoint.X - 65.0); Canvas.SetTop(CLOTHE, shoulderRightPoint.Y - 50.0); isRightArmLifted = false; } } if (!isRightArmLifted) { //右腕が「上がって」いる状態 if(rightArmLift > 0) { ChangeImageSource(); //服の 像画 Source 変更 weared = true; isRightArmLifted = true; } } 表 17 服が描画される為の条件 既述のように,Kinect が認識したプレイヤーが右手を,肘を伸ばした状態で高く上げると服が 描画・変更される仕組みになっている. 変数float rightArmLift で「(右肘の Y 座標)-(右肩の Y 座標)」を指定し,0 より大きな値に なるか小さな値になるか,つまり右腕が上がっている状態か下がっている状態かで異なる処理を 行う.weard(現在服が描画されている状態)で右腕が下がっていると,右肩から左肩の間に服 が描画され,右腕が上がるとChangeImageSource イベントを呼び出し,新たな服が描画される. 4.2.5 MainWindow.xaml.cs >> ChangeImageSource 描画する服の変更を行うイベント.
private void ChangeImageSource() {
++imageIndex;
imageIndex = imageIndex % N_images;
BitmapImage bitmapImage = new BitmapImage(new Uri(imgUriString[imageIndex], UriKind.Relative));
CLOTHE.Source = bitmapImage; }
public class Bitmap
Provides a specialized BitmapSource that is optimizedfor loading images using Extensible Application markup Language.
(特別なBitmapSource イメージを提供する.Extensible Application markup Language を使用してイメージ の読み込みのために最適化される.)
BitmapImage Constructor
BitmapImage() Initializes a new instance of the BitmapImage class. (Bitmap クラスの新しいインスタンスを初期化する.) BitmapImage(Uri,) Initialize a new instance of the BitmapImage class by using the
supplied Uri (指定された Uri を使用して Bitmap クラスの 新しいインスタンスを初期化する.)
BitmapImage(Uri, RequestCachePolicy)
Initializes a new instance of the BitmapImage class
with an image whose source is a Uri, and is cached
according to the provided RequestCachePolicy.
(指定されたUri を使用して Bitmap クラスの新しいイン スタンスを,RequestCachePolicy に従って初期化する.)
表 18 Bitmap class BitmapImage Constructor
private void ChangeImageSource() {
++imageIndex;
imageIndex = imageIndex % N_images;
BitmapImage bitmapImage = new BitmapImage(new Uri(imgUriString[imageIndex], UriKind.Relative)); CLOTHE.Source = bitmapImage; } 認識されたプレーヤーの右腕が上がるとChangeImageSource イベントが呼び出される. イベントが呼び出されると,imageIndex の値が一つ大きくなり,プレイヤーに服が描画されてい る場合でも,されていない場合でも,新しい服が指定され,描画される.
5. 今後の課題 ■ユーザー・インターフェースが不十分 当初は,腕が上がったことを認識すると服が表示されるのではなく,デフォルトで表示された 画像を,ジェスチャー認識のスワイプを行うことで別の服に入れ替える予定であったが,プログ ラムが複雑で学習に時間を要するため,時間の都合上,実現することが出来なかった. ■当初はターゲットの身長や体格,カメラからの距離によって服画像が拡大・縮小する予定で あった. Kinect に搭載されている近赤外線センサーを使用すれば,深度・骨格情報を得ることが出来る ため,ターゲットに合わせて服画像のサイズを自動的に変更することができたが,時間の都合上, 実現することが出来なかった. ■使い方を知らないユーザへの配慮の不足 既述のように,このアプリケーションは実際に一般のユーザが使用することを想定した上で取 り組んでいたものであるにもかかわらず,操作方法の説明がなく,次にユーザがとるべきジェス チャーの誘導がない.一般のユーザ目線で,わかりやすく,面白いと感じるシステムを開発する ことを意識して取り組むべきであった. 6. まとめ Kinect を用いたモーションキャプチャで拡張現実(AR)空間を構築し,実装させることができ た.このバーチャル試着は,着替えの手間なく試着をすることが出来るという便利さだけではな く,試着室に入らずに気軽に服を変更することが出来るため同行者とともに楽しみながら試着を 行うことが出来るので,その可能性は大いにあり,研究を行う意義は十分にあると考えられる. その一方で,研究の進捗に関しては多くの課題を残す結果となった.特に,「新しいユーザー・ インターフェース」をコンセプトとして,アイディアとそれを実現するための計画を立てた上で 研究に臨んだにも関わらず,学習と技術力の不足のために実現することが出来なかった. 卒業研究に約一年間取り組み,学習や研究の成果を論文に書き起こして発表するまでの期間に は,本論には載せられないほどの些細なミスの見落としがあったために何週間も悩まされたこと, 残り時間の都合から研究内容を大幅に変更するために開発環境を変更し,一から勉強し直す必要 がありミーティングにおける進捗状況の発表が遅れてしまったことがあったが,卒業後も研究は 引き続き継続し,発表の機会があれば是非積極的に参加していきたいと考えている. 7.謝辞 最後に,研究をはじめ,本論文の作成にあたりいつでも熱心なご指導・ご指摘を賜りました徐 丙鉄教授,開発環境の構築にあたり指導をして頂いた工学部情報システム工学科映像応用システ ム研究室の田中一基教授,映像応用システム研究室学生の皆様,そして日々のミーティングを通 じて多くの知識やアドバイスを得る機会をくださった情報物理研究室学生の皆様に深く感謝申し 上げます.
8.参考文献
[1]新型Kinect for Windows v2 Developer Preview プログラミング入門 http://www.buildinsider.net/small/kinect2dp/01
[2]Leap Motion | Mac & PC Motion Controller for Games, Design, & More
https://www.leapmotion.com
/[3]United States Patent “RANGE MAPPING USING SPECKLE DECORRELATION” https://docs.google.com/viewer?url=patentimages.storage.googleapis.com/pdfs/US7433024.pdf [4]Jarret Webb / James Ashley 著、株式会社プロシステムエルオーシー 訳
初音玲 監修 『Kinect ソフトウェア開発講座』(翔泳社) [5]手術室向け非接触型画像操作システム Opect(オペクト) http://www.nichiigakkan.co.jp/service/medical/category/hospital/opect.html [6]Kinect の特徴を生かしたインタラクティブ・リハビリシステム http://www.systemfriend.co.jp/node/434#.UgED3JLxreE [7]これまでとは違う!AR を本気でビジネスに生かす http://itpro.nikkeibp.co.jp/article/COLUMN/20130614/485301/?ST=systeml [8]中村薫,斎藤俊太,宮城英人 (株式会社ゲッシュ)著
『Kinect for Windows SDK プログラミング C#編』(秀和システム) [9]Silverlight 入門
http:// anticlimactically /fdotnet/chushin/introsl_02/introsl_02_01.html [10]第 1 回 いよいよ WPF の時代。WPF の習得を始めよう
9.付録(ソースコード)
MainWindow.xaml
<Window x:Class="KinectClosetSimulation.MainWindow"
xmlns="http://schemas.microsoft.com/winfx/2006/xaml/presentation" xmlns:x="http://schemas.microsoft.com/winfx/2006/xaml"
Title="MainWindow" Height="350" Width="525" Loaded="WindowLoaded" Closing="WindowClosing" Left="0" Top="0"
HorizontalAlignment="Left" IsManipulationEnabled="True" SizeToContent="WidthAndHeight" VerticalAlignment="Top"
WindowStartupLocation="CenterScreen"> <Viewbox>
<Grid>
<Canvas Width="640" Height="480">
<Image Name="Image" Width="640" Height="480" />
<Image x:Name="CLOTHE" Source="Images\SpaceSuit2.png"
RenderTransformOrigin="0.5, 0.5" Canvas.Left="100" Canvas.Top="100" Stretch="None"/> </Canvas> </Grid> </Viewbox> </Window> MainWindow.xaml.cs using System; using System.Globalization; using System.IO; using System.Windows; using System.Windows.Controls; using System.Windows.Media; using System.Windows.Media.Imaging; using Microsoft.Kinect; namespace KinectClosetSimulation {
{
Boolean isRightArmLifted = false; int N_images = 3;
string[] imgUriString = { "../Images/SchoolUnifo.png", "../Images/SpaceSuit2.png", "../Images/RogerUnifo2.png"};
int imageIndex = 1; Boolean weared = false;
private KinectSensor kinectSensor; private WriteableBitmap writeableBitmap; private byte[] colorPixels;
public MainWindow() { InitializeComponent(); CLOTHE.Visibility = Visibility.Collapsed; }
private void WindowLoaded(object sender, RoutedEventArgs e) {
foreach (var potentialSensor in KinectSensor.KinectSensors) { if (potentialSensor.Status == KinectStatus.Connected) { this.kinectSensor = potentialSensor; break; } } if (null != this.kinectSensor) { this.kinectSensor.ColorStream.Enable(ColorImageFormat.RgbResolution640x480Fps30); this.kinectSensor.SkeletonStream.Enable();
this.writeableBitmap = new WriteableBitmap(this.kinectSensor.ColorStream.FrameWidth, this.kinectSensor.ColorStream.FrameHeight, 96.0, 96.0, PixelFormats.Bgr32, null); this.Image.Source = this.writeableBitmap; this.kinectSensor.ColorFrameReady += this.ColorFrameReady; this.kinectSensor.SkeletonFrameReady += this.SkeletonFrameReady; try { this.kinectSensor.Start(); } catch (IOException) { this.kinectSensor = null; } } }
private void WindowClosing(object sender, System.ComponentModel.CancelEventArgs e) { if (this.kinectSensor != null) { this.kinectSensor.Stop(); } }
private void ColorFrameReady(object sender, ColorImageFrameReadyEventArgs e) {
{
if (colorImageFrame != null) {
colorImageFrame.CopyPixelDataTo(this.colorPixels);
this.writeableBitmap.WritePixels(new Int32Rect(0, 0, this.writeableBitmap.PixelWidth, this.writeableBitmap.PixelHeight),
this.colorPixels, this.writeableBitmap.PixelWidth * sizeof(int), 0);
} } }
private void SkeletonFrameReady(object sender, SkeletonFrameReadyEventArgs e) {
Skeleton[] skeletons = new Skeleton[0];
using (SkeletonFrame skeletonFrame = e.OpenSkeletonFrame()) {
if (skeletonFrame != null) {
skeletons = new Skeleton[skeletonFrame.SkeletonArrayLength]; skeletonFrame.CopySkeletonDataTo(skeletons);
} }
if (skeletons.Length != 0) {
foreach (Skeleton skel in skeletons) { if (skel.TrackingState == SkeletonTrackingState.Tracked) { ColorImagePoint shoulderRightPoint = kinectSensor.MapSkeletonPointToColor(skel.Joints[JointType.ShoulderRight].Position, ColorImageFormat.RgbResolution640x480Fps30); ColorImagePoint shoulderLeftPoint =
kinectSensor.MapSkeletonPointToColor(skel.Joints[JointType.ShoulderLeft].Position,
ColorImageFormat.RgbResolution640x480Fps30);
float rightArmLift = skel.Joints[JointType.ElbowRight].Position.Y - skel.Joints[JointType.ShoulderRight].Position.Y;
float leftArmLift = skel.Joints[JointType.ElbowLeft].Position.Y - skel.Joints[JointType.ShoulderLeft].Position.Y; if (weared) { if (rightArmLift < 0) { CLOTHE.Visibility = Visibility.Visible; Canvas.SetLeft(CLOTHE, shoulderLeftPoint.X - 65.0); Canvas.SetTop(CLOTHE, shoulderRightPoint.Y - 50.0); isRightArmLifted = false; } } if (!isRightArmLifted) { if(rightArmLift > 0) { ChangeImageSource(); weared = true; isRightArmLifted = true; } } } } } }
private void ChangeImageSource() {
++imageIndex;
imageIndex = imageIndex % N_images;
//messageTextBox.Text = "imageIndex=" + imageIndex;
BitmapImage bitmapImage = new BitmapImage(new Uri(imgUriString[imageIndex], UriKind.Relative));
CLOTHE.Source = bitmapImage;
}
} }