ホワイト ペーパー
Deploy Cisco HyperFlex Edge systems in the cloud with Cisco Intersight
Author: Hui Chen
Last Updated: April 10, 2018
Note: This document contains material and data with multiple dependencies. The information may be updated as and when necessary and is subject to change without notice.
ホワイト ペーパー
目次
エグゼクティブ サマリー ... 3
ソリューション概要 ... 3
はじめに ... 3
Cisco HyperFlex Edge システム ... 4
Cisco Intersight クラウド ベースの管理プラットフォーム ... 7
物理トポロジ ... 10
論理トポロジ ... 11
Installing Cisco HyperFlex Edge with the Cisco Intersight platform ... 14
Prerequisites ... 14
Sample topology and pre-installation checklist ... 16
Cisco Integrated Management Controller configuration ... 17
Claiming devices in the Cisco Intersight platform ... 21
Creating and installing Cisco HyperFlex Edge clusters ... 24
Post-installation configuration... 35
Cisco HyperFlex licensing ... 37
Conclusion ... 38
For more information... 38
Appendix ... 39
Appendix A: Sample Cisco Nexus 3048TP Gigabit Ethernet switch configuration ... 39
Appendix B: Sample script for VMware ESXi post-installation configuration ... 42
日本語は部分翻訳のみ、全文は英語版を参照下さい。
https://www.cisco.com/c/dam/en/us/products/collateral/hyperconverged-infrastructure/hyperflex-hx-series/whitepaper-c11- 740456.pdf
ホワイト ペーパー
エグゼクティブ サマリー
Cisco HyperFlex™ システムは、冗長化・拡張性を考慮した Cisco HyperFlex HX シリーズ x86 ラックマウント サーバの上に、ハイ パーバイザ ホスト、ネットワーク接続、仮想サーバ ストレージを 1 つのインフラで提供し、よりスマートで使いやすい仮想化サー バ プラットフォームを実現します。Cisco HyperFlex™ システムでは、Cisco Unified Computing System™(Cisco UCS®)による コンピューティングとネットワーキングの統合に、次世代ハイパーコンバージド ストレージ ソフトウェアを組み合わせることで、
仮想環境全体を 1 つの統一システム内で稼働させるために必要なコンピューティング リソース、ネットワーク接続、ストレージ、
ハイパーバイザ プラットフォームを提供します。
Cisco HyperFlex システムは、次のような多数のエンタープライズクラスの機能を提供します。
● 完全に分散したログ構造ファイル システム
● フラッシュフレンドリ アーキテクチャによる優れたパフォーマンスと低遅延
● 重複排除と圧縮によるインライン データ最適化
● コンピューティング リソースとストレージ リソースを個別に拡張できる柔軟性
● ハードウェアベースの自己暗号化ディスク(SED)による保存データの暗号化
● NVMe(Non-Volatile Memory Express)ベースのソリッド ステート ディスク(SSD)のサポート
● 仮想マシン スナップショットのネイティブ複製
Cisco HyperFlex HX データ プラットフォーム リリース 2.6 で導入された重要な機能は、Cisco Intersight™ クラウドベース リモート モニタリングおよび管理の初期リリースのサポートです。
Cisco HyperFlex Edge は、リモート サイト、ブランチ オフィス、およびエッジ環境向けに最適化された新しいバージョンの Cisco HyperFlex システムです。Cisco® ハイパーコンバージド ソリューションの小型フォーム ファクタである Cisco HyperFlex Edge に より、Cisco UCS ファブリック インターコネクトに接続しなくても、次世代ハイパーコンバージド プラットフォームのすべての能 力が得られます。Cisco HyperFlex Edge は 3 つの HX シリーズ コンバージド ノードによる固定構成をサポートしていますが、
システムの稼動中に容量ドライブを追加して容量を拡張することもできます。
このソリューションは、Cisco UCS、Cisco HyperFlex システム、および VMware ソリューション用の既存の個別ツールを使用し て、設定、展開、管理、およびモニタできます。Cisco HyperFlex クラスタは、VMware vSphere Web クライアント プラグインま たは HTML5 ベースのネイティブ Cisco HyperFlex Connect 管理ツールを使用して管理できます。ただし、Cisco Intersight プラッ トフォームを使用すれば、クラウドからソリューションを展開し、管理することができます。これにより、展開サイトに経験豊富な IT スタッフがいなくても、Cisco HyperFlex システムの低コストで容易に展開できるリモート管理機能をエッジ環境に導入できます。
ソリューション概要
はじめに
ハイパーコンバージド インフラストラクチャは、展開を簡素化し、管理を一元化し、俊敏性を向上させます。これにより、日常的 な IT 運用コストが削減されます。それでも、エンタープライズ データセンターのデータ量は急増しており、インフラストラクチャ の高可用性要件も厳しさが増しているため、大規模環境におけるデバイスの管理や IT 運用の円滑化は、依然として複雑で困難な課 題となっています。
ホワイト ペーパー
クラウドベースの管理プラットフォームでは、アプリケーションへのアクセスと、インフラストラクチャのモニタリング、設定、
およびオーケストレーションへのアクセスが統合されるため、IT 管理の複雑さが軽減され、多数のエッジ デバイスの展開と管理も 簡素化され、統合されます。Cisco Intersight ソリューションは、Cisco UCS サーバおよび Cisco HyperFlex システム用のシスコの 新しいシステム管理プラットフォームです(図 1)。このソリューションにより、クラウドを活用したインテリジェンスによる直感 的なコンピューティングが実現されます。このクラウドベースのプラットフォームは、従来のツールでは不可能だった方法で IT 組 織が環境を分析、簡素化、および自動化できる一元管理機能を提供します。この機能により、IT 組織は、総所有コスト(TCO)を 大幅に削減し、アプリケーションをより速く提供して、新しいビジネス構想を支援することが可能になります。Cisco Intersight プ ラットフォームにアクセスするには、https://intersight.com/ に移動してください。
このドキュメントの作成時点では、クラウド展開は Cisco HyperFlex Edge についてのみサポートされています。Cisco HyperFlex 製品ファミリ全体の展開のサポートは、今後の Cisco Intersight のリリースで提供される予定です。
図 1. Cisco HyperFlex Edge システムと Cisco Intersight の概要
Cisco HyperFlex Edge システム
Cisco HyperFlex Edge クラスタは、3 つの Cisco HyperFlex HX シリーズ コンバージド ノード(ディスク ストレージを装備)で構 成されます。データは 2 つのノードで複製され、3 番目のノードは単一ノードの障害時に運用を継続する上で必要になります。各 ノードには 1 台以上の優れたパフォーマンスの SSD ドライブが搭載されており、データ キャッシュと書き込み要求への迅速な応 答(ACK)を可能にしています。また各ノードには、長期的なストレージに対応するために、プラットフォームの物理スロット数 に応じてディスク追加も可能です。
Cisco HyperFlex Edge システムには、以下のコンポーネントがあります。
● Cisco HyperFlex HX シリーズ ラックマウント サーバ(次の一覧から同じモデルを 3 つ選択)
◦ Cisco HyperFlex HX220c M5SX ノード
◦ Cisco HyperFlex HX220c M5SX オール フラッシュ ノード
ホワイト ペーパー
◦ Cisco HyperFlex HX220c M4S ノード
◦ Cisco HyperFlex HX220c M4S オール フラッシュ ノード
● Cisco HyperFlex HX データ プラットフォーム ソフトウェア
● VMware vSphere ESXi Hypervisor
● VMware vCenter Server(エンドユーザが提供)
Cisco HyperFlex Edge システムには、3 つの統合された HX220c ハイブリッド ノードまたはオール フラッシュ ノードによる固定クラ スタ サイズがあります。データセンター内の Cisco HyperFlex システムとは異なり、Cisco HyperFlex Edge クラスタは Cisco UCS のコン ピューティング専用ノードをサポートしておらず、クラスタを追加のコンバージド ノードで拡張できません。ただし、空いている ドライブ ベイに、いつでもストレージ容量をオンラインで追加できます。ハイブリッド ノードまたはフラッシュ ノードの選択は、
容量、アプリケーション、パフォーマンス、および予算に関するお客様の要件に基づいて行われます。オール フラッシュ構成では、
反復可能かつ持続可能な優れたパフォーマンスが得られます。これは、多くのデータ セットを扱うシナリオ、つまり稼働中に多量 のデータを扱うシナリオに特に最適です。ハイブリッド構成は、Cisco HyperFlex ソリューションのシンプルさを求めると同時に、
容量の影響を受けやすいソリューションを必要とし、予算と、パフォーマンスの影響を受けやすいアプリケーションの数が比較的 少ないお客様に適しています。
Cisco HyperFlex Edge システムの構築に使用される HX220c ハイブリッド ノードおよびオール フラッシュ ノードは、標準の Cisco HyperFlex クラスタの構築に使用されるノードと同じです。Cisco HyperFlex Edge ノード用の個別の製品 ID はありません。
ただし、CPU、ディスク、ネットワーク アダプタなどのノードのハードウェア コンポーネントの選択は異なります。お客様は、
シスコの製品番号が HX-CPU-4114 以降の 1 つの CPU を使用して Cisco HyperFlex Edge ノードを柔軟に構成できます。シスコ の製品番号がそれ以前の HX-CPU-3106、HX-CPU-4108、HX-CPU-4110 などの CPU は、デュアル CPU 構成の Cisco HyperFlex Edge システムでのみサポートされます。
表 1 に、Cisco HyperFlex Edge システムと標準の Cisco HyperFlex オール フラッシュ システムおよびハイブリッド システムの違 いをまとめます。
表 1. Cisco HyperFlex システムと Cisco HyperFlex Edge システムの違い Cisco HyperFlex オール フ ラッシュ
Cisco HyperFlex ハイブ リッド
Cisco HyperFlex Edge
コンバージド ノード HX220c M4S ✕ ○ 対応
HX240c M4SX ✕ ○ 非対応
HX220c M4S はい × ○
HX240c M4SX はい ✕ ✕
HX220c M5SX ✕ ○ 対応
HX240c M5SX ✕ ○ 非対応
HX220c M5SX はい × ○
HX240c M5SX はい ✕ ✕
コンピューティング ノード 対応 ○ 非対応
ファブリック インターコネクト 対応 ○ 非対応
ホワイト ペーパー
サーバ管理 Cisco UCS Manager Cisco UCS Manager IMC
サービス プロファイル 対応 ○ 非対応
クラスタ サイズ 3 〜 16 のコンバージド ノードと
0 〜 16 のコンピューティング ノード
3 〜 8 のコンバージド ノードと
0 〜 8 のコンピューティング ノード
3 つのコンバージド ノード
クラスタ拡張 対応 ○ 非対応
リプリケーション ファクタ 2 または 3 2 または 3 2
ジャンボ フレーム 推奨 推奨 非推奨
ノードあたり 1 つの CPU ✕ ✕ ○
ノードあたりの容量ディスクの最小数 6 6 3
NVMe SSD 対応 ○ 非対応
データ暗号化(SED) 対応 ○ 非対応
ネイティブ複製 対応 ○ 非対応
クラウドの導入 将来 将来 販売中
表 2 に、Cisco HyperFlex Edge クラスタのさまざまなクラスタ構成の利用可能容量を、バイナリ プレフィックス値を使用して示しま す。このバイナリ プレフィックス値は、Cisco HyperFlex ソフトウェア、ファイル システム、またはオペレーティング システムの観 点から RAW 容量または利用可能容量が表示されるすべての計算に使用されます。これらは、製造元が RAW ディスク容量に使用する 10 進プレフィクス値とは異なります。このアプローチは、エンドユーザが Cisco HyperFlex の VMware vCenter 用 Web プラグインや Cisco HyperFlex Connect GUI からクラスタの容量、割り当て、および消費量を表示する際に、一貫性のある一連の値を提供するため に使用されます。これらは、ほとんどのオペレーティング システムでも表示される値です。これらの値は、最初の Cisco HyperFlex クラスタ購入の適切なサイズと、容量ディスクを追加することによって得られる容量を判断するために役立ちます。
表 2. Cisco HyperFlex Edge クラスタの利用可能容量
HX シリーズ サーバ モデ ル
ノード数 容量ディスクのサイズ
(それぞれ)
容量ディスクの数(ノードあた り)
RF = 2 の時のクラスタの利用可能 容量
HX220c M5SX オール フ ラッシュ
3 3.8 TB 3 14.5 TiB
8 38.6 TiB
960 GB 3 3.6 TiB
8 9.6 TiB
HX220c M4S オール フ ラッシュ
3 3.8 TB 3 14.5 TiB
6 28.9 TiB
960 GB 3 3.6 TiB
6 7.2 TiB
HX220c M5SX 3 1.2 TB 3 4.5 TiB
8 12.1 TiB
HX220c M4S 3 1.2 TB 3 4.5 TiB
6 9.0 TiB
ホワイト ペーパー
Cisco HyperFlex Edge インストールのソフトウェア リビジョンおよびファームウェア バージョンの要件は、標準の Cisco
HyperFlex システムの要件と同じです。サポートされているコンポーネントの最小ファームウェア バージョンについては、『Cisco HyperFlex Installation Guide for Cisco Intersight』を参照してください。
Cisco Intersight クラウド ベースの管理プラットフォーム
Cisco Intersight ソリューション(https://intersight.com)は、API 駆動のクラウドベース システム管理プラットフォームです(図 2)。この管理プラットフォームは、優れた自動化、簡素化、および運用効率性が実現された IT 管理および運用の実装を支援する ように設計されています。Cisco UCS システムおよび Cisco HyperFlex システム用の新世代のグローバル管理ツールであり、分散 環境と仮想環境を管理するための包括的な統合アプローチが提供されます。Cisco Intersight プラットフォームにより、インフラス トラクチャの導入、モニタリング、トラブルシューティング、アップグレード、およびサポート プロセスが簡素化されます。これ により、以下の利点が提供されます。
● クラウドベースの管理:Cisco UCS システムと Cisco HyperFlex システムをクラウドから管理する機能により、データセン ターやリモート サイト/ブランチ オフィス内のインフラストラクチャを迅速かつ容易に管理および拡張できます。
● 自動化:Cisco UCS システムと Cisco HyperFlex システムの統合 API により、インフラストラクチャのポリシーベースの設 定と管理が実現されます。また、Cisco Intersight プラットフォームとそれに接続されたデバイスが、完全にプログラム可能 で DevOps フレンドリなものになります。
● 分析とテレメトリ:Cisco Intersight プラットフォームは、すべての物理インフラストラクチャ コンポーネントと仮想イン フラストラクチャ コンポーネントの稼働状態と関係性をモニタリングします。また、シスコの情報セキュリティ要件に従っ てプラットフォームのインテリジェンスを開発するためのテレメトリおよび設定情報を収集します。
● 高度なサポート:Cisco Technical Assistance Center (TAC)との緊密な統合により、より効率的でプロアクティブなテクニ カル サポートが実現されます。Cisco Intersight プラットフォームは、ファイル送信を迅速化することによって運用の自動化 を強化します。これにより、トラブルシューティングの時間が短縮されます。
● 推奨エンジン:分析と機械学習によって駆動する Cisco Intersight の推奨エンジンは、日々増加するナレッジベースと、シ ステム全体から学習される実践的な洞察を通じて、IT 運用管理のための実用的なインテリジェンスを提供します。
● Management as a Service(MaaS):Cisco Intersight プラットフォームは、管理をサービスとして(Management as a Service)提供します。このプラットフォームは、無限に拡張でき、容易に実装できるように設計されています。これにより、
システム管理ソフトウェアおよびハードウェアを維持する負担が軽減されます。
ホワイト ペーパー
図 2. Cisco Intersight プラットフォーム
Cisco Intersight プラットフォームの初期リリース以来、すべての Cisco HyperFlex クラスタをモニタリングし、レポートを作成す る機能が提供されてきましたが、今回、Cisco HyperFlex HX220c M5 ラックサーバを使用した Cisco HyperFlex Edge システムの クラウドベースの展開が可能になりました。Cisco Intersight の Web サイトとフレームワークは、管理対象の製品とは独立した新 機能および拡張機能セットによってアップグレードできるため、ダウンタイムやエンドユーザによるアップグレードなしに多数の新 機能が提供されます。Cisco HyperFlex システムの将来のリリースでは、Cisco Intersight フレームワークへのアップグレードに加 えて、追加の機能が実現される予定です。この組み込みテクノロジとオンライン テクノロジの独自の組み合わせにより、展開から 廃棄までのライフサイクル全体にわたって Cisco HyperFlex システムを管理できる、完全なクラウドベースの管理ソリューション が提供されます。
Cisco Intersight プラットフォームを実行するためにサポートされている Web ブラウザの最小バージョンは次のとおりです。
● Google Chrome:リリース 62.0.3202.94
● Firefox:リリース 57.0.1
● Microsoft Edge:リリース 40.15063.674.0
● Safari:リリース 10.1.1
Cisco Intersight プラットフォームによって展開される Cisco HyperFlex Edge システムのサポートされている最小ファームウェア バージョンは次のとおりです。
● Cisco IMC ソフトウェア:リリース 3.1(2d)
● Cisco HyperFlex データ プラットフォーム:リリース 2.6.1b
● デバイス コネクタ:リリース 1.0.4-10 以降
ホワイト ペーパー
Cisco Intersight には、Base エディションと Essentials エディションの 2 つのライセンス エディションがあります(図 3)。
図 3. Cisco Intersight のライセンス オプション
Base エディションは追加コストなしで利用できます。これは、すべての Cisco UCS および Cisco HyperFlex システムの購入に自 動的に含まれます。Cisco Intersight Base エディションは集中型の監視や基本的な管理システムのインベントリ、タグ付けと検索を 含む組織の機能、およびCisco UCS Manager と Cisco HyperFlex Connect を含むネイティブのエンドポイント管理インターフェイ スを起動する機能を実現するポータルへのアクセスを提供します。
Essentials エディションは、Base エディションで提供されるものに追加の価値を提供します。Essentials エディションに含まれる 機能により、統一されたポリシー エンジンを介して構成管理を一元化し、Cisco UCS のハードウェア互換性リスト(HCL)とのコ ンプライアンスを判断し、ファームウェアのアップデートを開始できます。Essentials エディションは、仮想キーボード、ビデオ、
および Cisco Intersight プラットフォームから直接マウス (vKVM) コンソールを起動する機能のあるモニタリング、管理、および操 作のための単一のインターフェイスを提供します。Cisco Intersight Essentials エディションは、1 年間、3 年間、および 5 年間の サブスクリプション期間で注文できます。Cisco Intersight プラットフォームのライセンス ページからサインアップすることにより、
Essentials エディションの 90 日間の無料評価試用を開始できます。
Cisco HyperFlex クラウドの展開、Cisco HyperFlex ダッシュボード、2 日目のモニタリング、一元化されたアラーム、Cisco HyperFlex クラスタ一覧ビュー、vKVM の起動(Cisco HX シリーズ サーバのみ)、および Cisco HyperFlex Connect のクロス起動 は、すべて Base エディションに含まれています。Essentials エディションの HCL 機能を購入して使用すると、ファブリック イン ターコネクトを介して接続された Cisco HyperFlex システムのハードウェア、OS、ドライバ、およびコンポーネント ファームウェ アのバージョンのコンプライアンスを監査できます。Cisco HyperFlex Edge での HCL のサポートは、将来のリリースで利用可能に なる予定です。Essentials エディションによるファームウェア アップデートの機能は、Cisco UCS C シリーズ ラック サーバについ てのみサポートされており、Cisco Intersight の現在のリリースでは Cisco HyperFlex Edge と連携するように設計されていません。
ホワイト ペーパー
物理トポロジ
Cisco HyperFlex Edge システムのトポロジは単純です。このシステムは、クラスタごとに 3 台の Cisco HyperFlex HX220c M4 ま たは M5 ラックマウント サーバで構成されます。HX シリーズのコンバージド サーバは、オンボード LAN-on-motherboard(LOM)
ポートまたはオプションのインテル® i350-T4 クアッドポート PCIe ネットワーク インターフェイス カード(NIC)を介してお客 様のネットワークに直接接続されます。Cisco IMC VLAN と Cisco HyperFlex 管理 VLAN には、Cisco Intersight プラットフォーム に到達するためにアウトバウンド インターネット アクセスが必要です。
HTTPS プロキシは、現時点では、Cisco HyperFlex クラウド展開機能では使用できません。
HX シリーズ サーバとアップストリーム ネットワークの間では、シングル スイッチ構成とデュアル スイッチ構成の 2 つの物理ト ポロジがサポートされています。この選択は、特定のインストールの要件と、ハードウェアおよびネットワーク リソースの可用性 に依存します。
シングル スイッチ構成(図 4)では、サーバごとに 1 つだけのスイッチと 2 つ以上の 1 ギガビット イーサネット ポートを必要と する単純なトポロジが使用されます。リンクとスイッチの冗長性は、この基本トポロジでは提供されません。サポートされている 2 つのネットワーク ポート設定は、アクセス ポートとトランク ポートです。
図 4. Cisco HyperFlex Edge のシングル スイッチ構成
シングル スイッチ トポロジには、管理用ネットワーク(ゲスト仮想マシン ネットワークと VMware vMotion トラフィックを含む)
とデータ ネットワーク(ストレージ トラフィック用)の少なくとも 2 つの個別ネットワークが必要です。各サーバ上には 2 つの 1 ギガビット イーサネット ポートが必要です。これらの 2 つのポートの 1 つは Cisco HyperFlex ストレージ トラフィック専用です。
アップストリーム ネットワークには、次の要件があります。
● VLAN 機能を備えたマネージド スイッチが必要です。
● 3 つの Cisco HyperFlex ノード用に 6 つ以上の物理 1 ギガビット イーサネット ポートが必要です(インバンド Cisco IMC
が共有モードの 1 ギガビット イーサネット LOM ポート上に設定されている場合)。必要に応じて、LOM カード上の専用 ポートを使用してアウトオブバンド IMC を設定することもできます。この場合は、サーバごとに追加の 1 ギガビット イー サネット スイッチ ポートが必要です。
● ジャンボ フレームは不要です。
● PortFast または PortFast トランクを、中断のない IMC アクセス用に設定する必要があります。
ホワイト ペーパー
デュアル スイッチ構成(図 5)には、スイッチの障害、リンクおよびポートの障害、LOM および PCIe NIC のハードウェア障害か ら保護する完全な冗長性を備えた、少し複雑なトポロジが含まれます。これには、2 つのスイッチ(スタンドアロン スイッチまた はスタック構成のスイッチを使用可能)、4 つの 1 ギガビット イーサネット ポート、およびサーバあたり 1 つの追加のインテル i350 PCIe NIC が必要です。トランク ポートは、唯一サポートされているネットワーク ポート設定です。
図 5. Cisco HyperFlex Edge のデュアル スイッチ構成
デュアル スイッチ トポロジにも、管理用ネットワーク(ゲスト仮想マシン ネットワークを含む)とデータ ネットワーク(スト レージおよび VMware vMotion トラフィック用)の 2 つの個別ネットワークが必要です。各サーバ上には 4 つの 1 ギガビット イーサネット ポートが必要です。これらの 4 つのポートは、オンボード LOM カードからの 2 つのポートと PCIe アドオン NIC か らの 2 つのポートです。1 つ目の LOM と 1 つ目の PCIe ポートは冗長構成の管理トラフィックと仮想マシン ゲスト トラフィック に使用され、2 つ目の LOM と 2 つ目の PCIe ポートは冗長およびロード バランシング構成のストレージ データ トラフィックと vMotion トラフィックに使用されます。
アップストリーム ネットワークには、次の要件があります。
● VLAN 機能を備えた 2 つのマネージドスイッチが必要です。
● 3 つの Cisco HyperFlex ノード用に 12 以上の物理 1 ギガビット イーサネット ポートが必要です(インバンド Cisco IMC が共有モードの 1 ギガビット イーサネット LOM ポート上に設定されている場合)。必要に応じて、LOM カード上の専用 ポートを使用してアウトオブバンド IMC を設定することもできます。この場合は、サーバごとに追加の 1 ギガビット イー サネット スイッチ ポートが必要です。
● ジャンボ フレームは不要です。
● PortFast トランクを、中断のない IMC アクセス用に設定する必要があります。
注:このドキュメントに示されている構成例は、シングル スイッチ トポロジに基づいています。
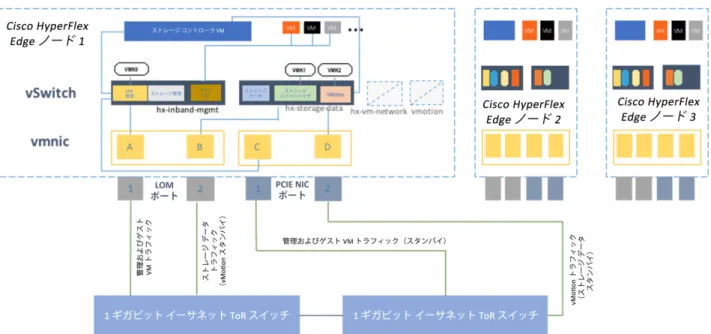
論理トポロジ
Cisco HyperFlex システムには、管理ゾーン、データ ストレージ ゾーン、vMotion ゾーン、ゲスト仮想マシン ゾーンの 4 つのゾー ンに分類される通信経路があります。このアプローチでは、単一のネットワーク上ですべてのトラフィックが多重化されるのではな く、特定用途のトラフィック タイプごとに個別のネットワークが提供されます。その結果、Cisco HyperFlex インストーラによっ て、すべての HX-Series ノード上に、それぞれ異なるネットワークに対応する 4 つの仮想スイッチ(vSwitch)が作成されます。
ホワイト ペーパー
● vswitch-hx-inband-mgmt
● vswitch-hx-storage-data
● vswitch-hx-vm-network
● vmotion
Cisco HyperFlex Edge システムでは、最初の 2 つの vSwitch(vswitch-hx-inband-mgmt と vswitch-hx-storage-data)だけが使 用されます。シングル スイッチ構成の場合は、一方の LOM ポートが vswitch-hx-inband-mgmt に割り当てられ、もう一方の LOM ポートが vswitch-hx-storage-data に割り当てられます。この構成では、データ ストレージ ネットワークに専用のポートが必要で す。このため、vswitch-hx-storage-data がストレージ データ トラフィックを伝送し、vswitch-hx-inband-mgmt が管理、
vMotion、およびゲスト仮想マシンのトラフィックを伝送します。この構成の vSwitch にはアップリンクの冗長性はありません。
デュアル スイッチ構成では、vSwitch レベルで冗長性が提供されます。1 つ目の LOM ポートと 1 つ目の PCIe NIC ポートが vswitch-hx-inband-mgmt に割り当てられ、2 つ目の LOM ポートと 2 つ目の PCIe NIC ポートが vswitch-hx-storage-data に割り 当てられます。シングル スイッチ構成との違いの一つは、vmotion ネットワークの配置です。ポート リソースをより有効に活用す るために、vMotion VMkernel ポートは vswitch-hx-storage-data ネットワーク上に配置され、ストレージ データ ネットワークと は逆のフェールオーバー順序が使用されます。このアプローチでは、ストレージ トラフィックのアップリンクと vMotion トラ フィックのアップリンクがアクティブ スタンバイとして設定されますが、各サービスは逆のアクティブ リンクを使用します。
vswitch-hx-inband-mgmt ネットワークは、すべてのポート グループに関して同じフェールオーバー順序でアクティブ/スタンバイ に設定されています。デフォルトでは、すべてのネットワーク サービスがアクティブ パスを使用し、障害シナリオでは必要に応じ てスタンバイ パスのみにフェールオーバーされます。
2 つの vSwitch だけが使用され、物理 VMNIC が割り当てられるため、vswitch-hx-vm-network と vmotion の vSwitch は手動で削 除できます。あるいは、post_install スクリプトを実行すると、クラスタ化されたすべての Cisco HyperFlex Edge ノードから vswitch-hx-vm-network と vmotion vSwitch が自動的に削除されます。また、post_install スクリプトでは、デュアル スイッチ構 成の vMotion VMkernel ポートに関しても適切なフェールオーバー順序が自動的に設定されます。
トポロジ内にファブリック インターコネクトがない場合、Cisco Intersight プラットフォームが Cisco HyperFlex サーバと通信する 際は、ファームウェアに組み込まれた、Cisco IMC ソフトウェアから有効にできるデバイス コネクタが使用されます。IMC は、組 み込みサーバ管理を Cisco UCS C シリーズ ラック サーバと Cisco HyperFlex HX シリーズ ラック サーバに提供するベースボード 管理コントローラです。これにより、すべての設定と管理が可能になり、ユーザがサーバを完全に制御できます。IMC は、専用 モードで動作するか共有モードで動作するかを設定できます。専用モードでは、オンボード LOM カードの専用管理ポートが使用さ れます。共有モードでは、任意の LOM ポートまたは仮想インターフェイス カード(VIC)アダプタ ポートを使用して IMC にアク セスできます。共有モードには、共有 LOM モード、共有 LOM 10 ギガビット イーサネット モード、Cisco VIC モード、および共 有 LOM 拡張モードが含まれます。
アップストリーム スイッチまたはアウトオブバンド管理スイッチに利用可能なネットワーク ポートが十分にある場合は、専用 IMC 管理ポートを設定することをお勧めします。ただし、この構成では、より多くのスイッチ ポートが消費され、追加のケーブル接続、
電源、および設定が必要になります。ユーザ環境のネットワーキング リソースの可用性に応じて、共有 LOM モードまたは共有 LOM 拡張モードを使用することで、構成が簡素化され、必要なスイッチ ポートとケーブル接続の数が削減されます。共有 LOM モードでは、適切な VLAN を許可して、すべてのホスト ポートが同じ管理サブネットを通過できるようにする必要があります。
Cisco HyperFlex ネットワーキングの論理設計とサーバ管理に必要な IMC 通信に応じて、Cisco HyperFlex Edge システムに複数の VLAN を設定することをお勧めします(表 3 を参照)。
ホワイト ペーパー
表 3. Cisco HyperFlex Edge の VLAN 設定
VLAN の機能 VLAN ID 目的 備考
Cisco IMC トラフィック お客様が 提供
Cisco UCS スタンドアロン サーバの IMC インターフェイス この VLAN は、ルーティング可能であり、Cisco
HyperFlex Intersight プラットフォームにアクセスで きる必要があります。
VMware ESXi と Cisco HyperFlex の管理トラ フィック
お客様が 提供
ESXi ホスト管理インターフェイス
Cisco HyperFlex ストレージ コントローラの仮想マシン管理イン ターフェイス
Cisco HyperFlex ストレージ クラスタのローミング管理インター フェイス
この VLAN は、ルーティング可能であり、Cisco HyperFlex Intersight プラットフォームにアクセスで きる必要があります。この VLAN は IMC VLAN と同 じものまたは異なるものに設定できます。
Cisco HyperFlex のスト レージ トラフィック
お客様が 提供
ESXi ホストのストレージ VMkernel インターフェイス Cisco HyperFlex ストレージ コントローラのストレージ ネット ワーク インターフェイス
Cisco HyperFlex ストレージ クラスタのローミング ストレージ インターフェイス
この VLAN は、ストレージ トラフィックに使用され ます。レイヤ 2 接続だけが必要です。管理 VLAN と 組み合わせることはできず、ストレージ トラフィッ ク専用にする必要があります。
VMware vMotion トラ フィック
お客様が 提供
ESXi ホストの vMotion VMkernel インターフェイス この VLAN は管理 VLAN と同じにすることができま
すが、このトラフィックを一意の VLAN に分離する アプローチをお勧めします。
ゲスト仮想マシン トラ フィック
お客様が 提供
ゲスト仮想マシン用のネットワーク 異なるアプリケーション用に複数の VLAN ポート グ ループを作成できます。
図 6 は、シングル スイッチ トポロジのネットワーク構成の論理図を示しています。
図 6. Cisco HyperFlex Edge 仮想ネットワーク:シングル スイッチ
ホワイト ペーパー
図 7 は、デュアル スイッチ トポロジのネットワーク構成の論理図を示しています。
図 7. Cisco HyperFlex Edge 仮想ネットワーク:デュアル スイッチ
注:このドキュメントに示されている構成例は、共有 LOM モードでのインバンド IMC の使用を前提としています。
ホワイト ペーパー
Installing Cisco HyperFlex Edge with the Cisco Intersight platform
Cisco HyperFlex systems are ordered with a factory preinstalled configuration. With this factory integration, the Cisco HyperFlex servers are delivered with the proper firmware revisions preset, a copy of the VMware ESXi hypervisor software preinstalled, and some components of the Cisco HyperFlex software already prestaged. When the system arrives onsite, the customer thus needs to perform fewer final steps and the installation process is simplified as a result of the work already completed at the factory. The Cisco HyperFlex system is normally installed using a deployable Cisco HyperFlex installer virtual machine from an OVA file.
Another option for installing a Cisco HyperFlex system is to use the Cisco Intersight cloud management platform. With this option, the installer function is delivered from the cloud, with no need for the user to have an installer virtual machine.
A Cisco HyperFlex Edge installation with the Cisco Intersight platform is supported only for completely new factory-shipped Cisco HyperFlex M5 rack-mount servers. Therefore, the setup process described in this document assumes that the factory preinstallation work has been completed, using the tools and processes developed by Cisco to simplify the process and
dramatically reduce the deployment time. This document follows the same out-of-the-box experience that customers encounter with a new cluster purchase.
Prerequisites
Prior to beginning the installation activities, you must set up a Cisco Intersight account. You also should gather all the configuration settings contained in the preinstallation checklist.
A Cisco Intersight account is required for this solution. To create your account you must first have a valid Cisco ID. If you do not yet have a Cisco ID, the account can be generated in this way:
1. Visit https://intersight.com from your workstation.
2. Click Sign In with Cisco ID.
3. On the Cisco Log In page, you can either choose to log into an existing account or click Register Now to create a new account.
4. Click Register Now and provide the requested information to create a Cisco.com account.
5. After a valid account has been created, use it to log in to the Cisco Intersight platform.
ホワイト ペーパー
To install the Cisco HyperFlex HX Data Platform from Cisco Intersight platform, you need to allocate some IP addresses. The Cisco UCS IMC IP addresses and HX Data Platform management IP addresses must allow communication with the Cisco Intersight platform. Additional IP addresses for the Cisco HyperFlex Edge system need to be allocated from the appropriate subnets and VLANs to be used. IP addresses that are used by the system include addresses for Cisco UCS IMC, Cisco HyperFlex and VMware ESXi management, Cisco HyperFlex storage, and VMware vMotion. The IMC IP addresses and Cisco HyperFlex and ESXi management IP addresses can either come from the same subnet or be separate, as long as the Cisco HyperFlex management subnet permits outbound access to the Cisco Intersight platform.
By default, the Cisco HyperFlex installation will assign a static IP address to the management interface of the ESXi servers. The use of Dynamic Host Configuration Protocol (DHCP) for automatic IP address assignment is not recommended for Cisco HyperFlex and ESXi management, Cisco HyperFlex storage, or vMotion networks. For the IMC network, either DHCP or static assignment can be used to ease the configuration process.
DNS servers should be configured to query fully qualified domain names (FQDNs) in the Cisco HyperFlex and ESXi management group. DNS forward and reverse lookup records need to be created prior to beginning the installation. In addition, all device connectors on the Cisco HyperFlex nodes and all Cisco HyperFlex controller virtual machines must properly resolve public domains through DNS and permit outbound-initiated HTTPS connections on port 443 so that the latest Cisco HyperFlex software packages can be automatically downloaded and the Cisco HyperFlex Edge cluster can be fully deployed from the Cisco
Intersight platform.
Consistent time clock synchronization is required across the components of the Cisco HyperFlex system, provided by reliable Network Time Protocol (NTP) servers, accessible to the IMC management network group and the Cisco HyperFlex and ESXi management group. NTP is used by the IMC, vCenter, ESXi hypervisor hosts, and Cisco HyperFlex storage platform controller virtual machines. The use of public NTP servers is highly discouraged; instead, you should use a reliable internal NTP server.
Prior to performing the installation, you need to document and create the required VLAN IDs in the upstream network as necessary. At a minimum, you need to trunk two VLANs to the upstream network: a VLAN for the Cisco HyperFlex and ESXi management group and a VLAN for the Cisco HyperFlex storage group. Following Cisco best practices, you can add two more VLANs: a VLAN for the vMotion group and at least one VLAN for the guest virtual machine traffic. The VLAN for vMotion can be the same as the management VLAN, but this setup is not recommended. During the installation process, only the VLAN ID for the management network and the VLAN ID for the storage network are required inputs.
Several user names and passwords need to be defined or known as part of the Cisco HyperFlex installation process: Cisco Intersight account, Cisco UCS IMC administrator, VMware ESXi administrator, Cisco HyperFlex administrator, and VMware vCenter administrator.
The physical layout of the Cisco HyperFlex system was previously described in the “Physical Topology” section. The HX-Series rack servers need to be cabled properly to the customer’s upstream networking switches before the start of installation activities.
Depending on the availability of the upstream switches or switch ports, you can choose a single-switch or dual-switch topology and with the IMC NIC policy (shared LOM or dedicated ports). After these decisions have been made, the nodes can be cabled appropriately.
The cabling for a single-switch topology is simple:
● Cable both LOM ports on each HX-Series server to the same top-of-rack (ToR) switch.
● If you choose to access the IMC through the dedicated management port, cable that management port on each server to the same switch or to an out-of-band management switch.
ホワイト ペーパー
Cable a dual-switch topology as follows:
● Cable both LOM ports on each HX-Series server to the same ToR switch.
● Cable any two of the four ports on the Intel PCIe NIC on each server to the second ToR switch. Do not connect more than two PCIe NIC ports prior to the installation. After the Cisco HyperFlex cluster has been created, you can freely use the remaining ports.
● If you choose to access the IMC through the dedicated management port, cable that management port on each server to the same switch to which the LOM ports connect or to an out-of-band management switch.
Do not use the 10 Gigabit Ethernet ports on the Cisco VIC to connect to the upstream switch in either the single-switch or dual- switch topology.
Sample topology and pre-installation checklist
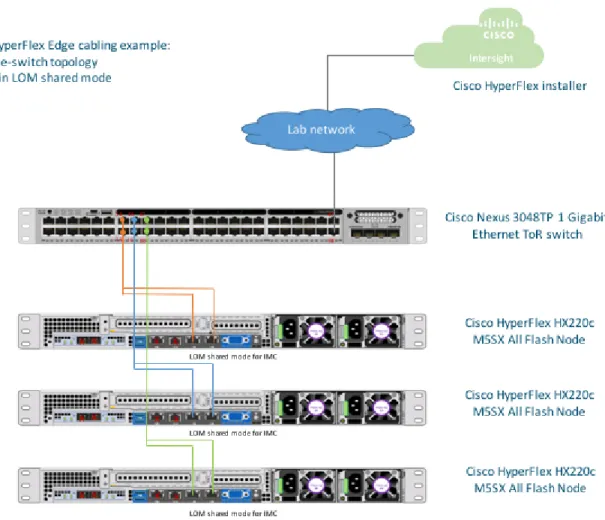
Figure 8 shows the sample topology validated for this document. It demonstrates the cabling of a Cisco HyperFlex Edge system in a single-switch topology.
図 8. Cisco HyperFlex Edge cabling example
The sample configuration for the Cisco Nexus 3048TP 1 Gigabit Ethernet ToR switch is provided in Appendix A.
Table 4 is an example of a completed pre-installation checklist for a Cisco HyperFlex Edge system.
ホワイト ペーパー
表 4. Pre-installation checklist VMware vCenter Cisco HyperFlex cluster
name: HX3Edge Data center name: HUIDC
VMware vCenter server
FQDN or IP address: hx3-vcenter.hx.lab.cisco.com Single-sign-on server: (Optional) VMware vCenter
administrator: huich@hx ZAQ!2wsx
Network services DNS server 1: 10.29.133.61 DNS server 2: 171.70.168.183
NTP server 1: 10.81.254.202 NTP server 2: 72.163.32.44
Time zone: America/Los_Angeles PST -8 User name and
password Cisco Intersight account huich xxxxxx VMware ESXi host
administrator: root Cisco123
Cisco UCS IMC
administrator: admin Cisco123 Cisco HyperFlex controller administrator:
root C!sco12345
Address group Cisco UCS IMC
interfaces Cisco HyperFlex and VMware ESXi
management Cisco HyperFlex storage VMware vMotion
VLAN ID 41 41 42 43
Subnet 10.29.145.0 10.29.145.0 169.254.1.0 169.254.2.0
Subnet mask 255.255.255.0 255.255.255.0 255.255.255.0 255.255.255.0
Gateway 10.29.145.1 10.29.145.1
Devices Cisco UCS
management addresses VMware ESXi management interface
Storage controller management
interface
VMware ESXi hypervisor storage VMkernel interface
Storage controller
storage interface VMotion VMkernel interface
Cisco HyperFlex cluster
10.29.145.162 169.254.1.20
Cisco HyperFlex
node 1 10.29.145.154 10.29.145.157 10.29.145.163 169.254.1.11 169.254.1.21 169.254.2.11 Cisco HyperFlex
node 2 10.29.145.155 10.29.145.158 10.29.145.164 169.254.1.12 169.254.1.22 169.254.2.12 Cisco HyperFlex
node 3 10.29.145.156 10.29.145.159 10.29.145.165 169.254.1.13 169.254.1.23 169.254.2.13 Note: Table cells shaded in yellow have auto-assigned IP addresses and don't require user configuration.
Cisco Integrated Management Controller configuration
The Cisco Intersight cloud-based management platform provides remote management of Cisco HyperFlex Edge servers through a device connector that is embedded in and can be enabled through Cisco IMC software. The Cisco UCS device connector provides access to Cisco UCS server management functions built in to the server. By pointing the device connector to the Cisco Intersight platform, Cisco UCS servers and Cisco HyperFlex clusters can be claimed as serviceable devices and easily remotely managed.
The Cisco Intersight platform needs access to the IMC and to the Cisco HyperFlex management network.
To enable the device connector on the Cisco HyperFlex nodes and the Cisco Intersight platform to communicate, the IMC interface needs to be configured on each server. Two options are available for setting the IP address for the IMC: DHCP or static configuration. If you already have a DHCP server set up in your environment, DHCP assignment will be the simplest approach.
Otherwise, you can assign a static IP address to the IMC.
ホワイト ペーパー
The following steps guide you through a static configuration:
1. Attach the VGA dongle to the new Cisco HyperFlex server and connect to a monitor and USB keyboard.
2. Power on the server.
3. Wait for some minutes until the screen with the Cisco logo is displayed.
4. When prompted for boot options, press the F8 key to enter the Cisco IMC configuration utility.
5. For a first-time configuration, you will be prompted for a new IMC password. Enter the default password password as the current IMC password and then set a new IMC password. The configuration described here uses Cisco123 as the new password.
6. In the Cisco IMC configuration utility window, choose the desired NIC mode. Select Dedicated if you want to access the IMC through the dedicated management port. Select Shared LOM if you want to access the IMC through any LOM port. Select Shared LOM Ext mode if you want to access the IMC through any LOM or adapter port.
7. Deselect the “DHCP enabled” option and select IPV4 to set a static IP address.
8. Enter IPv4 settings for the CIMC IP, Prefix/Subnet, and Gateway options.
9. Leave NIC redundancy set to Active-active.
10. Select the “VLAN enabled” option and enter the VLAN ID for IMC management.
ホワイト ペーパー
11. Press F10 to save the configuration and then press Esc to exit the utility. The server will reload and may boot into the ESXi operating system preloaded at the factory. Do not worry if the server does not fully boot into an OS at this point. The installation workflow will modify the boot order automatically at the correct stage of deployment, so do not make manual configuration changes in the IMC utility outside the steps listed here.
12. Ping the IMC IP address that was just set to validate the configuration.
13. Open a web browser with https://<CIMC-IP-Address> to the IMC management GUI. Log in as admin with the configured password.
ホワイト ペーパー
14. On the Summary page, check the running versions of the BIOS and IMC firmware to verify that these versions meet the requirements for Cisco HyperFlex and Cisco Intersight deployment. The factory-shipped systems should already have the recommended firmware preloaded. If an IMC upgrade is needed, go to the Cisco website to download the latest Host Upgrade Utility (HUU) and use that utility to upgrade the firmware to a compatible version.
15. If desired, click Select Timezone to set the correct time zone for the server.
16. From the navigation pane, choose Compute and then click the Power Policies tab. Change the Power Restore Policy from the default Power Off to the desired action.
ホワイト ペーパー
17. From the navigation pane, expand Admin. Then click Networking, under the Network tab, review the IMC IP settings, add an alternative DNS server here if desired. You can change the host name here as well.
18. Click the NTP Setting tab. Then add your NTP server information.
ホワイト ペーパー
19. After making the changes you want, click Save Changes to save and apply the changed values. A host-name change will create a new certificate for the web browser and require you to log in again to the web GUI. The system may take several minutes to commit the changes.
20. Repeat the preceding steps for all three Cisco HyperFlex Edge servers.
Claiming devices in the Cisco Intersight platform
Now you can enable the device connector on the Cisco HyperFlex servers and let the Cisco Intersight platform claim them for cloud management:
1. Log in to the IMC web management GUI with https://<CIMC-IP-Address>.
2. From the navigation pane, expand Admin. Then click Device Connector and enable Cisco Intersight management on the device connector using Allow Control as the access mode (this option may already be set). This configuration enables the IMC to establish a connection to the Cisco Intersight platform.
3. Wait until the connection succeeds and a claim code has been generated for this device. Note that the device is not claimed yet. Write down the device ID (server system number) and claim code as they will be needed in a subsequent step.
ホワイト ペーパー
4. Repeat steps 1 through 3 for all three Cisco HyperFlex Edge servers to gather all device IDs and claim codes. Note that each claim code has an expiration time as indicated by the colored bar under the claim code. Be sure to claim the servers before the codes expire.
5. Go to Cisco Intersight Cloud Management platform: https://intersight.com/.
6. Log in with your Cisco ID and password. If this is your first time using the Cisco Intersight platform, you should take a site tour to learn about some of the platform’s main features.
7. To claim a new device, in the Navigation pane at the left, click Devices. Then, at the top right corner of the Devices window, click Claim a New Device.
ホワイト ペーパー
8. Enter the device ID and claim code obtained from the IMC management GUI. Use copy and paste for accuracy. Click Claim.
9. Wait until the device has been claimed successfully.
10. Go to the server’s IMC page to verify the claim. The Device Connector page should now show that this device has been claimed.
11. Repeat steps 7 through 10 to claim all three Cisco HyperFlex servers on the Cisco Intersight platform.
12. Review the Device window again. The three Cisco HyperFlex nodes should now be listed as connected devices.
ホワイト ペーパー
13. You now have the option to launch the IMC management GUI directly from the Cisco Intersight platform. If you want to do so, click Launch IMC.
14. To unclaim (remove) a device from the Cisco Intersight platform, select the device and click the trash icon. On the pop-up confirmation page, click Remove to confirm the removal.
Creating and installing Cisco HyperFlex Edge clusters
The Cisco Intersight platform provides an installation wizard to install, configure, and deploy Cisco HyperFlex Edge clusters. The wizard constructs a preconfiguration definition of an Edge cluster called a Cisco HyperFlex cluster profile. The cluster profile is policy-based, with administrator-defined sets of rules and operating characteristics such as the node identity, interfaces, and vCenter connectivity. Every active node in the Edge cluster must be associated with a Cisco HyperFlex cluster profile. After the user enters all the configuration settings, the installation wizard will validate and deploy the cluster profile on the Cisco HyperFlex Edge nodes. You can clone a successfully deployed Cisco HyperFlex cluster profile and then use that copy as a template to easily create many more new clusters.
To install and configure a Cisco HyperFlex Edge cluster with the Cisco Intersight platform, complete the following steps:
1. Log in to the Cisco Intersight cloud management platform at https://intersight.com/ with your Cisco ID and password.
2. In the navigation pane at the left, choose Service Profiles. On the Service Profiles page, click the HX Cluster Profile tab and click Create HX Cluster Profile.
ホワイト ペーパー
3. The HX Cluster Profile installation wizard is displayed. Proceed through the installation steps. First, on the General page, enter a cluster name under HX Cluster Name. This cluster name must be unique and will be used as the HX Data Platform cluster name, vCenter cluster name, and Cisco Intersight cluster name. Under HX Cluster Type, select Cisco HyperFlex Edge.
Add the necessary description and tags for this cluster for reference.
4. Click Next to move to the Cluster Configuration page.
ホワイト ペーパー
5. Click the + sign to expand the Security configuration. Enter root as the hypervisor administration user name and enter Cisco123 as the default hypervisor password in Cisco HyperFlex 2.6. Enter a user-supplied password for the Cisco HyperFlex controller virtual machine and then confirm that password in the second text field.
6. When you close the Security configuration page, the settings are automatically saved to a policy named <HX-Cluster- Name>- local-credential-policy. This policy is reusable and can be selected when you create your next Cisco HyperFlex cluster profile.
7. (Optional) To choose an existing policy for your cluster profile, at the policy line click the Select Policy button. Choose the desired policy from the available policy list and click Select.
8. Click the + sign to expand the DNS, NTP and Timezone configuration page. Choose a time zone from the drop-down list and enter DNS server and NTP server information. Click the + sign to enter secondary DNS and NTP servers.
9. After you close the DNS, NTP and Timezone configuration page, the settings are automatically saved to a reusable policy named <HX-Cluster-Name>-sys-config-policy.
ホワイト ペーパー
10. Click the + sign to expand the vCenter configuration page. Enter the vCenter Server FQDN or IP address, administration user name, and password. Enter the data center name for the vCenter hosting the Cisco HyperFlex Edge cluster. Leave the vCenter Single Sign-On Server field blank unless instructed otherwise by the Cisco Technical Assistance Center (TAC). If you are deploying your system in a nested vCenter configuration, you can leave the vCenter fields blank and register the cluster to vCenter after it has been deployed on the cluster. For help, see the guide How to Deploy vCenter on the HX Data Platform.
11. After you close the vCenter configuration, the settings are automatically saved to a reusable policy named <HX-Cluster- Name>-vcenter-config-policy.
12. Click the + sign to expand the Storage configuration page. Select Clean Up Disk Partitions if you are performing a
reinstallation on top of an existing deployment. If you are deploying a virtual desktop infrastructure (VDI) environment on a hybrid Cisco HyperFlex cluster, select the box to enable file system optimization.
13. After you close the Storage configuration, the settings are automatically saved to a reusable policy named <HX-Cluster- Name>-cluster-storage-policy.
14. Click the + sign to expand the Auto Support configuration page. Select the box to enable Auto-Support. Enter your email address for service ticket notification.
15. After you close the Auto Support configuration, the settings are automatically saved to a reusable policy named <HX- Cluster- Name>-auto-support-policy.
ホワイト ペーパー
16. Click the + sign to expand the IP & Hostname configuration page. Enter a host-name prefix. In a later step, host names will be sequentially assigned to hosts using this prefix. Enter the starting IP address, ending IP address, netmask, and gateway for the management IP address pool. IP addresses from this range will automatically be assigned to hosts in the node configuration step. If you enter only the management network IP addresses, the same range will be used for both ESXi management and Cisco HyperFlex controller virtual machine management IP addresses. If you want to use a second, noncontiguous range of IP addresses for the Cisco HyperFlex controller virtual machines, you may optionally enter the starting IP address, ending IP address, netmask, and gateway for the controller virtual machine management IP address pool.
Note that these two IP ranges must fall within the same IP subnet and VLAN.
17. After you close the IP & Hostname configuration, the settings are automatically saved to a reusable named <HX-Cluster- Name>-node-config-policy.
18. Click the + sign to expand the Network configuration page. Enter the VLAN ID for the management network. Leave the Jumbo Frames checkbox unselected for Cisco HyperFlex Edge deployments.
19. After you close the Network configuration, the settings are automatically saved to a reusable policy named <HX-Cluster- Name>-cluster-network-policy.
20. Click the + sign to expand the HyperFlex Storage Network configuration page. Enter the VLAN ID for the data storage network. As a best practice, use a unique storage VLAN for each cluster if you are deploying multiple clusters in the same network.
ホワイト ペーパー
21. Click Next to move to the Nodes Assignment page. Select three available Cisco HyperFlex Edge nodes. You also have the option to assign nodes later, saving the Cisco HyperFlex cluster profile now and returning when the hardware is available to assign after it has been claimed in the Cisco Intersight platform.
22. Click Next to navigate to the Nodes Configuration page. Review the node configuration for all three Cisco HyperFlex Edge nodes. You can freely modify the host name defined by automatic IP address assignment if desired. Enter the cluster management IP address within the same IP management subnet.
ホワイト ペーパー
23. Click Next to move to the Summary page. Review the Cluster Configuration and Nodes Configuration pages. Check for errors.
24. Click Validate to validate the Cisco HyperFlex Edge cluster configuration, without starting deployment. This selection will start a series of hardware, software, and environmental checks that will take a few minutes to complete. Alternatively, click Validate & Deploy to complete validation and deployment together. This document performs an explicit validation first, followed by the start of the actual deployment.
ホワイト ペーパー
25. Wait until validation succeeds. Fix any errors found and note any warnings before continuing.
26. On the Results page for the validation process, click Deploy to install the Cisco HyperFlex Edge cluster. Optionally, you can click Save and Close to complete deployment later. Installation time will vary based on network bandwidth, but typically takes about one hour. You can remain on the Results page to watch the cluster deployment progress in real time.
Alternatively, you can click Close to send the task to the background and navigate elsewhere within the Cisco Intersight platform. To return to the results view, navigate back to the Service Profiles > HX Cluster Profile list view and select the cluster name.
27. After the deployment has completed successfully, click OK.
ホワイト ペーパー
28. When you are back on the Service Profiles > HX Cluster Profile page, find the newly deployed Cisco HyperFlex cluster profile with a status of OK.
29. You can clone and modify the cluster profile to quickly create many new cluster profiles. To clone a cluster profile, select the profile that you want to clone, in the Settings column click ..., and then click Clone.
30. In the pop-up Clone window, enter the name for the cloned cluster and choose the number of clones. Click Clone.
31. Before deploying the new copy of the cloned cluster profile, review the configuration and make any necessary changes to the policies.
32. To unassign the servers from the selected cluster profile, in the Settings column click ... and then click Unassign and Unassign again.
Note: Unassigning will remove all assigned servers from the cluster profile. This action is specific to the Cisco Intersight platform and will not result in a factory reset or affect the operation of the running cluster. To completely clean up this cluster from the Cisco Intersight platform, unclaim the cluster and associated servers. Contact the TAC for return materials authorization (RMA) support or cluster reinstallation procedures.
33. Verify the Cisco HyperFlex Edge cluster information on the Cisco Intersight platform. In the navigation pane, go to the HyperFlex Clusters page and click the hyperlinked cluster name.
ホワイト ペーパー
34. On the HyperFlex Clusters page, on the General tab, review summary information about the new cluster: health state, storage capacity, node count, etc. Check for any critical alarms requiring your attention.
35. On the same page, click the Profile tab, which allows you to review the newly created HX Cluster Profile information. Under Cluster Configuration, you can review the details of the policies you just configured.
36. Review the Nodes configuration.
ホワイト ペーパー
37. Review the details of the installation process under Results. Click the + sign at the top of each panel to expand the detailed information.
38. You can review more detailed status information for the new Cisco HyperFlex Edge cluster in the Cisco HyperFlex Connect management GUI. Cisco HyperFlex Connect can be directly launched from the Cisco Intersight platform. To find the cross- launch feature, first navigate back to the cluster list view by selecting HyperFlex Clusters in the navigation pane at the left.
39. Find the desired cluster in the list, in the Settings column click ..., and then click Launch HyperFlex Connect. The native Cisco HyperFlex Connect user interface will launch in a new browser tab. You can easily manage large-scale Cisco HyperFlex deployments directly from the Cisco Intersight platform.
All Cisco HyperFlex functions are available through cross-launch except cluster upgrade, support bundle download, and HX Data Platform device connector settings. These operations must be performed by directly launching Cisco HyperFlex Connect over the local network.
ホワイト ペーパー
Post-installation configuration
Prior to putting your Cisco HyperFlex Edge cluster into production, you should complete a few post-installation tasks. To automate the post-installation procedures and verify the Cisco HyperFlex cluster configuration, a script is provided on the Cisco HyperFlex controller virtual machines. These steps can also be performed manually or with a Power CLI script in vCenter if preferred (a sample script is shown in Appendix B).
The following procedure uses the post_install script. To run this script, complete the following steps:
1. Use SSH to go to the cluster management IP address and log in using the <root> user name and the controller virtual machine password provided during installation. Verify that the cluster is online and healthy by using the stcli cluster info or stcli cluster storage-summary command.
2. Type the following command in the shell and press Enter to update to the latest post-installation script. Look for the message "Scripts successfully updated."
curl -L http://cs.co/hxupdate | sh
3. Type the following command in the shell and press Enter:
/usr/share/springpath/storfs-misc/hx-scripts/post_install.py
4. Enter the Cisco HyperFlex storage controller virtual machine root password for the Cisco HyperFlex cluster (use the password entered during the Cisco HyperFlex cluster installation). Also enter the vCenter user name and password. You must license the vSphere hosts through the script or complete this task in vCenter before continuing. Failure to apply a license will result in an error when you attempt to enable VMware High Availability (HA) or Distributed Resource Scheduler (DRS) in subsequent steps.
5. Enter y to enable HA/DRS.
6. Enter y to disable the ESXi hosts’ SSH warning. SSH running in ESXi is required in HX Data Platform 2.6.