PCI Express graphics card installation
Introduction
This document describes how to install a PCI Express graphics card in your HP xw Workstation series. This graphics card uses the PCI Express hardware interconnect standard. PCI Express is the successor to the PCI, PCI-X, and AGP I/O standards. This graphics card is designed to work using your PCI Express I/O slot.
Kit contents
This kit includes the following components:
Graphics card Graphics driver CD DVI-VGA video cable adapter Card support Installation instructions Warranty information Support bracket (for select graphics cards) Regulatory information High density graphics cable adapter (optional) Card guide (optional)
Before you begin
See http://www.hp.com/accessories/workstations to determine the compatibility of this product with your HP workstation.
Tools required
No tools are required for this assembly.
© 2007 Hewlett-Packard Development Company, L.P. The HP Invent logo is a registered trademark of Hewlett-Packard Development Company, L.P. Printed in the U.S.
Warnings and cautions
WARNING! Any surface or area of the equipment marked with this symbol indicates the presence of a hot surface or hot component. If this surface is contacted, the potential for injury exists. To reduce the risk of injury from a hot component, enable the surface to cool before touching.
WARNING! Any surface or area of the equipment marked with this symbol indicates the presence of an electrical shock hazard. To reduce the risk of injury from electrical shock, do not open any enclosed area marked with this symbol.
WARNING! To reduce the risk of electric shock or damage to your equipment:
— Do not disable the power cord grounding plug. The grounding plug is an important safety feature. — Plug the power cord in a grounded (earthed) outlet that is easily accessible at all times.
— Disconnect power from the equipment by unplugging the power cord from the electrical outlet.
WARNING! To reduce the risk of serious injury, read the Safety & Comfort Guide. It describes proper workstation setup, posture, health, and work habits for computer users, and provides important electrical and mechanical safety information. This guide is located at http://www.hp.com/ergo and on the documentation CD (if one is included with the product).
WARNING! If a product is shipped in packaging marked with this symbol, , the product must always be lifted by two persons to avoid personal injury due to product weight.
CAUTION: Static electricity can damage the electronic components of the workstation. Before beginning these procedures, be sure you discharge static electricity by briefly touching a grounded metal object.
CAUTION: To prevent damage to the workstation, observe the following Electrostatic Discharge (ESD) precautions while performing the system parts removal and replacement procedures: — Work on a static-free mat.
— Wear a static strap to ensure that any accumulated electrostatic charge is discharged from your body to the ground.
— Create a common ground for the equipment you are working on by connecting the static-free mat, static strap, and peripheral units to that piece of equipment.
NOTE: HP accessories are for use in HP Workstation products. They have been extensively tested for reliability and are manufactured to high quality standards.
Step 1—Preparing the workstation
Introduction
Your workstation documentation includes instructions for disassembling and preparing the workstation for installation.
Procedure: Preparing the workstation
To prepare the workstation for component installation:
Table 1 Preparing the workstations Step Action
1 Power down the workstation.
2 Disconnect power from the workstation. 3 Open the access cover.
Additional Information
For product-specific information, see the Service and Technical Reference Guide for your HP workstation at http://www.hp.com/support/workstation_manuals.
Step 2—Installing the graphics card
Introduction
This section describes how to install the graphics card in your workstation.
Procedure: Installing the graphics card
CAUTION: To prevent overheating, your HP xw8400 or xw8600 Workstation might need a front PCI fan if:
— your workstation includes dual high performance* graphics cards.
— your workstation includes a single high performance graphics card and an adjacent IO card that is located near the inlet of the high performance graphics card fan.
If your HP xw8600 Workstation includes dual high performance graphics cards and lacks a front PCI fan, the BIOS detects an illegal cooling configuration at boot up and reports that the front PCI fan is missing.
Visit http://www.hp.com/go/quickspecs to learn which graphics cards are supported in your workstation, how much memory each graphics card includes, and graphics card power requirements.
* Graphics cards that have greater than 512 MB of video memory
NOTE: Ensure adequate slot space because some cards occupy two PCI slots.
For optimum performance, HP recommends that you place the card in the primary graphics slot of your workstation.
If this installation is for a second graphics card, ensure that both cards are compatible.
NOTE: To use the analog component, composite, or s-video functions on your HD graphics card, you must purchase an HD graphics cable for use with the card. Visit http://www.hp.com/workstations/ accessories for ordering information.
Table 2 Installing the graphics card Step Action
1 Download the latest BIOS and driver updates from the support Web site: http://www.hp.com/support/ workstation_swdrivers.
2 After installing the updates, power down the workstation, disconnect power from the system, and remove the access panel.
3 (Optional) Remove any card support brackets.
4 (Optional) If a card guide was included with your kit, lower it into the chassis and snap it into place. Two types of card guide installations are shown in the following illustration.
NOTE: If your workstation has a card guide integrated into the chassis, this step is unnecessary.
Step Action
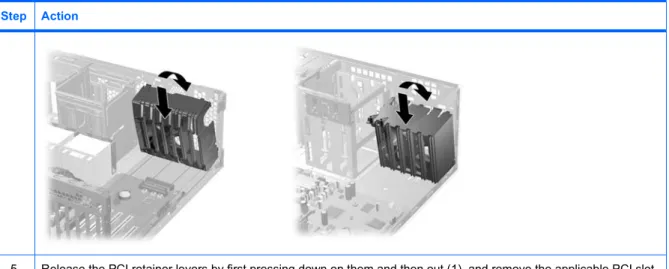
5 Release the PCI retainer levers by first pressing down on them and then out (1), and remove the applicable PCI slot covers (2).
6 If your PCI Express graphics card fits in a card guide, lower the card into the chassis and align the card in the groove of the card guide as shown next.
NOTE: For convenience, rotate the graphics card bulkhead under the rear chassis lip, and then rotate the card into the card guide, lowering it into the slot.
7 Install the PCI Express graphics card (1). Verify that the keyed components of the card align with the socket.
Table 2 Installing the graphics card (continued)
Step Action
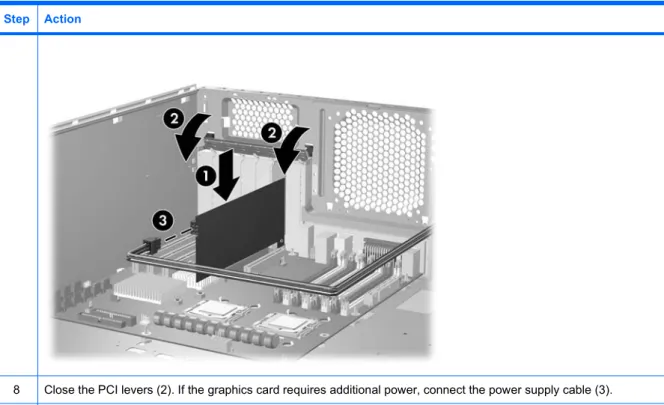
8 Close the PCI levers (2). If the graphics card requires additional power, connect the power supply cable (3). 9 If your PCI Express graphics card has a support bracket or a card support, install it to limit the movement of the card.
The following illustrations show the installation of some typical card support devices.
10 Using a supplied video cable adapter appropriate for your monitor, connect the graphics card to your monitor.
Table 2 Installing the graphics card (continued)
Step 3—Reassembling the workstation
After installation, reassemble the workstation using the instructions in the workstation documentation. The reassembly process involves reinstalling the side access panel and restoring power to the workstation.
PCI Express グラフィックス カードの取り付
け
概要
このマニュアルでは、HP xw Workstation シリーズで使用する PCI Express グラフィックス カードの 取り付け方法を説明します。
このグラフィックス カードでは、PCI Express ハードウェア相互接続規格が採用されています。 PCI Express は、PCI、PCI-X、および AGP I/O 規格に準拠しています。 このグラフィックス カードは、 PCI Express I/O スロットで動作するように設計されています。
キットの内容
このキットには、以下のものが含まれています。 グラフィックス カード グラフィックス ドライバ CD DVI-VGA ビデオ ケーブル アダプタ カード サポート 取り付け説明書 保証に関する情報 サポート ブラケット(グラフィックス カードの選択用) 規制情報 高密度グラフィックス ケーブル アダプタ(オプション) カード ガイド(オプション)お使いになる前に
この製品がお使いのHP ワークステーションに使用できることを、http://www.hp.com/accessories/ workstations(英語サイト)で確認してください。必要な工具
このアセンブリでは工具は必要ありません。© 2007 Hewlett-Packard Development Company, L.P. HP Invent ロゴは Hewlett-Packard Development Company, L.P.の登録商標です。 Printed in the U.S.
警告および注意
警告! 装置の表面または領域にこの記号が貼付されている場合は、高温の表面または高温の部 品が存在することを示しています。 この表面に触れると、火傷をするおそれがあります。 高温の部 品による火傷の危険を防ぐため、必ず、表面の温度が十分に下がってから手を触れてください。 警告! 装置の表面または領域にこの記号が貼付されている場合は、感電のおそれがあることを 示しています。 感電によるけがを防ぐため、この記号が貼付されているカバーは開けないでくださ い。 警告! 感電または装置の損傷の危険がありますので、次の点を守ってください。 — 必ず電源コードのアース端子を使用して接地してください。アース端子は重要な安全機能です。 — 電源コードは、製品の近くの手が届きやすい場所にあるアースされた電源コンセントに差し込んで ください。 — 電源コンセントから電源コードを抜いて、コンピュータの電源を切断してください。 警告! 操作する人の健康を損なわないようにするため、『快適に使用していただくために』をお読 みください。 正しいワークステーションの設定や、作業をする際の姿勢、および健康上/作業上の習 慣について説明しており、さらに、重要な電気的/物理的安全基準についての情報も提供していま す。 『快適に使用していただくために』は、http://www.hp.com/ergo から[日本語]を選択して参照で きます。また、製品にDocumentation CD(ドキュメンテーション CD)が付属している場合は、この CD にも収録されています。 警告! 製品の出荷パッケージに の記号が付いている場合、製品の重さによるけがを防ぐため に、製品は必ず2 人で持ち上げてください。 注意: 静電気の放電により、ワークステーションの電子部品が破損することがあります。 作業を始 める前に、アースされた金属面に触れるなどして、身体にたまった静電気を放電してください。 注意: ワークステーションの損傷を防ぐため、システム部品の取り外し/交換の手順を実行する際 は、静電気放電(ESD)に関する以下の注意事項を守ってください。 — 静電気防止マットの上で作業をしてください。 — 静電気ストラップを着用して、蓄積されたすべての静電気が確実に身体から地面に放電されるよう にしてください。 — 作業対象の装置に静電気防止マット、静電気ストラップ、および周辺装置を接続して、装置共通の アースを作成してください。 注記: HP オプション製品は、HP ワークステーション製品用に設計されています。 また、徹底し た信頼性検査が行われ、高い品質基準において製造されています。手順
1:ワークステーションの準備
概要
ワークステーションのマニュアルには、取り付ける際のワークステーションの分解および準備手順が 記載されています。手順:
ワークステーションの準備
部品の取り付けのためにワークステーションを準備するには、次の手順に従ってください。 表 1 ワークステーションの準備 手順 操作 1 ワークステーションの電源を切ります。 2 ワークステーションの電源コードを外します。 3 アクセス カバーを開きます。追加情報
製品固有の情報については、http://www.hp.com/support/workstation_manuals(英語サイト)からお 使いのHP ワークステーションの『Service and Technical Reference Guide(サービスおよびテクニ カル リファレンス ガイド)』を参照してください。手順
2:グラフィックス カードの取り付け
概要
この項では、ワークステーションにグラフィックス カードを取り付ける方法を説明します。手順:
グラフィックス カードの取り付け
注意: 以下の場合、過熱を防ぐためにお使いのHP xw8400 または xw8600 ワークステーションで 前面PCI ファンが必要になる場合があります。 — ワークステーションに高パフォーマンス* グラフィックス カードが 2 枚搭載されている。 — ワークステーションに高パフォーマンス グラフィックス カードが 1 枚搭載されており、それと隣接 して、高パフォーマンス グラフィックス カード ファンの吸気口近くに IO カードが搭載されている。 HP xw8600 ワークステーションに 2 枚の高パフォーマンス グラフィックス カードが搭載されているのに前面PCI ファンが搭載されていないと、BIOS は起動時に不正な冷却設定を検出して、前面 PCI
ファンがないことをレポートします。 お使いのワークステーションでサポートされているグラフィックス カード、各グラフィックス カー ドのメモリ数、およびグラフィックス カードの電力要件については、http://www.hp.com/go/quickspecs にアクセスしてください。 * ビデオ メモリの 512 MB を超えるグラフィックス カード JAWW 手順1:ワークステーションの準備 3
注記: カードの中には2 つの PCI スロットを使用するものがあるので、十分なスロット スペース を確保してください。 パフォーマンスを最適化するために、ワークステーションのプライマリ グラフィックス スロットに カードを装着することをお勧めします。 2 枚目のグラフィックス カードを取り付ける場合は、両方のカードに互換性があることを確認してく ださい。 注記: 高解像度(HD)グラフィックス カードでアナログ複合材部品または s ビデオ機能を使用す るには、カードに対応したHD グラフィックス ケーブルを購入する必要があります。 ご注文の方法 については、http://www.hp.com/workstations/accessoriesをご覧ください。 表 2 グラフィックス カードの取り付け 手順 操作
1 次に示すサポートのWeb サイトから、最新の BIOS とドライバの更新をダウンロードします。 http://www.hp.com/ support/workstation_swdrivers. 2 更新をインストールしたら、ワークステーションの電源を切り、システムから電源ケーブルを外し、アクセス パネ ルを取り外します。 3 (オプション)すべてのカード サポート ブラケットを外します。 4 (オプション)キットにカード ガイドが含まれている場合は、カード ガイドをシャーシに挿入し、所定の位置に収ま るまで下げます。 次の図に、2 種類のカード ガイド取り付け方法を示します。 注記: ワークステーションのシャーシにカード ガイドが組み込まれている場合は、この手順は不要です。 5 PCI 保持レバーを押し下げて解放し(1)、該当する PCI スロット カバーを取り外します(2)。
手順 操作 6 PCI Express グラフィックス カードをカード ガイドにはめたら、次の図に示されているように、カードをカード ガ イドの溝に合わせてシャーシまで押し込みます。 注記: 便宜上、背面シャーシのへりの下でグラフィックス カードのバルクヘッドを回転させ、カードをカード ガ イドに回しながら挿入してスロットまで差し込みます。 7 PCI Express グラフィックス カードを取り付けます(1)。 カードの挿入エッジのキーの形状がソケットと合ってい ることを確認します。 表 2 グラフィックス カードの取り付け (続き) JAWW 手順2:グラフィックス カードの取り付け 5
手順 操作 8 PCI レバーを閉じます(2)。グラフィックス カードに別電源が必要な場合は、電源ケーブルを接続します(3)。 9 PCI Express グラフィックス カードにサポート ブラケットまたはカード サポートがある場合は、カードが動かない ようにサポート ブラケットを取り付けます。 次の図に、一般的なカード サポート デバイスの取り付け方法を示しま す。 10 ご使用のモニタに適合する市販のビデオ ケーブル アダプタを使用して、グラフィックス カードをモニタに接続しま す。 表 2 グラフィックス カードの取り付け (続き)
手順
3:ワークステーションの再組み立て
取り付けたら、説明書に従ってワークステーションを組み立てます。この作業には、サイド アクセ
ス パネルの取り付けおよび電源の再投入が含まれます。