P2 Software/Logiciel P2
P2
软件 /P2 ソフトウェアInstall Manual/Manuel d’installation
安装手册 / インストールマニュアル
F0604TA088 -F
Printed in Japan 在日本印制 发行:2008 年 8 月 VQT0L24-9
DEUTSCH Für Erlauterungen in Deutsch, konsultieren
Sie bitte die mitgelieferte CD-ROM.
ITALIANO Per le istruzioni in italiano, vedere il CD-ROM in dotazione.
ESPAÑOL Para la explicación en español, consulte el CD-ROM suministrado.
한국어 한국어 설명은 부속품 CD-ROM 을 참조하여 주 십시오 . D 中 文 FRA NÇAIS 日 本 語 EN GL IS H
Contents
Operating Precautions When Using Windows
1. Before Installing . . . 2
2. Precautions in Handling the P2 Card in the Personal Computer . . . 3
3. Software to be Installed . . . 3
4. Installation of the P2 Software . . . 4
5. Adding a New P2 Device . . . 10
6. Uninstallation of the P2 Software . . . 10
7. Checking the Installed Devices . . . 11
8. Setting the internal P2 drive . . . 12
9. Checking the Installation Status of the P2 Driver . . . 13
10. Checking the Version of the P2 Driver . . . 17
11. P2 Card Manager . . . 17
12. Software for each P2 device . . . 18
When Using Macintosh PC card slot driver for Macintosh PowerBook . . . 19
P2 card formatter for the Macintosh . . . 20
Operating Precautions
It is prohibited to redistribute the software included with this supplied CD-ROM, regardless of whether or not compensation is received. Use of the software stored on the supplied CD-ROM without permission for the purposes of manufacturing and/or selling any kinds of software and hardware shall be also prohibited. Furthermore, we will not be responsible for any losses and/or damage that may arise from using or not being able to use this system. This shall apply even if we have already been notified of the possibility of such damage.
Windows, Windows 2000, Windows XP and Windows Vista are trademarks of Microsoft Corporation of the United States.
Macnintosh and Mac OS X are trademarks of Apple Computer, Inc. of the United States. Other names of companies and products are trademarks or registered trademarks of the respective companies.
zIn these instructions, Microsoft® Windows®, Windows® 2000, Windows® XP
Professional and Windows® Vista Business are given as “Windows,” “Windows 2000,” “Windows XP Professional,” and “Windows Vista Business,” respectively.
zSimilarly, in these instructions, Macintosh®, Mac OS® X and PowerBook® are given
E-2
EN
GL
IS
H
When Using Windows
1. Before Installing
This supplied CD-ROM installs the software for P2, used to reference on a personal computer the content of Panasonic P2 cards.
A personal computer on which this software will be installed needs to meet the following conditions:
zOS Windows 2000 SP4 or later Windows XP Professional SP2 or later
Windows Vista Business or higher
zRAM 512MB or greater recommended 1GB or greater recommended for Windows Vista Business zCPU Pentium® 4 1.5GHz or greater
recommended
zThe personal computer is equipped with a drive in which CD-ROM can be read. zIf the OS is Windows 2000 SP4, SP4
patches must be installed.
SP4 patches are included on the supplied CD-ROM, in a folder named \Win2000SP4Patch.
The personal computer further needs to meet the following conditions when actually using the software or when connecting the personal computer to the P2 card or P2 devices (P2 drive, P2 deck etc.).
When connecting the P2 devices to the personal computer via USB2.0:
zA USB2.0 port is provided, and the USB2.0 driver used is that supplied by Microsoft.
If said OS is preinstalled in the personal computer, the driver is already present in the computer, so you do not need to check it.
When using the software with the P2 card directly inserted into the card bus of the personal computer:
zA Type 2 card bus slot is installed. <Notes>
zDepending on the condition of the personal computer, phenomena such as dropping image frames and disconnecting sound may occur when playing back material.
zWhen connecting the P2 devices, be sure to reserve more free drives than the number of drives necessary for each P2 device which can be used by the personal computer. (The number of drives necessary for a P2 device should include those necessary for the P2 card slots and hard disks built into P2 device.) zThe following 3 types of cards only can
be used with the cardbus driver for Windows 2000. Other types of cards cannot be used.
AJ-P2C002SG AJ-P2C004HG AJ-P2C008HG
zIf the OS is Windows Vista Business, the “User Account Control” dialogue box may appear when installing, formatting etc. In this case, click “Continue” and continue the operation.
zFor versions of 64-bit Windows later than 64-bit Windows Vista, the installer is stored in the folder \Win64 on the CD-ROM.
2. Precautions in Handling the P2 Card in the
Personal Computer
3. Software to be Installed
The supplied CD-ROM installs the following programs:
zP2 driver zP2 card manager
zSoftware for each P2 device
When the programs are installed using the supplied CD-ROM, you are able to format the P2 card. The P2 card can be formatted in either of two ways:
zIn Windows Explorer, right-click on the P2 card drive. Select “Format” from the displayed menu.
zIn Windows Explorer, select the P2 card drive.
From the displayed menu, select “File”, “Removable Disk” and “Format” in that order.
The supplied CD-ROM also contains a set of instruction manuals. Refer to the folder named \Manuals.
To browse instruction manuals, you need Adobe® Reader. If Adobe Reader is not currently installed in the personal computer, you will need to download this program from the Adobe Web site.
When using the software with the P2 card or P2 devices connected to the personal computer, be sure to install the P2 driver on the personal computer from the supplied CD-ROM.
If these devices are connected to a personal computer on which the P2 driver is not installed, these devices may not operate properly.
Do not remove the P2 card from the slot during reading from or writing to the P2 card. Also, do not insert or remove the USB cable or change the setting of USB connector.
Otherwise, abnormal operation of the personal computer may result.
Also, perform the following operation before removing the P2 card from the card slot: zIf the P2 card is inserted directly into the card bus in the personal computer, execute
“Safely Remove Hardware” from the system tray on the Windows taskbar.
zIf the P2 devices are connected to the personal computer via USB2.0, open My Computer, then right-click on the particular hardware item into which the P2 card is inserted, and select “Take Out”.
zEnsure that the personal computer system is set up in such a way that it will not go into standby mode or hibernation mode during use of the P2 card. If the system is set up to go into standby mode or hibernation mode while a P2 card is being accessed, destruction of the files and/or data being executed may result.
E-4
EN
GL
IS
H
4. Installation of the P2 Software
<Notes>
zInstall the P2 software after logging into the personal computer under a user name that has administrator status. zWe recommend that installation of the
software be started with the P2 devices to be used, connected to the personal computer.
When the P2 devices are connected to the personal computer, Windows Explorer will additionally display the same number of drives as device card slots for these devices.
When no drive is displayed in Windows Explorer, check that the USB2.0 driver provided by Microsoft is installed in the personal computer.
zThe P2 card driver needs to be installed for each card bus slots. If you are using a personal computer that has two or more card bus slots, insert the P2 card into every slot.
The driver may not be installed for any slot into which the P2 card is not inserted, causing the P2 card to operate improperly. If the PC does not recognize the inserted P2 card, then try re-inserting it.
zIf the OS is Windows 2000/Windows XP Professional, installation of the software may fail when the driver signature option in Windows is set to “Block”.
If the installation fails, select the Hardware tab in the “System Properties” window in Control Panel and check that the driver signature option for the driver is not set to “Block”.
zIf a dialogue box not described in this manual appears during installation of the software, click “Cancel” to close the box.
zWhen a device such as the P2 card is connected to the personal computer before the driver is installed, the following dialogue box appears. Be sure to click “Cancel” to close the box.
Figure 1
(For Windows 2000/ Windows XP Professional)
Figure 2
zUsers with a P2 driver version prior to 1.07.0048 already installed in Windows 2000/Windows XP Professional Refer to “10. Checking the Version of the P2 Driver” for the procedure to check the version.
To install the new driver, you need to uninstall the currently installed driver. If you uninstall this driver, all the information installed until now will be deleted. Refer to “6. Uninstallation of the P2 Software” for the uninstallation procedure and notes.
Also, you can uninstall the old version of the P2 driver during the procedure to upgrade the P2 driver. For both procedures, you may need to restart Windows.
zIf the OS of the personal computer is Windows Vista Business, the dialogue box shown in Figure 3 may appear when you upgrade the P2 driver. In this case, click the “OK” button.
Figure 3
After checking each item in “1. Before Installing”, use the following procedure to install the P2 software in the personal computer:
1
Close all applications, then connect the P2 card or P2 devices to be used to the personal computer.When the devices are connected to the personal computer, the Found New Hardware Wizard box will appear automatically, but click “Cancel” to close the box.
2
Insert the supplied CD-ROM.3
From “MY COMPUTER”, access the drive containing the supplied CD-ROM and execute setup.exe.The window shown in Figure 4 appears, starting the setup process. Click “Next”.
E-6
EN
GL
IS
H
4
(Users with a P2 driver version prior to 1.07.0048 already installed in Windows 2000/Windows XP Professional)The box shown in Figure 5 is displayed. To install the new driver, you need to uninstall the currently installed driver.
If you wish to continue with the uninstallation, click the “OK” button. If you wish to uninstall manually, click “Cancel”. Refer to “6. Uninstallation of the P2 Software” for information on manual uninstallation.
Figure 5
5
As shown in Figure 6, the License Agreement box appears. If you agree to the terms of the LicenseAgreement, click “I accept the terms of the license agreement”, then click “Next”.
Figure 6
6
As shown in Figure 7, the installation destination folder setting window appears. To change the installation destination folder, click “Change”, and then create a new folder. Once the new installation destination folder is set, click “Next”.Figure 7
7
As shown in Figure 8, the installation start window appears. Click “Install”.8
As shown in Figure 9, the status display window appears, indicating that installation is in progress.Figure 9
9
As shown in Figure 10, the driver installation selection window appears with each device displayed. Select the device to be installed and check the appropriate box.zInstallation of drivers for the installed devices is not necessary. For monitoring the installation status, see Page 13.
Figure 10
10
After pressing the OK button, a dialogue box appears to prompt for connection with the P2 card or P2 device as shown in Figure 11. If you need to install them, connect them, then click “Install”. If you do not wish to use them, just click “Cancel”.If at some future time you want to add a device that was skipped in the initial setup, execute the installer again to perform an overwrite installation of the device. Please refer to “5. Adding a New P2 Device” for more information. <Note>
When the focus shifts to another window during installation, this box may be hidden behind that window. If the box shown in Figure 9 remains displayed and its status display does not change, check whether the box shown in Figure 11 is hidden behind another window.
E-8
EN
GL
IS
H
11
For Windows 2000/Windows XP Professional,The message window shown in Figure 12 may appear. Click “Continue Anyway”. The message window may appear several times.
Figure 12
For Windows Vista Business, The message window shown in Figure 13 may appear. Click “Install this driver software anyway”. The message window may apppear several times.
Figure 13
12
(Users with a P2 driver version prior to 1.07.0048 already installed inWindows 2000/Windows XP Professional)
The message window shown in Figure 14 may appear. In this case, uninstallation of the old version of the P2 driver is completed, however the new version of the driver is not installed.
Click the “OK” button to close the installer, restart Windows and then start the installation operation again from Step
1
.Figure 14
13
As shown in Figure 15, the installation completion window appears, signifying completion of the installation.14
As shown in Figure 16, a dialogue box appears, prompting you to restart the personal computer. Click “Yes” to restart.Figure 16
When connecting two P2 drives to the personal computer, install the P2 software by following the steps below. (It is assumed here that portA and portB are used as the two USB2.0 ports.)
Use two USB2.0 ports exclusively for the P2 drives.
1
With the personal computer running, connect one of the P2 drives to portA and then the other one to portB.2
Install the P2 software. (See pages 4 to 8)3
When the installation is completed and the panel requesting that the system be restarted (Figure 16 on Page 9) has appeared, click “No”, and disconnect each of the P2 drives from the USB2.0 ports.4
The P2 drives are now connected again, but this time one of them is connected to portB and then the other one to portA.5
After starting the installer again and click the “Next” button (Page 5), Figure 17 (on Page 10) appears. Check the “Repair” check box, and click the “Next” button.6
After following the instructions displayed on the screen, restart the personal computer.zBe sure to connect at least one P2 device to the personal computer. Up to two P2 drives can be connected.
E-10 EN GL IS H
5. Adding a New P2
Device
To connect a new P2 card or P2 device to a personal computer in which P2 software is already installed, use the procedure described in “4. Installation of the P2 Software” to perform an overwrite installation of the P2 software.
During the overwrite installation, the window shown in Figure 17 appears, but the License Agreement box shown in Figure 6 does not reappear.
In this window, check “Repair”, then click “Next”.
After following the instructions displayed on the screen, restart the personal computer.
Figure 17
<Note>
The above screen will be displayed when the installed P2 software and the installer have the same version.
6. Uninstallation of
the P2 Software
To uninstall the P2 software, use the following procedure:
For Windows Vista Business,
in the “Programs and Features” window in the “Programs” window in Control Panel, select “Panasonic P2 Drivers”, then click “Uninstall”.
For Windows XP Professional,
in the “Add or Remove Programs” window in Control Panel, select “Panasonic P2 Drivers”, then click “Remove”.
For Windows 2000,
in the “Add/Delete Applications” window in Control Panel, select “Panasonic P2 Drivers”, then click “Remove”.
After following the instructions displayed on the screen to complete the uninstallation, follow the on-screen instructions to restart the personal computer.
<Notes>
zIf you uninstall the software, all the information installed until now will be deleted so, if you install the software again, you will need to install the drivers for all the devices that you will use. We recommend checking the current information before uninstallation. Refer to “7. Checking the Installed Devices” for the procedure for checking.
zIf the OS of the personal computer is Windows Vista Business, the dialogue box shown in Figure 18 may appear when you uninstall the P2 driver. In this case, click the “OK” button.
Figure 18
7. Checking the
Installed Devices
To check which devices have a driver installed, use an installer that is the same version as the P2 software currently installed and follow the procedure described in “4. Installation of the P2 Software” to perform an overwrite installation.
If you start the installation, then click “Next”, the window shown in Figure 17 (on Page 10) appears. In this window, check “Repair”, then click “Next”. If you follow the instructions displayed on the screen, the window shown in Figure 19 appears. In this window, you can check which devices have a driver installed by checking if “Installed” is displayed.
After checking, click “Cancel” to close the window.
E-12
EN
GL
IS
H
8. Setting the internal
P2 drive
To use a personal computer in which the P2 drive is incorporated in the 5-inch bay, install the P2 card software, connect the P2 drive to the personal computer, then perform the following setting:
1
For Windows Vista Business/ Windows XP Professional,select the following: “Start” > “All Programs” > “Panasonic P2” > “Set P2 Drive Settings” > “Enable Internal Drive”.
For Windows 2000,
select the following: “Start” > “Program” > “Panasonic P2” > “Set P2 Drive Settings” > “Enable Internal Drive”.
2
The box shown in Figure 20 appears. Click “OK”.9. Checking the Installation Status of the P2
Driver
When the standard driver is installed via the Found New Hardware Wizard box (Figure 1), or when the P2 driver is uninstalled for some reason, the P2 device does not operate properly.
If any of the following events occurs, check that the P2 driver is properly installed; if it is not, reinstall it.
zP2 card or P2 device is not recognized. zReading from the P2 card or P2 device
cannot be performed.
zWriting to the P2 card or P2 device cannot be performed.
zImage frame dropping occurs frequently during playback from the P2 card or P2 device, indicating that there is a performance problem.
How to check the P2 driver <Note>
When checking that the P2 driver is properly installed, be sure to connect the appropriate device to the personal computer. Devices not connected to the personal computer cannot be checked using the following method:
For Windows Vista Business,
select: “Start” > “Control Panel” > “System and Maintenance”. Click on Device Manager.
For Windows XP Professional,
select: “Start” > “Control Panel” > “System”. The System Properties window appears. Select the Hardware tab, then click on Device Manager.
For Windows 2000,
select: “Start” > “Settings” > “Control Panel” > “System”. The System Properties window appears. Select the Hardware tab, then click on Device Manager.
E-14
EN
GL
IS
H
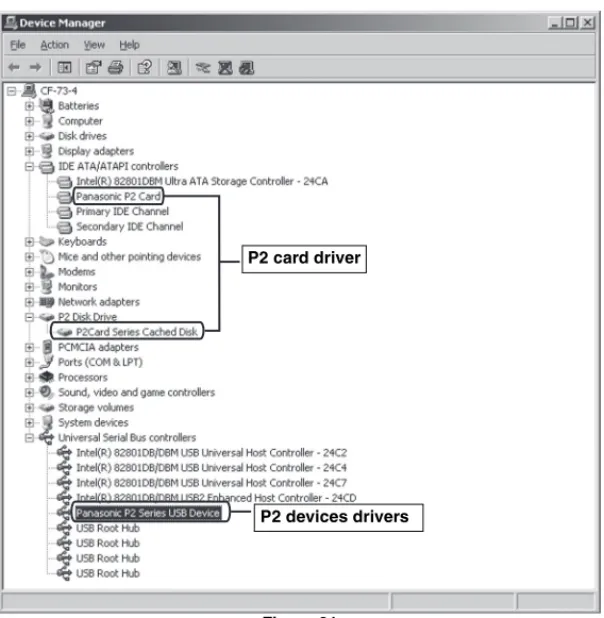
1
Check the P2 device driver display. Checking the P2 card driver“IDE ATA/ATAPI controllers” - “Panasonic P2 Card” is set.
“P2 Disk Drive” - “P2Card Series Cached Disk” is set.
Checking the P2 USB devices drivers “Universal Serial Bus controllers” -“Panasonic P2 Series USB Device” is set.
Figure 21 P2 card driver
Checking the P2 card 1394b driver For Windows XP Professional,
Click “MATSHITA AJ-PCD20 #1 IEEE 1394 SBP2 Device” listed under “Disk drives,” then click on the “Driver” tab in the “MATSHITA AJ-PCD20 #5 IEEE 1394 SBP2 Device” property panel. “Provider” - “Panasonic” is set.
Figure 22
P2 devices 1394b drivers
E-16
EN
GL
IS
H
For Windows Vista Business,
Click “P2 SBP2 Device”. There are 5 items displayed from “MATSHITA AJ-PCD20 #1 IEEE 1394 SBP2 Device” to “MATSHITA AJ-PCD20 #5 IEEE 1394 SBP2 Device”.
Figure 23
P2 devices 1394b drivers
10. Checking the
Version of the P2
Driver
For Windows Vista Business,
select: “Control Panel” > “Programs” > “Programs and Features“ > “View” > “Details”. Press the “Alt” key to display the menu, select “Display settings“ in the “View” menu, check the “Version” check box and click the “OK” button to display the version. For Windows XP Professional,
in the “Add or Remove Programs” window in Control Panel, select “Panasonic P2 Drivers”, then refer to the support information.
For Windows 2000,
in the “Add/Delete Applications” window in Control Panel, select “Panasonic P2 Drivers”, then refer to the support information.
11. P2 Card Manager
After P2 software installation, the “P2 Card Manager” icon will be added to the control panel and task bar.
Card names and passwords can be set for the P2 cards by using the “P2 Card Manager”.
Start the “P2 Card Manager” and select the desired P2 card from the recognized P2 cards, the “Change Card Name” and “Change Password” buttons will be enabled. After clicking the “Refresh” button, the latest information on the P2 card will be determined and displayed.
(Card names and passwords for unused P2 cards are not set.)
<Note>
If the P2 card cannot be written to because the write protect switch is set to “PROTECT” etc, the card name and password cannot be set.
<Change Card Name>
Card names can be changed from this screen. A password is required for the change.
No password is set when a new P2 card is inserted. Be sure to use the required password for P2 cards that are inserted and use a password.
1) Click the “Change Card Name” button, and enter the password and the card name.
2) After clicking the “OK” button, the card name can be changed. Pressing the “Cancel” button returns the user to the “P2 Card Manager” screen without changing the card name.
E-18 EN GL IS H <Change Password>
Passwords for protecting card names can be controlled from this screen.
1) Click the “Change Password” button, and enter the old and new passwords. Enter the current password in the “Old Password” column.
Enter a new password in the “New Password” column, and enter the same new password in the “New Password Confirm” column.
2) Click the “OK” button to confirm the change. Click the “OK” button when the “Successfully changed. When you eject, ... information may be shown.” message is displayed.
3) Pressing the “Cancel” button returns the user to the “P2 Card Manager” screen. 4) After the password change, the P2 card
information whose password has been changed will disappear from the “P2 Card Manager” screen. Remove the P2 card.
12. Software for each
P2 device
After installation of the P2 software, software for each P2 device will be installed simultaneously. For software for each device, refer to the instruction manual of the respective software.
When Using Macintosh
PC card slot driver for Macintosh PowerBook
This driver software is for referencing thecontent of a P2 card on a Macintosh PowerBook with a PC card slot.
This driver software has been verified to work in the following Macintosh environment. zCompatible models PowerBook G4 Series zOS Mac OS X 10.4.8 Mac OS X 10.5.1
<Installing the PC card slot driver for Macintosh PowerBook>
1
Insert the supplied CD-ROM.2
Double-click the Macintosh folder in the CD-ROM.3
Double-click P2PCCard Install.pkg.4
The installation of the driver software will begin. Follow the instructions on the screen to complete the install.<Notes>
zOnly the card slot driver will be installed. zWhen removing the P2 card, drag the P2
card to the “Trash” and wait until the icon disappears.
The write-protect switch is not effective when the P2 card is inserted in the PC card slot.
Make sure you remove the P2 card from the PC card slot, set the switch, then re-insert the card, in order to effect the switch setting.
E-20
EN
GL
IS
H
P2 card formatter for the Macintosh
This is the software to format a P2 card using the PC card slot of the Macintosh PowerBook or P2 drive AJ-PCD20.
<New installation of the P2 card formatter>
1
Insert the supplied CD-ROM.2
Double-click the Macintosh folder on the CD-ROM.3
Double-click the P2Formatter folder.4
Double-click P2Formatter.dmg to open a new window.5
Drag P2Formatter displayed in the new window to an appropriate place such as the Desktop.<Uninstallation of the P2 card formatter>
1
Drag P2Formatter to the Trash and then select “Empty Trash...” in “Finder” menu.2
Click “OK” in the confirmation window to delete it.<Formatting the P2 card>
1
Double-click P2Formatter.2
Select the slot where the P2 card is inserted, and click “Format”.3
Click “Format” in the confirmation window to format the card.4
Click “Close” or select “Close P2Formatter” in the P2Formatter menu to close the P2 card formatter. <Notes>zDo not remove P2 cards while the formatter is in operation.
zWhen using the AJ-PCD20, the status indicator will continue to flash after formatting as it will also access other P2 cards that were not formatted. Do not remove P2 cards while the status indicator is flashing.
Table des matières
Précautions d’utilisation Avec Windows
1. Avant l’installation . . . 2 2. Précautions à prendre lors de la manipulation de la carte P2
dans l’ordinateur personnel. . . 3 3. Logiciel à installer . . . 3 4. Installation du logiciel P2. . . 4 5. Ajouter un nouveau dispositif P2. . . 10 6. Désinstallation du logiciel P2 . . . 10 7. Contrôler les dispositifs installés . . . 11 8. Configuration du lecteur P2 interne. . . 12 9. Vérification de l’état de l’installation du Lecteur P2. . . 13 10. Contrôler la version du pilote P2 . . . 17 11. Gestionnaire de carte P2 . . . 17 12. Logiciel pour chaque dispositif P2. . . 18 Avec Macintosh
Pilote pour emplacement de carte PC pour PowerBook de Macintosh . . 19 Formateur de carte P2 pour Macintosh. . . 20
Précautions d’utilisation
Il est interdit de redistribuer le logiciel contenu dans ce CD-ROM fourni, que ce soit en échange d’une contrepartie ou non. Il est interdit d’utiliser sans autorisation le logiciel mémorisé sur le CD-ROM fourni, quel que soit le but, qu’il s’agisse de fabrication et/ou de vente de logiciels et de matériels quels qu’ils soient. De plus, nous ne pourrons pas être tenus pour responsables de la perte et/ou des dommages survenus lors de l’utilisation de ce système ou du fait de la capacité à utiliser celui-ci. Ces dispositions s’appliqueront même si nous avons déjà été informés de l’éventualité d’un tel dommage.
Windows, Windows 2000, Windows XP et Windows Vista sont des marques commerciales de Microsoft Corporation aux États-Unis.
Macintosh et Mac OS X sont des marques commerciales de Apple Computer, Inc. des États-Unis.
Les autres noms de sociétés et de produits sont des marques commerciales ou marques déposées des sociétés respectives.
zDans le cadre de ce manuel d’installation, Microsoft® Windows®, Windows® 2000,
Windows® XP Professional et Windows® Vista Business sont appelés “Windows,” “Windows 2000”, “Windows XP Professional” et “Windows Vista Business,” respectivement.
zDe même, dans ce manuel d’installation, Macintosh®, Mac OS® X et PowerBook®
F-2
FRA
NÇAIS
Avec Windows
1. Avant l’installation
Le CD-ROM fourni installe le logiciel associé à P2, utilisé pour référencer sur un ordinateur personnel le contenu des cartes P2 Panasonic
L’ordinateur sur lequel ce logiciel sera installé doit satisfaire aux conditions suivantes :
zOS Windows 2000 SP4 ou supérieur Windows XP Professional SP2 ou supérieur
Windows Vista Business ou plus haut
zRAM 512 Mo ou supérieur recommandé 1Go ou plus recommandé pour Windows Vista Business zCPU Pentium® 4 1,5 GHz ou
supérieur recommandé
zL’ordinateur personnel doit être équipé d’un lecteur permettant de lire le CD-ROM. zSi le système d’exploitation est Windows
2000 SP4, les patches SP4 doivent être installés.
Les patches SP4 sont inclus dans le CD-ROM fourni, dans un dossier nommé \Win2000SP4Patch.
De plus, l’ordinateur personnel doit satisfaire aux conditions suivantes lors de l’utilisation réelle du logiciel ou lors de la connexion de l’ordinateur à la carte P2 ou aux dispositifs P2 (lecteur P2, l’enregistreur P2 etc.
Lors de la connexion des dispositifs P2 à l’ordinateur via USB2.0 :
zUn port USB2.0 est fourni et le lecteur USB2.0 utilisé est celui fourni par Microsoft. Si les systèmes d’exploitation sus-cités sont installés sur l’ordinateur, le pilote est intégré, vous n’avez donc pas besoin de vérifier sa présence.
Lors de l’utilisation du logiciel avec la carte P2 directement insérée dans l’emplacement card bus de l’ordinateur personnel :
zUn emplacement card bus de type 2 est installé.
<Remarques>
zEn fonction de l’état de l’ordinateur personnel, des phénomènes tels que des sauts d’images ou une interruption du son peuvent survenir lors de la lecture d’informations.
zLors de la connexion des dispositifs P2 , veillez à réserver plus de lecteurs libres que le nombre de lecteurs nécessaire pour chaque dispositif P2 qui peut être utilize par l’ordinateur. (Le nombre de lecteurs nécessaire pour un dispositif P2 doit comprendre les lecteurs nécessaires pour les logements pour carte P2 et les disques durs intégrés au dispositif P2) zSeuls les 3 types de carte suivants
peuvent être utilisés avec le pilote pour CardBus pour Windows 2000. Les autres types de carte ne peuvent pas être utilisés.
AJ-P2C002SG AJ-P2C004HG AJ-P2C008HG
zSi le S.E. est Windows Vista Business, la boîte de dialogue “Commande de compte d’utilisateur” pourrait apparaître lors de l’installation, du formatage etc. Dans ce cas, cliquez sur “Continuer” et continuez l’opération.
zPour les versions Windows 64-bits antérieures à Windows Vista 64-bits, le logiciel d’installation est mémorisé dans le dossier \Win64 du CD-ROM.
2. Précautions à prendre lors de la manipulation
de la carte P2 dans l’ordinateur personnel
3. Logiciel à installer
Le CD-ROM fourni installe les programmes suivants :
zPilote P2
zGestionnaire carte P2
zLogiciel pour chaque dispositif P2 Lorsque vous installez les programmes à l’aide du CD-ROM fourni, vous pouvez formater la carte P2. Pour cela, vous disposez de deux méthodes :
zDans l’Explorateur Windows, cliquez du bouton droit sur le lecteur carte P2. Sélectionnez “Formater…” dans le menu affiché.
zDans l’Explorateur Windows, cliquez du bouton droit sur le lecteur carte P2. Dans le menu affiché, sélectionnez l’option “Fichier”, “Disque amovible” puis “Formater…” dans cet ordre.
Le CD-ROM fourni contient également un ensemble de manuels d’instructions. Reportez-vous au dossier nommé \Manuals.
Pour lire les manuels d’instructions, vous devez disposer d’Adobe® Reader. Si Adobe Reader n’est pas installé sur votre ordinateur personnel, vous devrez le télécharger sur le site Web d’Adobe. Lors de l’utilisation du logiciel avec la carte P2 ou les dispositifs P2 connectés à l’ordinateur personnel, assurez-vous que vous avez bien installé, sur l’ordinateur, le pilote P2 à partir du CD-ROM fourni.
Si ces périphériques sont connectés à un ordinateur personnel sur lequel le pilote P2 n’est pas installé, ils risquent de ne pas fonctionner correctement.
Ne retirez pas la carte P2 de son emplacement en cours de lecture ou d’écriture sur celle-ci. De plus, vous ne devez ni brancher ni débrancher le câble USB, ni changer les paramètres de connecteur USB.
Sinon, l’ordinateur personnel risque de fonctionner de façon anormale.
De plus, exécutez l’opération suivante avant de retirer la carte P2 de son emplacement : zSi la carte P2 est directement insérée dans le card bus de l’ordinateur personnel, exécutez le programme “Safely Remove Hardware” dans la barre d’état système de la barre des tâches Windows.
zSi les dispositifs P2 sont connectés à l’ordinateur personnel USB2.0, ouvrez le Poste de travail, puis cliquez du bouton droit sur l’élément matériel dans lequel la carte P2 est insérée, puis sélectionnez “Take Out”.
zVeillez à ce que les paramètres de l’ordinateur personnel ne soient pas réglés de façon à passer en mode Attente ou Hibernation pendant l’utilisation de la carte P2. Si les paramètres sont réglés de façon à passer en mode Attente ou Hibernation lors de l’accès à la carte P2, cela pourrait provoquer la destruction des fichiers et/ou des données en exécution.
F-4
FRA
NÇAIS
4. Installation du logiciel P2
<Remarques>
zInstallez le logiciel P2 après vous être connecté à votre ordinateur personnel en tant qu’administrateur, à l’aide d’un nom d’utilisateur.
zIl est conseillé de démarrer l’installation du logiciel une fois que les dispositifs P2 à utiliser sont connectés à l’ordinateur personnel.
Lorsque les dispositifs P2 sont connectés à l’ordinateur, l’Explorateur Windows affiche le nombre de lecteurs correspondant aux emplacements de cartes de ces périphériques.
Si aucun lecteur ne s’affiche dans l’Explorateur Windows, vérifiez que le pilote USB2.0 fourni par Microsoft est bien installé sur votre ordinateur.
zLe pilote de carte P2 doit être installé pour chaque emplacements de cartes. Si votre ordinateur personnel est équipé de deux emplacements de cartes ou plus, insérez la carte P2 dans chaque emplacement.
Il est possible que le pilote ne soit installé sur aucun des emplacements dans lesquels la carte P2 est installée, ce qui entraîne un fonctionnement incorrect de celle-ci. Si le PC ne reconnait pas la carte P2 inseree, essayez de la reinserer. zSi le S.E. est Windows 2000/Windows XP Professional, l’installation du logiciel pourrait échouer si l’option Signature du pilote sous Windows est paramétrée sur “Block”.
Si l’installation échoue, sélectionnez l’onglet Matériel dans la fenêtre “Propriétés Système” du Panneau de configuration et assurez-vous que l’option Signature du pilote n’est pas paramétrée sur “Block”.
zSi une boîte de dialogue non décrite dans ce manuel apparaît au cours de l’installation du logiciel, cliquez sur “Annuler” pour la fermer.
zSi un dispositif tel qu’une carte P2 est connecté au PC avant l’installation du pilote, la boîte de dialogue suivante apparaît. Veillez à cliquer sur “Annuler/Cancel” pour fermer la boîte.
Figure 1
(Pour Windows 2000/ Windows XP Professional)
Figure 2
zUtilisateurs ayant une version de pilote P2 antérieure à 1.07.0048 déjà installée sous Windows 2000/ Windows XP Professional
Voir “10. Contrôler la version du pilote P2” pour la procédure de contrôle de la version.
Pour installer le nouveau pilote, vous devez désinstaller le pilote actuellement installé. Si vous désinstallez ce pilote, toutes les informations installées jusqu’à présent seront effacées. Voir “6. Désinstallation du logiciel P2” pour la procédure de désinstallation et les notes. En outre, vous pouvez désinstaller l’ancienne version du pilote P2 pendant la procédure de mise à niveau du pilote P2. Pour les deux procédures, il pourrait être nécessaire de redémarrer Windows. zSi le S.E. du PC est Windows Vista Business, la boîte de dialogue présentée dans figure 3 pourrait apparaître lors de la mise à niveau du pilote P2. Dans ce cas, cliquez sur le bouton “OK”.
Figure 3
Après avoir vérifié chaque élément de la section “1. Avant l’installation”, utilisez la procédure suivante pour installer le logiciel P2 sur l’ordinateur personnel :
1
Fermez toutes les applications, puis connectez la carte P2 ou les dispositifs P2 à utiliser à l’ordinateur personnel.Lorsque les périphériques sont connectés à l’ordinateur personnel, l’assistant “Found New Hardware Wizard” s’affiche automatiquement, mais cliquez sur “Annuler” pour fermer la boîte.
2
Insérez le CD-ROM fourni.3
A partir de “Poste de travail”, accéder au lecteur qui contient le CD-ROM fourni et lancer setup.exe.La fenêtre illustrée à la figure 4 s’affiche, permettant de démarrer le processus d’installation. Cliquez sur “Next”.
F-6
FRA
NÇAIS
4
(Utilisateurs ayant une version de pilote P2 antérieure à 1.07.0048 déjà installée sous Windows 2000/ Windows XP Professional)La boîte présentée en figure 5 s’affiche. Pour installer le nouveau pilote, vous devez désinstaller le pilote actuellement installé.
Si vous souhaitez continuer la désinstallation, cliquez sur le bouton “OK”.
Si vous souhaitez procéder à la désinstallation manuellement, cliquez sur “Cancel”. Voir “6. Désinstallation du logiciel P2” pour plus d’informations sur la désinstallation manuelle.
Figure 5
5
Comme illustré à la figure 6, la licence d’utilisation apparaît. Si vous acceptez les termes du Contrat de licence, cliquez sur “I accept the terms in the licence agreement”, puis cliquez sur “Next”.Figure 6
6
Comme illustré à la figure 7, la fenêtre de configuration du dossier de destination de l’installation apparaît. Pour changer de dossier de destination d’installation, cliquez sur “Change” puis créez un nouveau dossier. Une fois le dossier de destination de l’installation défini, cliquez sur “Next”.Figure 7
7
Comme illustré à la figure 8, la fenêtre de démarrage de l’installation apparaît. Cliquez sur “Install”.8
Comme illustré à la figure 9, la fenêtre d’affichage de l’état apparaît, indiquant que l’installation est en cours.Figure 9
9
Comme cela est indiqué dans la figure 10, la fenêtre de sélection de l’installation du pilote apparaît avec chaque dispositif affiché. Sélectionnez le dispositif à installer et cochez la case correspondante.zL’installation des pilotes pour les dispositifs installés n’est pas nécessaire. Pour contrôler l’état de l’installation, voir Page 13.
Figure 10
10
Après avoir appuyé sur le bouton OK, une boîte de dialogue apparaît pour inviter l’utilisateur à effectuer la connextion avec la carte P2 ou le dispositif P2 de la façon indiquée dans la figure 11. Si vous devez les installer, connectez-les, puis cliquez sur “Install”. Si vous ne souhaitez pas les utiliser, il suffit de cliquer sur “Cancel”. Si vous souhaitez ajouter ultérieurement un périphérique ignoré lors de l’installation initiale, exécutez à nouveau le programme d’installation pour effectuer une nouvelle installation du périphérique. Veuillez vous reporter à la section “5. Ajouter un nouveau dispositif P2” pour plus d’informations.<Remarque>
Lorsque le focus passe sur une autre fenêtre au cours de l’installation, cette boîte de dialogue peut être masquée. Si la boîte de dialogue illustrée à la figure 9 reste affichée et que l’affichage de l’état ne change pas, vérifiez si la boîte de dialogue illustrée à la figure 11 est masquée par une autre fenêtre.
F-8
FRA
NÇAIS
11
Pour Windows 2000/Windows XP Professional,La fenêtre de message présentée en figure 12 pourrait apparaître. Cliquez sur “Continuer”. La fenêtre de message pourrait apparaître plusieurs fois.
Figure 12
Pour Windows Vista Business, La fenêtre de message présentée en figure 13 pourrait apparaître. Cliquez sur “Install this driver software anyway”. La fenêtre de message pourrait apparaître plusieurs fois.
Figure 13
12
(Utilisateurs ayant une version de pilote P2 antérieure à 1.07.0048 déjà installée sous Windows 2000/ Windows XP Professional)La fenêtre de message présentée en figure 14 pourrait apparaître. Dans ce cas, la désinstallation de l’ancienne version du pilote P2 est terminée, mais la nouvelle version du pilote n’est pas installée. Cliquez sur le bouton “OK” pour quitter le programme d’installation, redémarrez Windows puis reprenez la procédure d’installation depuis l’étape
1
.Figure 14
13
Comme illustré à la figure 15, la fenêtre de fin d’installation apparaît, indiquant que l’installation est terminée.14
Comme illustré à la figure 16, une boîte de dialogue vous invitant à redémarrer votre ordinateur apparaît. Cliquez sur “Yes” pour redémarrer.Figure 16
Lorsque deux lecteurs P2 sont raccordes a l’ordinateur personnel, installez le logiciel P2 en effectuant les operations suivantes. (Nous supposons que les deux ports USB2.0 sont le port (A) et le port (B).) Utilisez deux ports USB2.0 exclusivement pour les lecteurs P2.
1
Lorsque l’ordinateur personnel fonctionne, raccordez l’un des deux lecteurs P2 au port (A), puis l’autre au port (B).2
Installez le logiciel P2. (Voir pages 4 a 8.)3
Lorsque l’installation est terminee et que l’ecran demandant que vous redemarriez le systeme (Figure 16 de la page 9) apparait, cliquez sur “No”, puis debranchez chaque lecteur P2 des ports USB2.0.4
Reraccordez les lecteurs P2, mais cette fois raccordez le premier au port (B), puis l’autre au port (A).5
Après avoir redémarré l’installateur, cliquez sur le bouton “Next” (Page 5), la figure 17 (de la Page 10) apparaît. Cochez la case “Repair”, puis cliquez sur le bouton “Next”.6
Après avoir suivi les instructions affichées à l’écran, redémarrez l’ordinateur personnel.zVeillez à connecter au moins un dispositif P2 à l’ordinateur. Jusqu’à deux lecteurs peuvent être connectés.
F-10
FRA
NÇAIS
5. Ajouter un nouveau
dispositif P2
Pour connecter une nouvelle carte P2 ou un dispositif P2 à un ordinateur personnel sur lequel le logiciel est déjà installé, utilisez la procédure décrite à la section “4. Installation du logiciel P2” pour effectuer une installation d’écrasement du logiciel P2.
Au cours de l’installation d’écrasement, la fenêtre illustrée à la figure 17 apparaît, mais la boîte de dialogue Licence d’utilisation illustrée à la figure 6 n’apparaît pas.
Dans cette fenêtre, cochez la case “Repair”, puis cliquez sur “Next”.
Après avoir suivi les instructions affichées à l’écran, redémarrez l’ordinateur personnel.
Figure 17
<Remarque>
L’écran ci-dessus d’affiche quand le logiciel P2 installé et l’installateur ont la même version.
6. Désinstallation du
logiciel P2
Pour désinstaller le logiciel P2, utilisez la procédure suivante :
Pour Windows Vista Business,
dans la fenêtre “Programmes et fonctionnalités” de la fenêtre “Programmes” du Panneau de configuration, sélectionnez “Panasonic P2 Drivers”, puis cliquez sur “Désinstaller”.
Pour Windows XP Professional,
dans la fenêtre “Ajouter ou supprimer des programmes” du Panneau de configuration, sélectionnez “Panasonic P2 Drivers”, puis cliquez sur “Remove”.
Pour Windows 2000,
dans la fenêtre “Ajouter/Supprimer des applications” du Panneau de configuration, sélectionnez “Panasonic P2 Drivers”, puis cliquez sur “Remove”.
Après avoir suivi les instructions affichées à l’écran pour terminer la désinstallation,suivez les instructions à l’écran pour redémarrer le PC.
<Remarques>
zSi vous désinstallez le logiciel, toutes les informations installées jusqu’à présent seront effacées, si bien que si vous installez de nouveau le logiciel, vous devrez installer tous les pilotes pour tous les dispositifs à utiliser. Nous vous conseillons de contrôler les informations actuelles avant de procéder à la désinstallation. Voir “7. Contrôler les dispositifs installés” pour la procédure de contrôle.
zSi le S.E. du PC est Windows Vista Business, la boîte de dialogue présentée dans figure 18 pourrait apparaître lors de la désinstallation du pilote P2. Dans ce cas, cliquez sur le bouton “OK”.
Figure 18
7. Contrôler les
dispositifs installés
Pour contrôler les dispositifs dont le pilote est installé, utilisez un programme d’installation de la même version que le logiciel P2 actuellement installé et suivez la procédure décrite en “4. Installation du logiciel P2” pour effectuer une installation qui remplacera la version précédente. Si vous démarrez l’installation, cliquez sur “Next”, la fenêtre présentée en figure 17 (de la Page 10) apparaît. Dans cette fenêtre, cochez “Repair”, puis cliquez sur “Next”. Si vous suivez les instructions affichées à l’écran, la fenêtre présentée en figure 19 apparaît.
Dans cette fenêtre, vous pouvez contrôler les dispositifs dont le pilote est installé en contrôlant si “Installed” est affiché.
Après avoir contrôlé, cliquez sur “Cancel” pour fermer la fenêtre.
F-12
FRA
NÇAIS
8. Configuration du
lecteur P2 interne
Pour utiliser un ordinateur personnel dans lequel le lecteur P2 est inséré dans l’emplacement 5 pouces, installez le logiciel P2, connectez le lecteur P2 à l’ordinateur, puis effectuez la configuration suivante :
1
Pour Windows Vista Business/ Windows XP Professional,sélectionnez les options suivantes : “Démarrer” > “Tous les programmes” > “Panasonic P2” > “Set P2 Drive Settings” > “Enable Internal Drive”. Pour Windows 2000,
sélectionnez les options suivantes : “Démarrer” > “Programme” > “Panasonic P2” > “Set P2 Drive Settings” > “Enable Internal Drive”.
2
La boîte de dialogue illustrée à la figure 20 apparaît. Cliquez sur “OK”.9. Vérification de l’état de l’installation du
Lecteur P2
Lorsque le lecteur standard est installé via la fenêtre de l’assistant “Found New Hardware Wizard” (Figure 1) ou lorsque le lecteur P2 est désinstallé pour une raison quelconque, le périphérique P2 ne fonctionne pas correctement.
Si l’un des événements suivants se produit, vérifiez que le lecteur P2 est correctement installé, sinon, réinstallez-le.
zLa carte P2 ou le dispositif P2 ne sont pas reconnus.
zImpossible de lire les données sur la carte P2 ou le dispositif P2.
zImpossible d’écrire des données sur la carte P2 ou le dispositif P2.
zDes sauts d’images se produisent fréquemment au cours de la lecture à partir de la carte P2 ou du dispositif P2, ce qui indique qu’il existe un problème de performances.
Comment vérifier le pilote P2 <Remarque>
Lorsque vous vérifiez si le lecteur de carte P2 est correctement installé, assurez-vous de connecter le périphérique approprié à l’ordinateur personnel. Les périphériques non connectés à l’ordinateur personnel ne peuvent pas être vérifiés à l’aide de la méthode suivante :
Pour Windows Vista Business,
sélectionnez: “Démarrer” > “Panneau de configuration” > “Système et
maintenance”. Cliquez sur Gestionnaire de pèriphèriques.
Pour Windows XP Professional,
sélectionnez : “Démarrer” > “Panneau de configuration” > “Système”. La fenêtre “Propriétés système” apparaît.
Sélectionnez l’onglet “Hardware”, puis cliquez sur “Device Manager”. Pour Windows 2000,
sélectionnez : “Démarrer” > “Paramètres” > “Panneau de configuration” >
“Système”. La fenêtre “Propriétés système” apparaît. Sélectionnez l’onglet “Hardware”, puis cliquez sur “Device Manager”.
F-14
FRA
NÇAIS
1
Vérifiez l’affichage du pilote du dispositif P2. Vérification du pilote de la carte P2“IDE ATA/ATAPI controllers” – “Panasonic P2 Card” est défini. “P2 Disk Drive” – “P2Card Series Cached Disk” est défini.
Contrôler les pilotes des dispositifs USB P2
“Universal Serial Bus controllers” – “Panasonic P2 Series USB Device” est défini.
Figure 21
Pilotes des dispositifs P2
Contrôler le pilote 1394b de la carte P2 Pour Windows XP Professional,
Cliquez sur “MATSHITA AJ-PCD20 #1 IEEE 1394 SBP2 Device” énuméré sous “Disk drives”, puis cliquez sur l’onglet “Pilote” dans le panneau des propriétés “MATSHITA AJ-PCD20 #5 IEEE 1394 SBP2 Device”. “Provider” - “Panasonic” est paramétré.
Figure 22
Pilotes 1394b pour dispositifs
F-16
FRA
NÇAIS
Pour Windows Vista Business,
Cliquez sur “P2 SBP2 Device”. Il y a 5 options affichées, de “MATSHITA AJ-PCD20 #1 IEEE 1394 SBP2 Device” à “MATSHITA AJ-PCD20 #5 IEEE 1394 SBP2 Device”.
Figure 23 Pilotes 1394b pour dispositifs
10. Contrôler la version
du pilote P2
Pour Windows Vista Business,
sélectionnez: “Panneau de configuration” > “Programmes” > “Programmes et fonctionnalités” > “Affichage” > “Détails”. Appuyez sur la touche “Alt” pour afficher le menu, sélectionnez “Choisir les détails...” dans le menu “Affichage”, cochez la case “Version” et cliquez sur le bouton “OK” pour afficher la version.
Pour Windows XP Professional,
dans la fenêtre “Ajouter ou supprimer des programmes” du Panneau de configuration, sélectionnez “Panasonic P2 Drivers”, puis reportez-vous aux informations d’aide. Pour Windows 2000,
dans la fenêtre “Ajouter/Supprimer des applications” du Panneau de configuration, sélectionnez “Panasonic P2 Drivers”, puis reportez-vous aux informations d’aide.
11. Gestionnaire de
carte P2
Après l’installation du logiciel P2, l’icône “P2 Card Manager” est ajoutée au panneau de contrôle et à la barre des tâches. Les noms de carte et les mots de passe peuvent être paramétrés pour les cartes P2 en utilisant “P2 Card Manager”.
Démarrez “P2 Card Manager” et sélectionnez la carte P2 souhaitée parmi les cartes P2 reconnues, les boutons “Change Card Name” et “Change Password” sont activés. Après avoir cliqué sur le bouton “Refresh”, les dernières informations concernant la carte P2 sont déterminées et affichées.
(Les noms de carte et mots de passe pour les cartes P2 inutilisées ne sont pas paramétrés.)
<Remarque>
Si la carte P2 ne peut pas être écrite parce que le bouton de protection en écriture est paramétré sur “PROTECT” etc., le nom et le mot de passe de la carte ne peuvent pas être paramétrés.
<Change Card Name>
Les noms de carte peuvent être modifiés dans cet écran. Un mot de passe est nécessaire pour la modification.
Aucun mot de passe n’est paramétré quand une nouvelle carte P2 est insérée. Veillez à utiliser le mot de passe requis pour les cartes P2 qui sont insérées et utilisez un mot de passe.
1) Cliquez sur le bouton “Change Card Name”, et saisissez le mot de passe et le nom de la carte.
2) Après avoir cliqué sur le bouton “OK”, le nom de la carte peut être modifié. En appuyant sur le bouton “Cancel” l’utilisateur revient à l’écran “P2 Card Manager” sans modifier le nom de la carte.
F-18
FRA
NÇAIS
<Change Password>
Les mots de passe protégeant les noms de carte peuvent être contrôlés depuis cet écran.
1) Cliquez sur le bouton “Change Password”, et saisissez le vieux et le nouveau mot de passe.
Saisissez le mot de passe actuel dans la colonne “Old Password”.
Saisissez un nouveau mot de passe dans la colonne “New Password” et saisissez le même nouveau mot de passe dans la colonne “New Password Confirm”.
2) Cliquez sur le bouton “OK” pour confirmer la modification. Cliquez sur le bouton “OK” quand le message “Successfully changed. When you eject, ... information may be shown.” apparaît. 3) En appuyant sur le bouton “Cancel” l’utilisateur revient à l’écran “P2 Card Manager”.
4) Après la modification du mot de passe, les informations de la carte P2 dont le mot de passe a été modifié disparaissent de l’écran “P2 Card Manager”. Enlevez la carte P2.
12. Logiciel pour
chaque dispositif P2
Après l’installation du logiciel P2, le logiciel pour chaque dispositif P2 est installé simultanément. Pour le logiciel pour chaque dispositif, voir le manuel d’utilisation de chaque logiciel.
Avec Macintosh
Pilote pour emplacement de carte PC pour PowerBook
de Macintosh
Ce logiciel de pilote est utilisé pour référencer le contenu d’une carte P2 sur un ordinateur portable PowerBook de Macintosh avec emplacement de carte PC. Ce logiciel de pilote fonctionne en environnement Macintosh comme suit. zModèles compatibles
Séries PowerBook G4 zS.E.
Mac OS X 10.4.8 Mac OS X 10.5.1
<Installation du pilote pour emplacement de carte PC pour PowerBook de
Macintosh>
1
Insérez le CD-ROM fourni.2
Double-cliquez sur le dossier Macintosh du CD-ROM.3
Double-cliquez sur P2PCCard Install.pkg.4
L’installation du logiciel de pilote démarre. Suivez les instructions sur l’écran pour l’installation.<Remarques>
zUniquement le pilote pour emplacement de carte est installé.
zLors du retrait de la carte P2, déplacez la carte P2 sur “Corbeille” et attendez que l’icône disparaisse.
Le commutateur de protection contre l’écriture n’est pas active lorsque la carte P2 est inserée dans l’emplacement de carte PC.
Assurez-vous de retirer la carte P2 de l’emplacement de carte PC, d’activer le commutateur, puis de réinsérer la carte pour que la configuration du commutateur soit effective.
F-20
FRA
NÇAIS
Formateur de carte P2 pour Macintosh
Il s’agit du logiciel permettant de formaterune carte P2 en utilisant la fente pour carte de l’ordinateur portable Macintosh PowerBook ou le lecteur P2 AJ-PCD20. <Nouvelle installation du formateur de carte P2>
1
Insérez le CD-ROM fourni.2
Double-cliquez sur le dossier Macintosh du CD-ROM.3
Double-cliquez sur le dossier P2Formatter.4
Double-cliquez sur P2Formatter.dmg pour ouvrir une nouvelle fenêtre.5
Glissez P2Formatter apparaissant dans la nouvelle fenêtre sur un emplacement approprié comme le bureau.<Désinstallation du formateur de carte P2>
1
Glissez P2Formatter dans la corbeille, puis sélectionnez “Vider la Corbeille…” dans le menu “Finder”.2
Cliquez sur “OK” dans la fenêtre de confirmation pour le supprimer.<Formatage de carte P2>
1
Double-cliquez sur P2Formatter.2
Sélectionnez la fente pour l’introduction de la carte P2 et cliquez sur “Format”.3
Cliquez sur “Format” dans la fenêtre de confirmation pour formater la carte.4
Cliquez sur “Close” ou sélectionnez “Close P2Formatter” dans le menu P2Formatter pour fermer le formateur de carte P2.<Remarques>
zN’enlevez pas les cartes P2 pendant que le formateur est en fonction.
zPendant l’utilisation de l’AJ-PCD20, le indicateur d’activité continue à clignoter après le formatage s’il accède à d’autres cartes P2 n’ayant pas été formatées. N’enlevez pas les cartes P2 pendant que le indicateur d’activité clignote.
目 录
操作注意事项
使用 Windows 时
1. 安装前 . . . 2
2. 在个人计算机中操作 P2 卡的注意事项 . . . 3
3. 要安装的软件. . . 3
4. 安装 P2 软件 . . . 4
5. 新增新的 P2 设备. . . 10
6. 卸载 P2 软件 . . . 10
7. 检查已安装的设备 . . . 11
8. 设置内置 P2 驱动器. . . 12
9. 检查 P2 驱动程序的安装状态 . . . 13
10. 检查 P2 驱动程序的版本 . . . 17
11. P2 卡管理器. . . 17
12. 每个 P2 设备的软件 . . . 18
使用 Macintosh 时
Macintosh PowerBook 的 PC 卡插槽驱动程序 . . . 19
Macintosh 的 P2 卡格式器 . . . 20
操作注意事项
无论是有偿还是无偿,都禁止再分发提供的CD-ROM中附带的软件。禁止以制造和 /或销 售各种软件和硬件为目的, 在未经许可的情况下使用提供的CD-ROM中所保存的软件。此 外,对使用或无法使用本系统而造成的任何损失和/ 或损坏,我们概不负责。即使我们被告 知可能发生此类损坏时,也同样适用。Windows、Windows 2000、Windows XP 和 Windows Vista 是 Microsoft Corporation 在美 国的商标。
Macnintosh 和 Mac OS X 是美国 Apple Computer, Inc. 的商标。 其它公司名称和产品是各自公司的商标或注册商标。
z本使用说明书中, Microsoft® Windows®、 Windows® 2000、 Windows® XP
Professional 和 Windows® Vista Business 相应以 “Windows”、“Windows 2000”、 “Windows XP Professional”和 “Windows Vista Business”表示。
z同样,在本使用说明书中, Macintosh®、 Mac OS® X 和 PowerBook® 相应以
C-2 中 文
使用 Windows 时
1. 安装前
提供的CD-ROM可以安装 P2软件,用于在 个人计算机上参阅有关Panasonic P2卡的 内容。 安装本软件的个人计算机必须满足以下条 件: zOS Windows 2000 SP4 或更高版本 Windows XP Professional SP2或 更高版本Windows Vista Business 或更高 版本
zRAM 建议使用 512MB或以上
对于 Windows Vista Business, 建议使用 1GB或以上 zCPU 建议使用 Pentium® 4 1.5GHz 或 以上 z个人计算机配备可以读取CD-ROM的驱动 器。 z如果OS 是Windows 2000 SP4,则必须安 装SP4补丁。 SP4 补丁包含在提供的 CD-ROM 中名称 为\Win2000SP4Patch 的文件夹中。 在实际使用本软件,或者将个人计算机连接 到 P2 卡或 P2 设备 (P2 驱动器、 P2 座机 等)时,个人计算机需要进一步配置以满足 以下条件。 通过 USB2.0 将 P2 设备连接到个人计算机 时: zUSB2.0 端口已提供,使用的 USB2.0 驱动 程序由 Microsoft提供。 如果个人计算机中已预装上述OS,则计算 机中已装有驱动程序,因此您无需检查 它。 在 P2 卡直接插入个人计算机卡总线的情况 下使用本软件时: z已安装类型 2卡总线插槽。 < 注 > z根据个人计算机的情形,在回放时可能会 出现如丢失影像帧和声音断开的现象。 z连接 P2 设备时,请务必为个人计算机要 使用的每个 P2 设备预留比所需驱动器数 量更多的闲置驱动器。(P2 设备所需的驱 动器数量应包括需要用于 P2 卡槽和组成 P2 设备的硬盘的驱动器。) z以下 3 种卡仅可用于 Windows 2000 的 cardbus 驱动程序。不可用其他类型的卡。 AJ-P2C002SG AJ-P2C004HG AJ-P2C008HG/MC
z如果 OS是 Windows Vista Business,安 装、格式化等时,可能会出现 “用户账户 控制 ” 对话框。在这种情况下,单击 “继 续 ” ,继续下面的操作。 z关于比 64位 Windows Vista 更新的64位 Windows 的版本,安装程序被保存在 CD-ROM 上的文件夹 \Win64 中。
2. 在个人计算机中操作 P2 卡的注意事项
3. 要安装的软件
提供的CD-ROM可以安装以下程序: zP2 驱动程序 zP2 卡管理器 z每个 P2 设备的软件 使用提供的CD-ROM安装程序时,您可以格 式化P2卡。 P2 卡能以两种方式格式化: z在 Windows 资源管理器中,右键单击 P2 卡驱动器。从显示的菜单中选择 “格式 化”。 z在 Windows 资源管理器中,选择 P2 卡驱 动器。 从显示的菜单中,按顺序选择 “文件” 、 “可移动磁盘”和 “格式化”。 提供的 CD-ROM也包含一套使用说明书。请 参阅名称为 \Manuals 的文件夹。 要浏览说明手册,需要 Adobe® Reader。如 果个人计算机上未安装 Adobe Reader,则 需要从 Adobe 网站下载此程序。 在将 P2卡或 P2设备连接到个人计算机的情况下使用本软件时,请务必从提供的 CD-ROM 中将 P2 驱动程序安装在个人计算机上。 如果这些设备连接到未安装 P2 驱动程序的个人计算机上,则这些设备可能无法正常运 行。 在读取或写入 P2 卡时,不要从插槽中取出 P2 卡。 同样,不要插入或取下 USB 电缆或更改 USB 接口的设置。 否则,可能导致个人计算机操作不正常。 同时,从卡插槽中取出 P2 卡之前,请执行以下操作: z如果 P2 卡直接插入个人计算机的 P2 存储卡总线中,请从 Windows 任务栏的系统盘 中执行 “安全删除硬件”。 z如果通过 USB2.0 将 P2 设备连接到个人计算机,请打开我的电脑,右键单击 P2 卡要 插入的特殊硬件项目,然后选择 “取出”。 z确保在使用 P2 卡的过程中,个人计算机系统设定为不进入待机模式或睡眠模式。正在 存取 P2 卡时,如果系统设定为进入待机模式或睡眠模式,则可能会破坏正在执行的文 件和 /或数据。C-4 中 文
4. 安装 P2 软件
< 注> z使用具有系统管理员身份的用户名登录到 个人计算机后,安装 P2 软件。 z我们建议将要使用的 P2 设备连接到个人 计算机后,启动软件安装。 当 P2 设备连接到个人计算机时, Windows 资源管理器另外将显示与 P2 设 备的卡插槽同一数目的驱动器。 如 果 Windows 资 源管 理器 未显 示驱 动 器,请 检 查 个 人 计 算 机 中 是 否 已 安 装 Microsoft 提供的 USB2.0 驱动程序。 z每个卡总线插槽必须安装 P2 卡驱动程 序。如果您正在使用有两个或以上卡总线 插槽的个人计算机,请将 P2 卡插入每个 插槽。 驱动程序可能不会安装到未插入 P2 卡的 插槽上,这会导致 P2 卡无法正常操作。如 果 PC 不识别插入的 P2 卡,请重新插入。 z如果OS 是Windows 2000/Windows XPProfessional,当 Windows 系统下的驱动 程序签名选项设置为 “阻止”时,软件的 安装可能会失败。 如果安装失败,在控制面板的“系统属性” 窗口中选择硬件标签,并检查驱动程序的 驱动程序签名选项是否设置为 “阻止”。 z如果在安装软件过程中出现本手册未提及 的对话框,请单击 “取消”关闭对话框。 z当一个设备如P2卡在安装驱动程序之前连 接到个人计算机上时,会出现以下对话 框。 请务必单击 “取消” 关闭对话框。 图 1 (对于Windows 2000/ Windows XP Professional) 图 2
z用户使用P2 驱动程序版本优先于在 Windows 2000/Windows XP Professional中已经安装的 1.07.0048 有关检查版本的步骤,请参阅“10. 检查P2 驱动程序的版本” 。 为了安装新的驱动程序,需要卸载当前安 装的驱动程序。如果卸载此驱动程序,将 会删除到目前为止所有安装的信息。有关 卸载步骤和注意事项,请参阅 “6. 卸载 P2 软件” 。 此外,在P2 驱动程序升级的过程中,可以 卸载旧版本的P2驱动程序。为了使两个操 作都有效,可能需要重新启动Windows。 z如果个人计算机的OS 是Windows Vista
Business,当升级 P2 驱动程序时,可能 会出现图 3 所示的对话框。在这种情况 下,单击 “确定 ” 按钮。 图 3 检查 “1. 安装前”中的每个项目后,使用下 列步骤在个人计算机中安装 P2 软件: