Narrative Song Writing in a Digital Context
journal or
publication title
The language and Media Learning Research Center Annual Report
number 2017
page range 171‑189
year 2018‑03‑30
URL http://id.nii.ac.jp/1092/00001462/
Narrative Song Writing in a Digital Context
Scott Sustenance. Kanda University of International Studies.
In 2013, the English Language Institute (ELI) of Kanda University of International Studies (KUIS) implemented broad scale curriculum changes to the Freshman Reading and Writing courses (Owens &
Johnson, 2016). The multiliteracies approach (New London Group, 1996), which sees literacy as extending across many modes of representation and communication (e.g. speech, images, and gestures), was chosen as the underlying theoretical framework for the new course. Pedagogically, this approach operationalizes the concept of design, and as such, is well suited to incorporating new technology and digital literacies into the curriculum. Since 2014, all KUIS Freshman have been required to
purchase iPads, and teachers in the ELI have been asked to make use of them as much as possible in their classes. In response to these
organizational imperatives, the author created a Narrative Song Writing unit for a Freshman class that uniquely aligns with the multiliteracies philosophy while also addressing learners’ individual needs and broader curricular objectives. It takes students on a digital journey of what Kress (2003, 2010) calls “transformation” and “transduction”, and culminates
with the creation of a personal Music Video. Each video, or “modal ensemble” (Bezemer & Kress, 2008), communicates an original fictional narrative through a combination of four different modes; written text, music, still images, and video. This paper will explain how iPad
applications and online resources can be used to create a digital learning environment that brings together both the practical needs of the program and the multiliteracies framework in a creative and transformative multimodal combination of technology, music and
personal expression in a way that would have been impossible even ten years ago.
Introduction
In this post-Fordist era that has been called the “third globalization” by Kalantzis and Cope (2012, p.34), literacy is no longer purely the domain of the first two of the three Rs; reading and writing. New technologies, such as the iPad, are making it increasingly cheap and easy for
everyone to participate in multi-modal forms of communication that synthesize written language, images, and sounds. This has led to a new definition of literacy; multiliteracies.
A multiliteracies pedagogy consists of four non-linear components;
situated practice, overt instruction, critical framing, and transformed practice (New London Group, 1996). Transformed practice activities are related to either applying knowledge appropriately or creatively. The digital technology described in this paper facilitates the incorporation of different representational modes, and the different inherent affordances that they provide, to allow students to apply their knowledge creatively.
Students first create a fictional narrative, which is then “transformed”
(Kress, 2003, 2010) within the written text mode into pop song lyrics. These lyrics then undergo a process of “transduction” (Kress, 2003, 2010) as they are shifted across several modes; music, still images and video. This
process is shown visually in Appendix A.
Creating a Fictional Narrative
Freytag’s Pyramid (Freytag, 1900) provides an easily understandable way of explaining the process of writing a fictional narrative to your students. I introduce students to the idea of the dramatic arc (Exposition, Rising Action, Climax, Falling Action and Resolution) by having them
deconstruct a simple, well-known story that follows the structure. I have found that “The Three Little Pigs” works very well. I create a PDF of the
story, email it to the students and give them time to read through it and work together to discover how the story fits into the narrative structure.
Before starting this unit each year, I go through my computer and phone and find about 30 interesting photos. Pretty much anything is OK, as long as there is variety. Rather than printing out the photos, I take advantage of the digital classroom situation I find myself in and upload the photos to a class website I have created using Weebly.
Over the years, I have experimented with many different free website creation and hosting services, and www.weebly.com is by far the best I have found. It features an easy to use “drag and drop” interface for creating websites full of text and photos, and it even lets you embed YouTube videos seamlessly. At the start of each academic year, I instruct the students to bookmark the page in their iPad browser, so they can easily access it when necessary. It serves as the hub of my digital classroom.
Example class website: www.nsw17.weebly.com
When the students come to write their own narrative, they don't have creative carte blanche. They must choose one photo from the 30 to act
as inspiration for each part of the narrative structure. In other words, one photo will inspire the Exposition, one will inspire the Rising Action, one will inspire the Climax, one will inspire the Falling Action, and one will inspire the Resolution. The first of many modal shifts in this unit occurs as students use the photos to create a framework for their fictional narrative.
Collaboration is an element of the multiliteracies-based approach (New London Group, 1996), and in this unit, students work together in pairs or groups of three. Google Docs, an online word processing program linked to your Gmail account, is a wonderful tool for collaborative writing. It allows multiple users to work on the same document simultaneously, and all changes are automatically saved. It also allows you, the teacher, to look at, correct, and offer comments on the writing in real time, without the fear of lowering a student’s affective filter (Krashen, 1981) by
hovering over their shoulder.
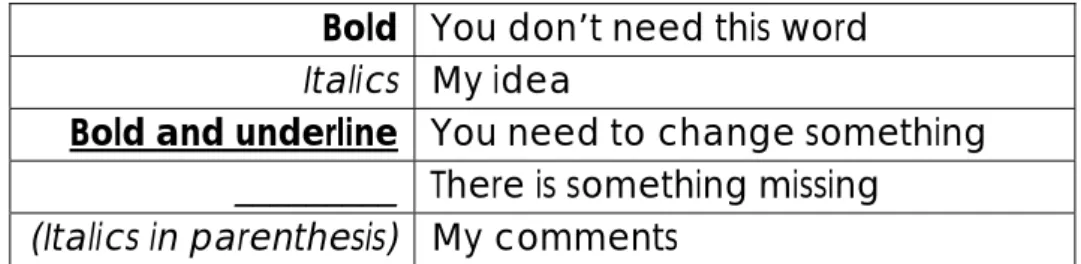
Although it is possible to use track changes when giving feedback in Google Docs, I have run into problems with students not being able to access them on their iPads. Therefore, I have created a system that uses the formatting tools readily available in Google Docs. This system is shown in Table 1. If I change the font to bold, it lets the students know that they should delete that word. It is often used in conjunction with a
word in italics, which is my suggestion for what they should use instead. If the students have the right word, but there is something that needs to be changed, such as spelling or verb agreement, I use bold and underline.
Related to this is the use of just an underline ( __ ) which informs the students that there is something missing. For any other feedback to the students, I use (Italics in parenthesis). I use this same system for each writing task, and students quickly get used to seeing my changes and comments appear on their screen while they are writing.
Bold You don’t need this word Italics My idea
Bold and underline You need to change something _________ There is something missing
(Italics in parenthesis) My comments
Table 1: Google Docs feedback system
The teacher should use their Google Drive to create a separate Google Doc for each group, and share it with them. There are several ways to share a document with a student, but I will explain the way that I have found works the best. First, go to your Google Drive and open up the file you wish to share. Then, click the “Share” button in the top-right corner. A
“Share with others” box will appear in the middle of the screen. Click
“Advanced” in the bottom right corner. On the next screen, you should
see the word “Change” in blue somewhere. Click this, and then choose
“On - Anyone with the link”. After that, go to the bottom of the box and change “Can view” to “Can edit”. Don’t forget to click the “Save”
button to apply the changes. Then, all that remains to be done is to copy the URL link from the address bar and email it to the students you want to share it with.
From Narrative to Pop Song lyrics: a transformation within modes
Once the fictional narrative has been completed, the next step is to turn it into a pop song, and the first stage of this process is to turn the
narrative into pop song lyrics. Kress (2003, 2010) refers to this movement within a mode (written text in this case) as “transformation”. When writing the narrative, the mantra espoused to the students was “details, details, details”. In contrast, writing the pop song is all about telling the same story in a creatively concise way.
A large amount of seemingly disparate pop songs follow an almost identical structure. They generally start with an instrumental intro, before moving into the first verse. Then comes the pre-chorus (optional) and chorus. The chorus contains the “hook” of the song. It is the part that most readily gets stuck in your head and it is usually the part that you
start singing when you try to recall the song. The verse / chorus pattern then repeats. After the second chorus, there is often an obvious change in the song. This is the bridge (also known as the middle eight). The song then ends with the coda, which is basically an extended chorus (Peterik, Austin & Lynn, 2010).
After some overt instruction in the pop song structure, and some practice deconstructing several pop songs as a class, each group chooses an English-language pop song that will act as the basis for their narrative pop song. Their chosen song must have two verses, a repeating chorus, a bridge, and also have a karaoke version available on YouTube.
Students then analyse the lyrics to find the number of syllables per line and the rhyme scheme, because these will inform their own lyrical choices.
The students write the song lyrics in Google Docs underneath their fictional narrative. This allows them to quickly refer to the details of the narrative, because each part of the pop song maps onto a different part of the narrative. The verses tell the details of the story based on the narrative structure, the chorus explains the theme, and the bridge is concerned with the moral or lesson of the fictional narrative.
Recording the Song: GarageBand
GarageBand is an application that allows users to easily record and edit music using multiple tracks. When recording their song, students use at least two tracks. The first track will contain a karaoke version of the song they based their lyrics on, most commonly sourced from YouTube. Using two iPads, one to play the song and one to record the song, they record the music onto the first track of a new song in GarageBand using the
“Audio Recorder” setting. Before recording, the song length needs to be extended from the default 8 bars to a length that will record the whole song, and the metronome should be turned off. It also goes without saying that the environment should be as quiet as possible. Once the backing music is recorded, they can begin to record the vocals.
Recording the vocals is much more problematic that recording the backing track, but there are some ways to make the process easier. The first thing to do is to create another track. This allows the backing music and the vocals to be edited independently. When recording a new track, headphones should be worn to ensure that previously recorded material is not re-recorded onto the new track. If students are having difficulties singing the words they wrote at the correct speed, the music can be slowed down to half speed, and then returned to normal after
recording. After recording the vocals at the slower tempo, they need to be sped up to double the recorded speed. Links to some GarageBand tutorial videos I created are available in Appendix B.
From Text to Images: a picture tells 1,000 words
After the modal shift from written lyrics into music, the creation
undergoes yet one more transduction; this time into visual images. Each line of the song lyrics is turned into a visual image, which helps add an extra layer of meaning to the song. The students have freedom in how they would like to create the images, and I have had some students create hand-drawn pictures, but the majority of students opt to use a combination of Google Images and Pic Collage.
The resolution of the images that students choose should be high enough for it to be clear even when projected on a screen in the classroom.
When using Google Images on an iPad, the image size is not displayed, but it is possible to go into the image search settings and limit the images presented based on size. 400 x 300 pixels and above is generally safe. If an image that perfectly captures the meaning of the line cannot be found on Google Images, two or more images can be combined to create a new image.
Pic Collage is a basic image-manipulation application. It is easy to use, quick to learn and available free from the App Store. Once the images to be combined have been found and saved to the camera roll, open up Pic Collage and choose “Freestyle”. Tap anywhere on the screen and a box that gives you the option to add a photo will pop up. Touch
“Photos” and choose your image, then touch the tick mark. Do this for all of the images you want to use. The image’s size can be adjusted by pinching with your index finger and thumb, and by tapping the image, you will bring it to the top of all the other images on the page. When constructing the new, original image, be aware that the iMovie screen is a horizontal rectangle, so all of the images created in Pic Collage should be in a similar aspect ratio. A good idea is to imagine that the vertical Pic Collage screen is divided into quarters, and then just use the middle two quarters when creating an image.
If you only want to use one part of a particular image, it is possible to crop it. Double tap the image and choose “Clip”. Then, either choose one of the predetermined shapes, or use your finger to crop the image to the shape you want. If you are using your finger, drag the dotted line around the section you want to keep. Once you arrive back at the
starting position and complete the loop, the area that will be deleted will
lose opacity. Touch the tick mark to crop the image. When the new image is complete, save it to your camera roll. A links to a Pic Collage tutorial video I created is available in Appendix B.
Pic Collage: www.youtube.com/watch?v=4cjBMzR4lCk
Music Video: an iMovie modal ensemble
The final step in this multimodal Narrative Song Writing journey is to
combine all of the elements into a “modal ensemble” (Bezemer & Kress, 2008) of written text, music, still images, and video. The resulting music video will be a combination of the song that was created in
GarageBand, the still images created with Google Images and Pic Collage, and the lyrics, which will be copy-and-pasted from the Google Doc and displayed on screen using the iMovie subtitle function.
GarageBand and iMovie are both Apple-created applications, so importing the song into your music video should be a smooth, albeit somewhat convoluted, process. In the home screen of GarageBand, where all of the songs are shown, choose “Select” and touch the song you wish to export. You will see a blue border around the image. Then touch the export icon, which is located in the top left corner of the
screen, and looks like a square with an arrow shooting out of the top of it.
From the pop-up window, choose “Open in”. On the new screen, touch
“Share”, and it will start exporting the song. After that, choose “Import with iMovie”, and then “Create New Movie”. Your song will be imported into a fresh iMovie project as background music.
Importing the images into iMovie is quite straightforward. To access your camera roll, touch the symbol that is a combination of a film strip and a musical note. All of your photo albums will then be displayed. Choose the album that contains your images, and then select the first image. The photo will fly into your iMovie timeline, and your song will become much, much shorter. Don’t be alarmed. As you continue to add images, the song will expand to fit the length of your movie.
By default, the images will be about five seconds long. It is unlikely that this will be the perfect option for you, but you can adjust the amount of time the image stays on the screen. Touch the image so that a yellow border appears around it. The end of the photo can then be dragged out to the desired position, and the song will move along with it.
When first imported, the images will move when the music video is
played. This is due to the Ken Burns effect, which by default is set to “on”
when you add a photo. The start and end positions of this effect can be adjusted, or the effect can be turned off all together to create a static image. The controls for this are in the bottom-right corner of the preview window.
Adding subtitles will complete the music video. Go to the Google Doc that has the song lyrics, and copy the first line of the song. In iMovie, select the photo that represents the first line of the lyrics. A “T” symbol will appear at the bottom of the screen. Touch this to access the subtitles function. Choose the second box from the left at the bottom of the screen to give the text a backdrop, and then tap “Middle”. Each Theme in iMovie has different subtitle-box backdrops, but I recommend either
“Modern” or “Bright”. The theme can be controlled through the settings, which can be accessed through the icon that looks like a cog. To place your lyrics in the subtitle box, tap the “Title Text Here” box, delete that text, and then paste in the lyrics. Links to an iMovie tutorial and an example Music Video I created are available in Appendix B.
The unit concludes with a class screening of all the music videos. When they have completed the iMovie project, students save it to their
camera roll at a medium-to-high resolution (HD 720p is a good mix of high resolution and low file size) using the export function in iMovie. The
video is then shared with the teacher’s iPad using the “Air Drop” function, and projected in class using a VGA adapter for the images, and an
audio cable from the headphone jack of the iPad to the classroom speakers.
References
Bezemer, J. & Kress, G. (2008). Writing in multimodal texts: A social semiotic account of designs for learning.
Written Communication, 166-195. doi:
10.1177/0741088307313177
Freytag, G., (1900). Technique of the Drama. Third Edition. Chicago. Scott, Foresman and Company.
Kalantzis, M. & Cope, B. (2012). Literacies. New York: Cambridge University Press.
Krashen, S. D. (1981). “Bilingual education and second language
acquisition theory”. In Schooling and Language Minority Students:
A Theoretical Framework, Edited by: California State Department of Education. Los Angeles: Evaluation, Dissemination and
Assessment Center.
Kress, G. (2003). Literacy in the new media age. London: Routledge.
Kress, G. (2010). Multimodality: A social and semiotic approach to contemporary communication. New York: Routledge
New London Group. (1996). A pedagogy of multiliteracies: Designing social futures. Harvard Educational Review, 66(1), 60-93.
Owens, J., & Johnson, N. H. (2016). Connecting reading, writing, and culture through a literacies-based approach to narrative. In G.
Brooks, M. Porter, D. Fujimoto, & D. Tatsuki (Eds.), The 2015 PanSIG Journal (pp. 133-141). Tokyo, Japan: JALT.
Peterik, J., Austin, D., & Lynn, C. (2010). Songwriting for Dummies. (2nd ed.). Hoboken, NJ. Wiley Publishing Inc.
Appendix A – The Narrative Song writing process
Photos
Pop Song Lyrics
Song
Music Video Narrative
Narrative Structure
Pop Song Structure
GarageBand
iMovie / Pic Collage
Appendix B – Instructional Videos
GarageBand - www.youtube.com/watch?v=0kT2Sv1mA-U
Adjusting the speed - www.youtube.com/watch?v=GdqNMWOjZMs
Pic Collage: www.youtube.com/watch?v=4cjBMzR4lCk
iMovie: www.youtube.com/watch?time_continue=49&v=gV8oWiu8ulc
Example Music Video: www.youtube.com/watch?v=P_V_wMjeozc