PCI Express graphics card installation
HP xw Workstation series
This document describes how to install a PCI Express graphics card in your workstation.
This graphics card uses the PCI Express hardware interconnect standard. PCI Express is the successor to the PCI, PCI-X, and AGP I/O standards. This graphics card is designed to work using your PCI Express x16 I/O slot.
Kit contents
This kit includes the following components:
● Graphics card ● Cable adapter ● Installation instructions ● Support bracket ● Graphics driver CD ● Retention clip ● Warranty information ● Regulatory information
© 2007 Hewlett-Packard Development Company, L.P. The HP Invent logo is a registered trademark of Hewlett-Packard Development Company, L.P. Printed in the U.S.
Warnings and cautions
WARNING! Any surface or area of the equipment marked with these symbols indicates the presence of a hot surface or hot component. If this surface is contacted, the potential for injury exists. To reduce the risk of injury from a hot component, allow the surface to cool before touching.
WARNING! Any surface or area of the equipment marked with these symbols indicates the presence of an electrical shock hazard. To reduce the risk of injury from electrical shock, do not open any enclosed area.
WARNING! To reduce the risk of electric shock or damage to your equipment:
— Do not disable the power cord grounding plug. The grounding plug is an important safety feature. — Plug the power cord in a grounded (earthed) outlet that is easily accessible at all times.
— Disconnect power from the equipment by unplugging the power cord from the electrical outlet.
WARNING! To reduce the risk of serious injury, read the Safety & Comfort Guide. It describes proper workstation, setup, posture, and health and work habits for computer users, and provides important electrical and mechanical safety information. This guide is located on the Web at http://www.hp.com/ ergo and/or on the documentation CD if one is included with the product.
WARNING! If a product is shipped in packaging marked with this symbol, , the product must always be lifted by two persons to avoid personal injury due to product weight.
CAUTION: Static electricity can damage the electronic components of the workstation. Before beginning these procedures, be sure you are discharged of static electricity by briefly touching a grounded metal object.
CAUTION: Observe the following cautions when removing or replacing a processor:
— Installing a processor incorrectly can damage the system board. Have an HP authorized reseller or service provider install the processor. If you plan to install it yourself, read all of the instructions carefully before you begin.
— Failure to follow the workstation preparation instructions and these result in an improperly installed processor, causing extensive system damage.
— Processor socket pins are delicate and bend easily. Use extreme care when placing the processor in the socket.
CAUTION: To prevent damage to this system, observe the following Electro Static Discharge (ESD) precautions while performing the system parts removal/replacement procedures:
— Work on a static-free mat.
— Wear a static strap to ensure that any accumulated electrostatic charge is discharged from your body to the ground.
— Create a common ground for the equipment you are working on by connecting the static-free mat, static strap and peripheral units to that piece of equipment.
NOTE: HP accessories are for use in HP workstation products. They have been extensively tested for reliability and are manufactured to high quality standards. HP, therefore, warrants only those
accessories that are manufactured or sold by HP.
Step 1—Preparing the workstation
Your workstation documentation includes instructions for disassembling and preparing the workstation for installation.
For product-specific information, and to identify the proper PC slot for your graphics card, see the Service
and Technical Reference Guide for your HP workstation at http://www.hp.com/support/ workstation_manuals.
Step 2—Installing the graphics card
NOTE: If you are installing a high definition (HD) graphics card, you must purchase an HD graphics cable for use with the card.
1. Download the latest BIOS and driver updates from the support Web site: http://www.hp.com/go/ workstationsupport.
2. After installing the updates, power down the workstation, disconnect power from the system, and remove the access panel.
3. (Optional) Remove any card support brackets.
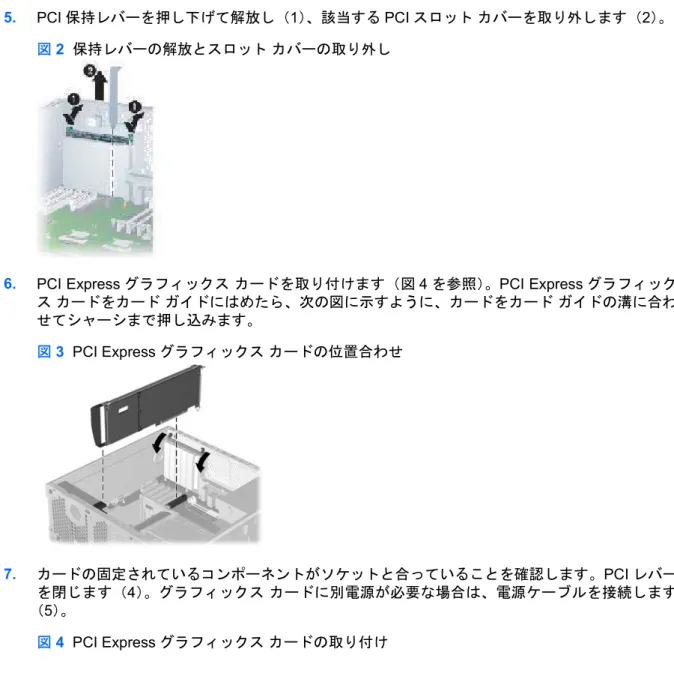
4. (Optional) If a card guide was included with your kit, lower it into the chassis and snap it into place. Two types of card guide installations are shown in the following illustration.
NOTE: If your workstation has a card guide integrated into the chassis, this step is unnecessary.
Figure 1 Installing the card guide
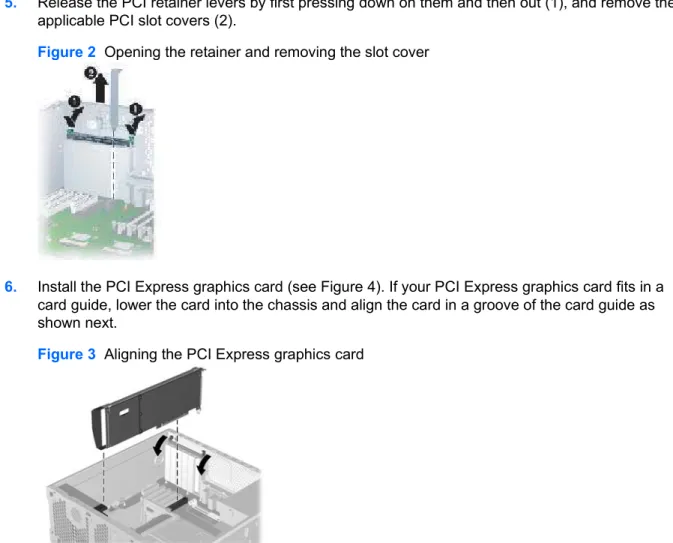
5. Release the PCI retainer levers by first pressing down on them and then out (1), and remove the applicable PCI slot covers (2).
Figure 2 Opening the retainer and removing the slot cover
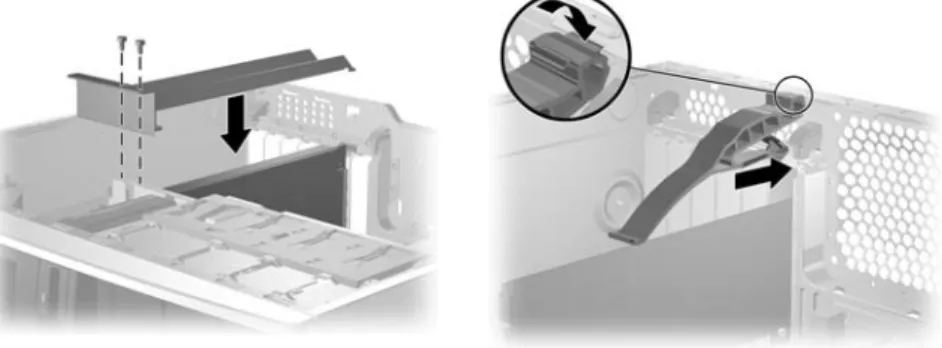
6. Install the PCI Express graphics card (see Figure 4). If your PCI Express graphics card fits in a card guide, lower the card into the chassis and align the card in a groove of the card guide as shown next.
Figure 3 Aligning the PCI Express graphics card
7. Verify that the keyed components of the card align with the socket. Close the PCI levers (4). If the graphics card requires additional power, connect the power supply cable (5).
Figure 4 Installing the PCI Express graphics card
8. If your PCI Express graphics card has a support bracket, install it to limit the movement of the card. The following illustrations show the installation of some typical card support brackets.
Figure 5 Installing the card support bracket (1 of 2)
Figure 5 Installing the card support bracket (1 of 2)
Step 3—Reassembling the workstation
After installation, reassemble the workstation using the instructions in the workstation documentation. The reassembly process involves reinstalling the side access panel and restoring power to the workstation.
PCI Express グラフィックス カードの取り付
け
HP xw シリーズ ワークステーション
このマニュアルでは、ワークステーションで使用するPCI Express グラフィックス カードの取り付け 方法を説明します。
このグラフィックス カードでは、PCI Express ハードウェア相互接続規格が採用されています。PCI Express は、PCI、PCI-X、および AGP I/O 規格に準拠しています。このグラフィックス カードは、 PCI Express x16 I/O スロットで動作するように設計されています。
キットの内容
このキットには、以下のものが含まれています。 ● グラフィックス カード ● ケーブル アダプタ ● インストール手順 ● サポート ブラケット ● グラフィックス ドライバ CD ● 保持クリップ ● 保証書 ● 規制情報警告および注意
警告! 装置の表面または領域にこの記号が貼付されている場合は、高温の表面または高温の部 品が存在することを示しています。この表面に触れると、火傷をするおそれがあります。高温の部品 による火傷の危険を防ぐため、必ず、表面の温度が十分に下がってから手を触れてください。 警告! 装置の表面または領域にこの記号が貼付されている場合は、感電のおそれがあることを 示しています。感電によるけがを防ぐため、カバーは開けないでください。 JAWW HP xw シリーズ ワークステーション 1警告! 感電または装置の損傷の危険がありますので、次の点を守ってください。 — 必ず電源コードのアース端子を使用して接地してください。アース端子は重要な安全機能です。 — 電源コードは、製品の近くの手が届きやすい場所にあるアースされた電源コンセントに差し込んで ください。 — 電源コンセントから電源コードを抜いて、コンピュータの電源を切断してください。 警告! 操作する人の健康を損なわないようにするため、『快適に使用していただくために』をお読 みください。正しい作業環境の整え方や、作業をする際の姿勢、および健康上/作業上の習慣について 説明しており、さらに、重要な電気的/物理的安全基準についての情報も提供しています。『快適に使 用していただくために』は、HP の Web サイト(http://www.hp.com/ergo/)から[日本語]を選択して 参照できます。また、製品にDocumentation CD(ドキュメンテーション CD)が付属している場合 は、このCD にも収録されています。 警告! 製品の出荷パッケージに の記号が付いている場合は、製品の重さによるけがを防ぐため に、製品は必ず2 人で持ち上げてください。 注意: 静電気の放電により、ワークステーションの電子部品が破損することがあります。作業を始 める前に、アースされた金属面に触れるなどして、身体にたまった静電気を放電してください。 注意: プロセッサを取り外すか交換するときは、次の注意事項に従ってください。 — プロセッサを正しく取り付けないと、システム ボードを損傷することがあります。プロセッサの取 り付けは、HP 認定の販売代理店またはサービス プロバイダにお任せください。自分で取り付ける場 合は、開始前に、すべての操作手順を注意深くお読みください。 — ワークステーションの準備手順に従わないと、プロセッサが適切に取り付けられず、システムの大 きな損傷を招く原因となります。 — プロセッサソケットのピンは壊れ易くて曲がり易いものです。プロセッサをソケットに取り付ける ときは、十分に注意してください。 注意: システムの損傷を防ぐため、システム部品の取り外し/交換の手順を実行する際は、静電気 (ESD)に関する以下の注意事項を守ってください。 — 静電気防止マットの上で作業をしてください。 — 静電気ストラップを着用して、蓄積されたすべての静電気が確実に身体から地面に放電されるよう にしてください。 — 作業対象の装置に静電気防止マット、静電気ストラップ、および周辺装置を接続して、装置共通の アースを作成してください。
手順
1:ワークステーションの準備
ワークステーションのマニュアルには、取り付ける際のワークステーションの分解および準備手順が 記載されています。
製品固有の情報について、さらに、グラフィックス カードに適した PC スロットかどうかを確認する
には、http://www.hp.com/support/workstation_manuals(英語サイト)からお使いのHP ワークステー
ションの『Service and Technical Reference Guide(サービスおよびテクニカル リファレンス ガイ ド)』を参照してください。
手順
2:グラフィックス カードの取り付け
注記: 高解像度(HD)グラフィックス カードを取り付ける場合は、カードに対応した HD グラフ ィックス ケーブルを購入する必要があります。
1. サポートのWeb サイト(http://www.hp.com/go/workstationsupport)から、最新のBIOS とドラ イバの更新をダウンロードします。 2. 更新をインストールしたら、ワークステーションの電源を切り、システムから電源ケーブルを外 し、アクセス パネルを取り外します。 3. (オプション)すべてのカード サポート ブラケットを外します。 4. (オプション)キットにカード ガイドが含まれている場合は、カード ガイドをシャーシに挿入 し、所定の位置に収まるまで下げます。次の図に、2 種類のカード ガイド取り付け方法を示しま す。 注記: ワークステーションのシャーシにカード ガイドが組み込まれている場合は、この手順 は不要です。 図 1 カード ガイドの取り付け xw6000 シリーズ xw4000 シリーズ JAWW 手順1:ワークステーションの準備 3
5. PCI 保持レバーを押し下げて解放し(1)、該当する PCI スロット カバーを取り外します(2)。
図 2 保持レバーの解放とスロット カバーの取り外し
6. PCI Express グラフィックス カードを取り付けます(図 4 を参照)。PCI Express グラフィック ス カードをカード ガイドにはめたら、次の図に示すように、カードをカード ガイドの溝に合わ せてシャーシまで押し込みます。 図 3 PCI Express グラフィックス カードの位置合わせ 7. カードの固定されているコンポーネントがソケットと合っていることを確認します。PCI レバー を閉じます(4)。グラフィックス カードに別電源が必要な場合は、電源ケーブルを接続します (5)。 図 4 PCI Express グラフィックス カードの取り付け
8. PCI Express グラフィックス カードにサポート ブラケットがある場合は、カードが動かないよ うにサポート ブラケットを取り付けます。次の図に、一般的なカード サポート ブラケットの取 り付け方法を示します。 図 5 カード サポート ブラケットの取り付け (1 の 2) 図 5 カード サポート ブラケットの取り付け (1 の 2)