GAZE ESTIMATION FROM RGB-D CAMERA AND HEAD- MOUNTED EYE CAMERA
(㐲㝸RGBD࣓࢝ࣛཬࡧ࣊ࢵࢻ࣐࢘ࣥࢺ࣓࢝ࣛࡼࡿど⥺᥎ᐃ)
by
Jianfeng LI
Doctor of Engineer
Electrical and Electronic Engineering Tottori University
March, 2017
I
TABLE OF CONTENTS
LIST OF FIGURES ... IV LIST OF TABLES ... VI
ABSTRACT ... 1
ACKNOWLEDGEMENTS ... 3
INTRODUCTION ... 4
CHAPTER 1 1.1 Approaches to eye movement detection ... 4
1.2 Eye movement detection by camera ... 6
1.3 Contributions ... 9
1.4 Organization ... 10
FUNDAMENTALS ... 11
CHAPTER 2 2.1 Eye ... 11
2.1.1 Inside the eye ... 11
2.1.2 Working principle of eye... 14
2.2 Camera model ... 17
2.2.1 Pinhole camera model ... 17
2.2.2 Camera calibration with OpenCV ... 19
2.2.3 The RGB camera ... 21
2.2.4 The RGB-D camera ... 21
2.3 Ellipse fitting ... 22
RELATED RESEARCH ... 25
CHAPTER 3 3.1 Eye model ... 25
3.2 Gaze estimation ... 27
II
3.3 Remote camera approach ... 29
3.4 Head-mounted camera approach ... 31
GAZE ESTIMATION FROM REMOTE CAMERA ... 32
CHAPTER 4 4.1 The RGB-D camera--Kinect ... 35
4.1.1 The sensor ... 36
4.1.2 RGB camera ... 37
4.1.3 Depth sensor (IR) ... 37
4.1.4 Field view ... 38
4.1.5 Microphone array ... 38
4.1.6 Face tracking and 3D head pose ... 38
4.2 Coordinate systems ... 40
4.3 Initial iris center detection ... 42
4.4 Fitting the iris ... 44
4.5 Eyeball center calibration ... 47
4.6 Gaze estimation ... 49
4.7 Error analysis ... 50
4.8 Evaluation ... 52
4.8.1 Iris fitting result ... 54
4.8.2 Eyeball center calibration ... 56
4.8.3 Gaze test ... 57
4.8.4 Database test ... 62
4.9 Conclusions ... 67
4.10 Appendix ... 68
III
4.10.1 Eyeball center calibration problem ... 68
4.10.2 Iris fitting problem ... 70
GAZE ESTIMATION FROM HEAD-MOUNTED CAMERA ... 71
CHAPTER 5 5.1 Block diagram of the proposed method ... 72
5.2 Fitting of iris contour ... 73
5.3 Calibration of eyeball center position ... 76
5.4 Evaluation ... 78
5.4.1 Simulation ... 78
5.4.2 Method validation ... 82
5.4.3 Eyeball calibration... 85
5.4.4 Iris fitting ... 86
5.4.5 Screen test ... 87
5.5 Conclusion ... 90
CONCLUSIONS ... 91
CHAPTER 6 6.1 Summary ... 91
6.2 Future work ... 93
REFERENCES ... 94
LIST OF PUBLICATIONS ... 100
IV
LIST OF FIGURES
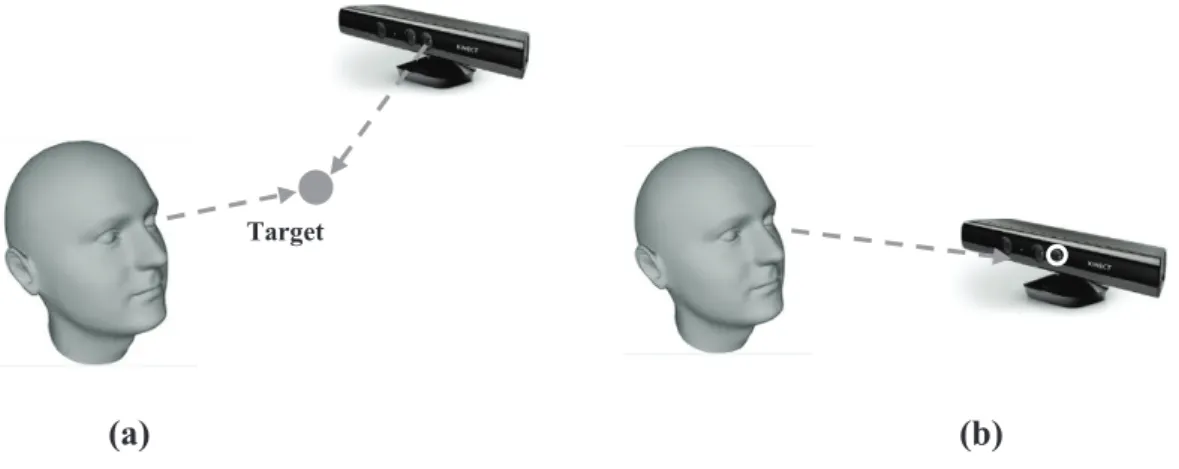
Fig. 1.1: The Kinect sensor and the head pose detection………...8
Fig. 1.2: Head-mounted camera and captured eye image………..8
Fig. 2.1: Eye structure………..13
Fig. 2.2: Cornea structure……….16
Fig. 2.3: Pinhole camera model………18
Fig. 3.1: 3D eye model……….26
Fig. 4.1: Different calibration methods………32
Fig. 4.2: Main steps of method……….34
Fig. 4.3: Kinect sensor………..35
Fig. 4.4: Kinect structure………..37
Fig. 4.5: Head pose………...39
Fig. 4.6: Face tracking………..39
Fig. 4.7: Four coordinate systems………...…….41
Fig. 4.8: Initial iris center detection……….43
Fig. 4.9: Orientation of the optic axis of the eye………..49
Fig. 4.10: Gaze estimation errors when the distance changed or iris detecting errors occurred……….51
Fig. 4.11: Iris fitting result in different conditions………...55
Fig. 4.12: Comparison of estimated gaze and ground truth……….59
Fig. 4.13: The error depends on the angle………60
Fig. 5.1: Block diagram of the proposed method………72
V
Fig. 5.2: sketch of our computation model of iris fitting from a head-mounted camera based on an eye-model………..75 Fig. 5.3: Iris fitting by iterations………...77 Fig. 5.4: Iris fitting error………...79 Fig. 5.5: The iris detection on the occlusion, iris reflection, and blurred situation…..84 Fig. 5.6: Vector product principle………84 Fig. 5.7: Screen gaze point error………..89
VI
LIST OF TABLES
TABLE 1.1: Three categories of measuring rotations of eyes………...5
TABLE 4.1: Values of the eye parameters………...53
TABLE 4.2: Gaze estimation errors……….61
TABLE 4.3: Gaze estimation comparing result………...61
TABLE 4.4: Gaze estimation errors for EYEDIAP database………..65
TABLE 4.5: Eyeball center errors for EYEDIAP database……….66
TABLE 5.1: The average fitted iris center error………..81
TABLE 5.2: Fitted iris center error with outliers……….81
TABLE 5.3: Eyeball calibration validation………..86
TABLE 5.4: Iris fitting test on samples………...………86
TABLE 5.5: Average angle error of each marker………88
TABLE 5.6: Comparison with other works……….89
1 ABSTRACT
This thesis focuses on the topic of gaze estimation from cameras. Gaze estimation is an important topic in computer vision in such areas as driver behavior analysis, security monitoring, behavior investigation, and human-computer interfaces.
In particular, gaze information can offer a new means of communication with machines, such as determining a human’s region of interest. In addition, there are two big categories in this area: one is gaze estimation from a remote camera, which is placed in front of an observer, and the observer would not have any direct bindings with the remote camera. The other is gaze estimation from a head-mounted eye camera, which is placed on the observer’s head. The camera can have a direct view of the eye. This thesis proposes novel methods of gaze estimation based on an eye model for the remote camera and the head-mounted camera, and is composed by two parts as follows.
Part I (Gaze estimation from remote camera): The most crucial factors in the eye-model-based approach to gaze estimation are the three-dimensional (3D) positions of the eyeball and iris centers. In the proposed method, a RGB-D camera, Kinect sensor, is used to obtain the head pose as well as the eye region of the color image. Because the ray from the eyeball center to target and the ray from the eyeball center to the iris center should meet a relationship. Based on the knowledge, our method sets up a model to calibrate the eyeball center by gazing at the center of the color image camera. Then, to estimate the 3D position of the iris center, the 3D contour of the iris is projected onto the color image with the known head pose
2
obtained from color and depth cues of an RGB-D camera. Thus, the ellipse of the iris in the image can be described using only two parameters: the yaw and pitch angles of the eyeball in the iris coordinate system, rather than the conventional five parameters of an ellipse. The proposed method can fit an iris that is not complete due to eyelid occlusion. The average errors of vertical and horizontal angles of the gaze estimation for seven subjects are 5.9 degrees and 4.4 degrees in experiments, respectively.
However, for lower resolution and poor illumination images, as tested on the public database EYEDIAP, the performance of the proposed eye-model-based method is inferior to that of the-state-of-the-art appearance-based method.
Part II (Gaze estimation from head-mounted camera): As introduced in Part I.
Gaze estimation is based on the eyeball center and the iris center, so in this proposed method, we divide the continuous gaze estimation of a head-mounted eye camera into two phases. One phase, known as the calibration phase, is used to estimate the eyeball center position in relation to the coordinate system of the head-mounted eye camera.
The other phase is used to fit the iris contour in 2D images employing only two parameters for gaze estimation. Based on an eye-model, iris can be extracted in a more efficient and accurate manner by projecting the 3D iris contour onto a 2D space.
Given the calibrated 3D eyeball center and estimated 3D iris center, the gaze tracking can be achieved. As seen from the experimental results, the proposed method demonstrates both credible eyeball center estimation and an accurate iris contour estimation in comparison with the conventional approach using five unknown parameters. At the end, the accuracy of our gaze estimation method and other existed methods using targets on a screen was evaluated.
3
ACKNOWLEDGEMENTS
Firstly, I would like to express my sincere gratitude to my advisor Prof.
Shigang Li for the continuous support of my PhD study and related research, for his patience, motivation, and immense knowledge. His guidance helped me in all the time of research and writing of this thesis. I could not have imagined having a better advisor and mentor for my PhD study.
Besides my advisor, I would like to thank Prof. Nakanishi. Without his consistent and illuminating instruction, this thesis could not have reached its present form. And I would also like to thank Prof. Ito and Prof. Iwai, their treasure advises did a great help to this thesis.
My sincere thanks also goes to my friends, especially Dr. Hanchao Jia and Dr.
Wuhe Zou, who have instructed and helped me a lot in my first year.
Last but not the least, I would like to thank my family: my parents, my sister and my wife for supporting me spiritually throughout writing this thesis and my life in general.
4 CHAPTER 1 Introduction
1.1 Approaches to eye movement detection
Our eyes are one of the most significant sense organs, which allow us to explore, analysis, and interact with environments by the visual information content of the physical world. The eye and its movements provide a key contribution to interpreting and understanding a person’s wishes, needs, tasks, cognitive processes, affective states and interpersonal relations.
The unique geometric and photometric properties of the eyes provide important visual cues for obtaining face-related information. Thus, the research about gaze estimation becomes important.
To measure rotations of the eye, there are principally three categories (Table 1.1).
z Measurement of the movement of an object attached to the eye, such as a special contact lens with an embedded mirror or magnetic field sensor, and the movement of the attachment is measured with the assumption that it does not slip significantly as the eye rotates [38].
z Measurement of electric potentials using electrodes placed around the eyes, the electric signal that can be derived using two pairs of contact electrodes placed on the skin around one eye called Electrooculogram (EOG). If the eyes move from the center position towards the periphery, the retina approaches one electrode while the cornea approaches the opposing one. This change in the orientation of the dipole and consequently the electric potential field result in a change in the measured
5
EOG signal. Inversely, by analyzing these changes, eye movement can be tracked [39].
z Optical tracking without direct contact to the eye, it uses some non- contact, optical method for measuring eye motion. Light, typically infrared is reflected from the eye and sensed by a video camera or some other specially designed optical sensors.
In this thesis, we focus on the optical tracking approach using a camera.
TABLE1.1
THREE CATEGORIES OF MEASURING ROTATIONS OF EYES
Categories Devices
Measurement of the movement of an object attached to the eye
A special contact lens with an embedded mirror or magnetic
field sensor
Measurement of electric potentials Electrodes placed around the eyes
Optical tracking to the eye
A video camera or some other specially designed optical
sensors
6 1.2 Eye movement detection by camera
Gaze estimation is the process of measuring either the point of gaze or the motion of an eye relative to the head. Gaze estimation is a hot topic in computer vision in such areas as driver behavior analysis, security monitoring, behavior investigation, and human-computer interfaces [1]. In particular, gaze information can offer a new means of communication with machines, such as determining a human’s region of interest. The most widely used current designs are video-based gaze estimation. A camera focuses on one or both eyes and records their movement as the viewer looks at some kind of stimulus. Since gaze direction corresponds to human eyeball movement. The most crucial factors in estimating gaze direction are the eyeball and iris/pupil centers. While the iris/pupil center can be directly observed using a camera, the eyeball center must be calibrated. Most modern gaze estimation methods use the center of the pupil and infrared/near-infrared non-collimated light to create corneal reflections (glint). The vector between the pupil center and the corneal reflections can be used to compute the point of regard on surface or the gaze direction.
A simple calibration procedure of the individual is usually needed before using the gaze estimation method.
However, the gaze estimation system based on infrared illumination have many limitations like below:
1. The infrared illumination can be affected by the sunshine in outdoor scenario.
2. The relative position between the infrared lights and the camera need to be calibrated carefully.
7
3. The pupil and the glint are very small, usually a high-resolution camera is needed.
So most current gaze estimation system can only work in indoor scenario. To solve this problem and apply the gaze estimation system in outdoor scenario, we focus on the research that estimates the gaze by common cameras, including the remote camera and the head-mounted camera.
For the remote camera, since an eyeball is a part of the head, gaze direction can be represented in the coordinate system of the head if the head pose is known. To estimate the gaze estimation, we must first detect the face in the image. This requires a platform that can detect the face and determine the head pose quickly and accurately when constructing a gaze estimation system. Refer to the platform, there are many mature commercial products existing until now. One of them, Kinect sensors, which can acquire both color and depth cues, have become widely used in human–machine interaction tasks. Based on the Kinect SDK (Software Development Kit), head pose and face tracking can be acquired at the rate of 30 fps. Figure 1.1 shows the platform and the head pose and a face tracking result.
For the head-mounted camera, since the camera can have a direct view of the eye, we do not need any information about the head pose or the eye position in images.
To achieve such an eye image, we put a common RGB camera on a glasses frame.
The platform and the image acquired by the camera are shown in Fig. 1.2. Since the eye camera is mounted on the head, the position of eyeball center at the coordinate system of head-mounted eye camera does not change unless the position of eye camera is changed. Once the position of eye center is known, what we need to do is only to determine the direction vector of gaze.
8
Fig. 1.1: The Kinect sensor and the head pose detection.
Fig. 1.2: Head-mounted camera and captured eye image.
9 1.3 Contributions
In this thesis, we focus on gaze estimation from color cues based on an eye model.
For the remote camera, we assume the head pose is known from depth cues from a RGB-D camera. In comparison to other eye-model-based methods of gaze estimation, the contributions are as follows:
x An eyeball center calibration protocol is introduced. In contrast to the conventional target-gazed calibration methods, the protocol requires the user to fixate on the camera from different directions, effectively generating samples of the eyeball oriented in different directions and reducing occlusions by a target located in front of the user.
x We present an innovative method for iris fitting, the problem of determining the eyeball orientation that aligns best with the edges found in the color image. Instead of the conventional five parameters for fitting an ellipse, our fitting process requires determining only two unknown parameters.
For the head-mounted camera, we propose a new method for the estimation of the eyeball center position and the iris contour separately for gaze tracking. By decoupling these two factors, we propose to make two contributions to the process of gaze estimation using a head-mounted eye camera as follows:
x We represent the ellipse of an iris contour projected onto the image using only two parameters. To the best of knowledge, in all estimation approaches using a head-mounted eye camera, the fitting of an ellipse to
10
the iris contour is performed using five unknowns during the entire process of gaze tracking.
x The other contribution is related to the calibration of the center of the eyeball. In contrast to existing methods that estimate the eyeball center position by fitting an ellipse to the iris contour using five parameters [24] and other offline calibration methods [3, 4], automatic online eyeball center calibration is realized by using our iris fitting method with two parameters iteratively and employing a multiple frame strategy.
1.4 Organization
The rest of this thesis is organized as follows: Related research is introduced in the next chapter. Chapter 3 introduces the basic and related knowledge that can help the readers to understand our method easier. In Chapter 4, the method that gaze estimation from a remote camera is introduced. And the method that gaze estimation from a head-mounted camera is introduced in Chapter 5. Finally, conclusions are given in Chapter 6.
11 CHAPTER 2 Fundamentals
As the subject of this thesis is gaze estimation on the remote camera and the head-mounted camera, first some fundamentals need to be introduced to help understanding this thesis. In this chapter, we start with the explanation of a physical model of human’s eye. Then the camera model and projection are introduced. To understand this thesis better, the knowledge of ellipse fitting are recommended, we would introduce this part at the end of the chapter.
2.1 Eye
The eyes are wonderful sensory organs. They help people learn about the world in which people live. Eyes see all sorts of things - big or small, near or far, smooth or textured, colors and dimensions. The eyes have many parts - all of which must function in order to see properly.
2.1.1 Inside the eye
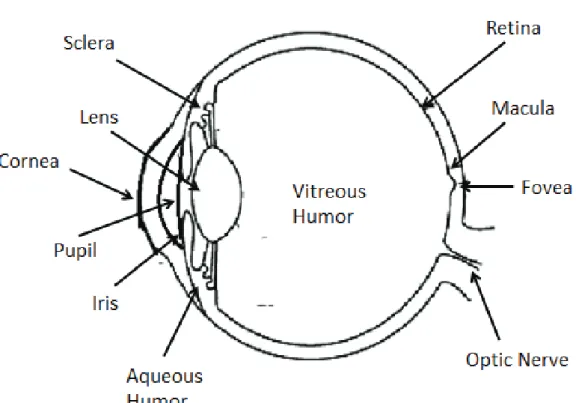
In addition to the many sections of the eyeball itself, muscles are attached to the outer walls of the eyeball. The eye muscles are attached to eyes in order to move the eyes. Figure 2.1 shows these main parts. If anything goes wrong, such as from diabetic eye disease, an individual might not be able to see as well. Visual information from the retina in the eye travels to the brain via the optic nerve. When eyes see an object, two images from them are slightly different since there is a distance between them. Therefore, the brain must mix the two images to get a complete picture.
What we think of as seeing is the result of a series of events that occur among the eye, the brain, and the outside world. Light reflected from an object passes
12
through the cornea of the eye, moves through the lens which focuses it, and then reaches the retina at the very back where it meets with a thin layer of color-sensitive cells called the rods and cones. Because the light crisscrosses while going through the cornea, the retina "sees" the image upside down. The brain then "reads" the image right-side up [41].
Glossary
x Aqueous Humor: a clear, watery fluid that fills the front part of the eye between the cornea, lens and iris.
x Cornea: the transparent outer portion of the eyeball that transmits light to the retina.
x Fovea: A tiny spot located in the macula that is the area of clearest vision on the retina.
x Iris: the colored, circular part of the eye in front of the lens. It controls the size of the pupil.
x Lens: the transparent disc in the middle of the eye behind the pupil that brings rays of light into focus on the retina.
x Optic Nerve: the important nerve that carries messages from the retina to the brain.
x Retina: the inner layer of the eye containing light-sensitive cells that connects with the brain through the optic nerve. It also contains retinal blood vessels which feed the retina and which can be affected by diabetes.
x Sclera: the white part of the eye that is a tough coating which, along with the cornea, forms the external protective coat of the eye.
13
x Vitreous Humor: a colorless mass of soft, gelatin-like material that fills the eyeball behind the lens.
x Macula: is a small area of the retina located near the optic nerve at the back of the eye. It is responsible for our central, most acute vision.
x Pupil: the circular opening at the center of the iris that controls the amount of light into the eye.
Fig. 2.1: Eye structure
14 2.1.2 Working principle of eye
This section refers to Ref. [40], which can help readers to understand the working principle of eye. The eye is made up of three layers: the outer layer called the fibrous tunic, which consists of the sclera and the cornea; the middle layer responsible for nourishment, called the vascular tunic, which consists of the iris, the choroid, and the ciliary body; and the inner layer of photoreceptors and neurons called the nervous tunic, which consists of the retina.
The eye also contains three fluid-filled chambers. The volume between the cornea and the iris is known as the anterior chamber, while the volume between the iris and the lens is known as the posterior chamber, both chambers contain a fluid called aqueous humor. Aqueous humor is watery fluid produced by the ciliary body. It maintains pressure and provides nutrients to the lens and cornea. Aqueous humor is continually drained from the eye through the Canal of Schlemm. The greatest volume, forming about four-fifths of the eye, is found between the retina and the lens called the vitreous chamber. The vitreous chamber is filled with a thicker gel-like substance called vitreous humor which maintains the shape of the eye.
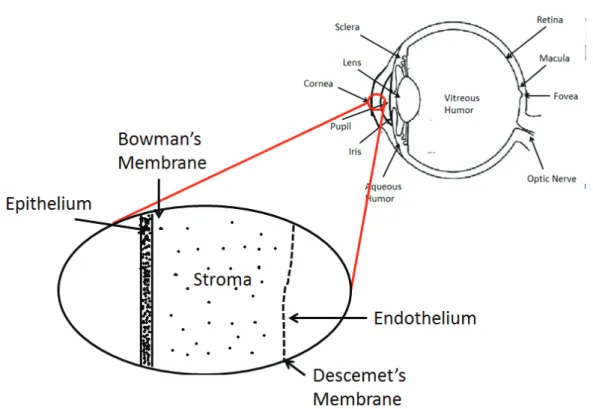
Light enters the eye through the transparent, dome shaped cornea. The cornea consists of five distinct layers (Fig. 2.2). The outermost layer is called the epithelium which rests on Bowman's Membrane. The epithelium has the ability to quickly regenerate while Bowman's Membrane provides a tough, difficult to penetrate barrier.
Together the epithelium and Bowman’s Membrane serve to protect the cornea from injury. The innermost layer of the cornea is called the endothelium which rests on Descemet's Membrane. The endothelium removes water from cornea, helping to keep
15
the cornea clear. The middle layer of the cornea, between the two membranes is called the stroma and makes up 90% of the thickness of the cornea.
From the cornea, light passes through the pupil. The amount of light allowed through the pupil is controlled by the iris, the colored part of the eye. The iris has two muscles: the dilator muscle and the sphincter muscle. The dilator muscle opens the pupil allowing more light into the eye and the sphincter muscle closes the pupil, restricting light into the eye. The iris has the ability to change the pupil size from 2 millimeters to 8 millimeters.
Just behind the pupil is the crystalline lens. The purpose of the lens is to focus light on the retina. The process of focusing on objects based on their distance is called accommodation. The closer an object is to the eye, the more power is required of the crystalline lens to focus the image on the retina. The lens achieves accommodation with the help of the ciliary body which surrounds the lens. The ciliary body is attached to lens via fibrous strands called zonules. When the ciliary body contracts, the zonules relax allowing the lens to thicken, adding power, allowing the eye to focus up close. When ciliary body relaxes, the zonules contract, drawing the lens outward, making the lens thinner, and allowing the eye to focus at distance.
Light reaches its final destination at the retina. The retina consists of photoreceptor cells called rods and cones. Rods are highly sensitive to light and are more numerous than cones. There are approximately 120 million rods contained within the retina, mostly at the periphery. Not adept at color distinction, rods are suited to night vision and peripheral vision. Cones, on the other hand, have the primary function of detail and color detection. There are only about 6 million cones contained within the retina, largely concentrated in the center of the retina called the
16
fovea. There are three types of cones. Each type receives only a narrow band of light corresponding largely to a single color: red, green, or blue. The signals received by the cones are sent via the optic nerve to the brain where they are interpreted as color.
People who are color blind are either missing or deficient in one of these types of cones.
Fig. 2.2: Cornea structure
17 2.2 Camera model
A camera model is a function which maps our 3-dimensional world onto a 2- dimensional plane, called the image plane. Generally, this function is designed to closely model a real-world, physical camera. There are many camera models of varying complexity, and a natural dividing line which helps categorize them is whether or not they are able to capture perspective.
2.2.1 Pinhole camera model
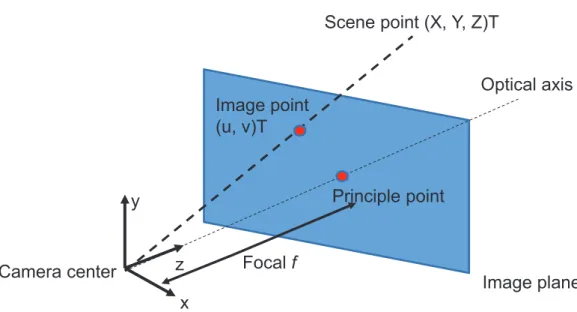
The Pinhole camera is the simplest camera in various camera models. When using a pinhole camera, this geometric mapping from 3D to 2D is called a perspective projection. The line perpendicular to the image plane passing through the camera center as the optical axis (Fig. 2.3). Moreover, the intersection point of the image plane with the optical axis is called the principal point. We assume that the image plane is positioned parallel to the xy-plane, at position z=f, so the coordinate of the principal point is (0, 0, f)T.
Considering a 3D scene point (X, Y, Z)T and its corresponding image point (u, v)T. By looking at similar triangles, the correspondence of these two points can be written as below,
ቐ ݑ ൌ
כ
ݒ ൌ
כ
,
(2.1)Then, to avoid such a non-linear division operation, the relation below can be reformulated using the projective geometry framework, as
ሺߣݑǡ ߣݒǡ ߣሻ் ൌ ሺ݂ܺǡ ܻ݂ǡ ܼሻ்
,
(2.2) This relation can be expressed in matrix notation by18 ߣ ቆ
ݑ ݒ
ͳቇ ൌ ൭݂ Ͳ Ͳ Ͳ ݂ Ͳ Ͳ Ͳ ͳ
Ͳ Ͳ Ͳ
൱ ቌ
ܻܺ
ܼ ͳ
ቍ, (2.3)
Where ߣ ൌ ܼ is the homogenous scaling factor.
Fig. 2.3: Pinhole camera model y
z x Camera center
Scene point (X, Y, Z)T
Image point (u, v)T
Image plane Optical axis
Principle point
Focal f
19 2.2.2 Camera calibration with OpenCV
This section refers to Ref. [42], which can help readers to understand the camera calibration with OpenCV. Cameras have been around for a long-long time.
However, with the introduction of the cheap pinhole cameras in the late 20th century, they became a common occurrence in our everyday life. Unfortunately, this cheapness comes with its price: significant distortion. Luckily, these are constants and with a calibration and some remapping we can correct this. Furthermore, with calibration we may also determine the relation between the camera’s natural units (pixels) and the real world units (for example millimeters).
For the distortion OpenCV takes into account the radial and tangential factors.
For the radial factor one uses the following formula:
ݔ௧ௗൌ ݔሺͳ ݇ଵݎଶ ݇ଶݎସ ݇ଷݎሻ
ݕ௧ௗൌ ݕሺͳ ݇ଵݎଶ ݇ଶݎସ ݇ଷݎሻ (2.4) So for an old pixel point at (x, y) coordinates in the input image, its position on the corrected output image will be (xcorrected, ycorrected). The presence of the radial distortion manifests in form of the “barrel” or “fish-eye” effect.
Tangential distortion occurs because the image taking lenses are not perfectly parallel to the imaging plane. It can be corrected via the formulas:
ݔ௧ௗ ൌ ݔ ሾʹଵݔݕ ଶሺݎଶ ʹݔଶሻሿ
ݕ௧ௗ ൌ ݕ ሾʹଶݔݕ ଵሺݎଶ ʹݕଶሻሿ (2.5) So we have five distortion parameters which in OpenCV are presented as one row matrix with 5 columns:
ܦ݅ݏݐݎݐ݅݊௧௦ ൌ ሺ݇ଵ݇ଶଵଶ݇ଷሻ (2.6) Now for the unit conversion we use the following formula:
20 ߣ ቆ
ݑ ݒ ͳቇ ൌ ൭
݂ Ͳ ܿ௫ Ͳ ݂ ܿ௬
Ͳ Ͳ ͳ
Ͳ Ͳ Ͳ
൱ ቌ
ܻܺ
ܼ ͳ
ቍ (2.7)
where the presence of ߣ is explained by the use of homography coordinate system (and ߣ ൌ ܼ). The unknown parameters are f (camera focal lengths) and (cx, cy) which are the optical centers expressed in pixel’s coordinate. The matrix containing these three parameters is referred to as the camera matrix. While the distortion coefficients are the same regardless of the camera resolutions used, these should be scaled along with the current resolution from the calibrated resolution.
The process of determining these two matrices is the calibration. Calculation of these parameters is done through basic geometrical equations. The equations used depend on the chosen calibrating objects. Currently OpenCV supports three types of objects for calibration:
z Classical black-white chessboard.
z Symmetrical circle pattern.
z Asymmetrical circle pattern.
Basically, we take snapshots of these patterns with the camera and let OpenCV find them. Each found pattern results in a new equation. To solve the equation we need at least a predetermined number of pattern snapshots to form a well- posed equation system. This number is higher for the chessboard pattern and less for the circle ones. For example, the chessboard pattern requires at least two snapshots.
However, in practice we have a good amount of noise present in our input images, so for good results we will need at least 10 good snapshots of the input pattern in different positions.
21 2.2.3 The RGB camera
The RGB color model is an additive color model in which red, green and blue light are added together in various ways to reproduce a broad array of colors. The name of the model comes from the initials of the three additive primary colors, red, green and blue. An RGB camera delivers the three basic color components on three different wires. This type of camera often uses three independent CCD sensors to acquire the three color signals. RGB cameras are used for very accurate color image acquisitions.
2.2.4 The RGB-D camera
The RGB-D camera is based on the RGB camera, and the major difference is that an IR camera is used to take the depth data, that means by the RGB-D camera we can know the distance between the object and the camera. Sometimes the depth information is very useful in doing some research, RGB-D camera can supply us with more information (depth information) than the RGB camera and more convenient. Up to now, some commercial RGB-D cameras are widely used in many fields, like Microsoft Kinect, Inter RealSense, Asus Xtion Pro.
22 2.3 Ellipse fitting
Traditional iris fitting methods always take the iris contour as an ellipse. And based on detected iris edge points on an image, a set of the general equations of an ellipse can be formulated. Then by solving the nonlinear function set, the five parameters of the ellipse can be obtained, so the iris contour is obtained. We call these methods five parameters iris fitting methods (FIFM). The general equation of an ellipse is introduced below, which refers to Ref. [43].
The standard equation for an ellipse, x2 / a2 + y2 / b2 = 1, represents an ellipse centered at the origin and with axes lying along the coordinate axes. In general, an ellipse may be centered at any point, or have axes not parallel to the coordinate axes. But such an ellipse can always be obtained by starting with one in the standard position, and applying a rotation and/or a translation. For the most general formulation, we can include rotations through an angle of 0 (that is, no rotation at all) and translations by the zero vector (no translation at all). Then every ellipse can be obtained by rotating and translating an ellipse in the standard position. Accordingly, we can find the equation for any ellipse by applying rotations and translations to the standard equation of an ellipse.
It is a matter of choice whether we rotate and then translate, or the opposite. To see this, let R represent a rotation, and consider what happens to a point x = (x, y) if we first translate by vector v, and then apply R. The result will be R(x + v) = Rx + Rv, because R is linear. But this is the same as first rotating x, and then translating by Rv. This shows that every ellipse can be obtained from one in the standard position by either a rotation followed by a translation, or a translation
23
followed by a rotation. In developing a general equation for ellipses, we will use rotation and then translation.
Rotation counterclockwise about the origin through an angle α carries (x, y) to (x cos α − ysin α, ycos α+x sin α) (derived here). The inverse operation can be obtained by rotating through 2π − α, and hence carries (x, y) to (x cos α + y sin α, y cos α − x sin α). Applying the methods of equation of a transformed ellipse now leads to the following equation for a standard ellipse which has been rotated through an angle α.
(2.8) Expanding the binomial squares and collecting like terms gives
(2.9) which is in the form Ax2 + Bxy + Cy2 = 1, with A and C positive. In this way we see that the equation for a rotated ellipse, centered at the origin is a quadratic with a nonzero xy term.
We have seen that a rotated ellipse, centered at the origin, is always given by an equation of the form Ax2 + Bxy + Cy2 = 1, where A and C are positive, and B2 − 4AC < 0. To complete the analysis of the general equation of an ellipse, note that translating a curve by a fixed vector (h, k) simply has the effect of replacing x by x − h and y by y − k in the equation for that curve. Accordingly, the general equation for a rotated ellipse centered at (h, k) has the form A(x − h)2 + B(x − h)(y − k) + C(y − k)2 = 1, again where A and C are positive, and B2 − 4AC < 0. Note also that
24
expanding the general form of the translated ellipse will introduce, for the first time, x and y terms. In fact the expanded version is
Ax2 + Bxy + Cy2 − (2Ah + kB)x − (2Ck + Bh)y + (Ah2 + Bhk + Ck2 − 1) = 0. (2.10) So the five parameters of an ellipse are axes (a, b), ellipse center (h, k), rotated angle α.
25 CHAPTER 3 Related Research
In this section, we first give an explanation of eye-model in brief. Then, we introduce the related works focused on gaze estimation. Last, the related works about eyeball center calibration and iris fitting related to the remote camera approach and the head-mounted approach are introduced.
3.1 Eye model
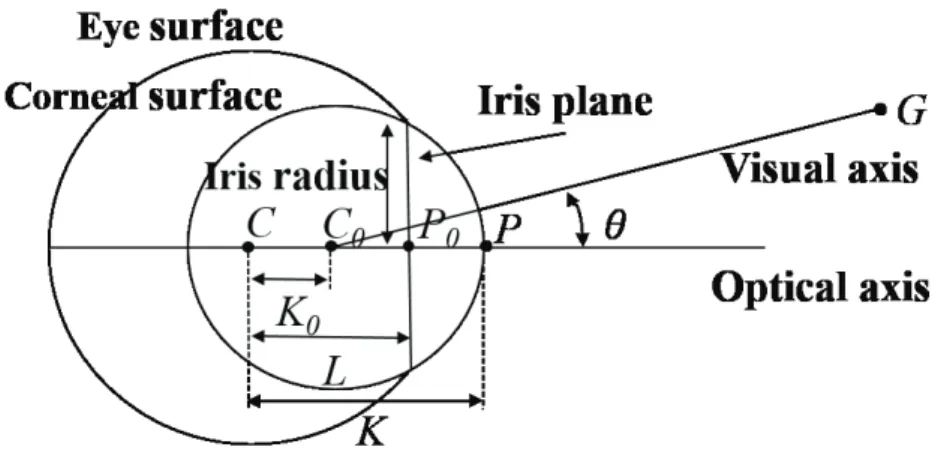
Figure 3.1 shows a simple eye-model of humans [5]. The eyeball consists of two spheres of different sizes. The anterior smaller sphere is the cornea, which contains the iris. As a result of human biological structure, the real gaze direction is not the same as the direction that passes through the eyeball center C and the iris center P. Generally, we take the real gaze direction to be the visual axis from corneal center C0 to gaze point G. The theoretical direction is called the optical axis, and these two axes form a constant angle ̊. K is the distance between the eyeball and iris centers, and K0 is the distance between the eyeball and corneal centers. Moreover, in three-dimensional (3D) space, because the cornea resembles a ball, there should be another internal iris center P0 beside the iris center P, as shown in Fig. 3.1. The iris plane is the cross section of the cornea perpendicular to the optical axis and through P0. In this thesis, we call P0 the internal iris center to distinguish it from the iris center P. L is the distance between the eyeball and internal iris centers.
26
Note that the optical axis is the normal vector of the iris plane. If we know the optical axis, the visual axis corresponding to gaze direction can be determined using human’s biometric parameters.
Fig. 3.1: 3D eye model. The optical and visual axes maintain a constant geometric relationship. The optical axis can be determined from eyeball center C and iris center P. The visual axis can be calculated from the known optical axis, as the eye parameters are known.
27 3.2 Gaze estimation
Gaze estimation methods can be divided into feature-based and appearance- based ones. Appearance-based methods do not extract features explicitly, but learn a direct mapping from high-dimensional eye images to the low-dimensional space of gaze coordinates [6, 7, 8]. Lu et al. [8] introduced an accurate adaptive linear regression method for mapping from sparsely collected training samples, but the method requires a fixed head pose. To solve the appearance-based gaze estimation problem under free head motion, Lu et al. [7] decompose the problem into sub- problems, including initial estimation under fixed head pose and subsequent compensations for estimation biases. Each sub-problem is solved using either a learning-based method or geometric calculation. However, appearance-based methods require large sets of training data to deal with eye image variations when learning a general mapping, owing to differences in appearance, illumination, head pose, scale, and eyelid movement. Noris et al. [9] used specialized head-mounted hardware to track the gaze in unconstrained environments. Zhu et al. [10] constructed a highly nonlinear generalized gaze mapping function that accounts for head movement by using support vector regression. These methods require an additional device.
Unlike appearance-based methods, feature-based methods extract features such as corneal infrared reflections, pupil center, and iris contour [11, 12, 13]. These features are used to set up a 3D eye model and then estimate the gaze direction.
Feature-based methods can be highly accurate under free head movement. However, this kind of method has the disadvantage that special cameras or lights are required to extract eye features [14, 15]. One or more infrared lights are used to illuminate the
28
eye region and to build the corneal refection on the corneal surface, while one or more cameras are used to capture the image of the eye [5]. Instead of using infrared lights and their corneal reflections, Ishikawa et al. [16] used a global head model to track the entire head and eye contour, but they used template matching to find the iris and refined the iris location by using an ellipse fitting algorithm. Chen et al. [4] proposed a 3D eye gaze estimation and tracking algorithm based on facial feature tracking using a single camera, but they labeled the iris center manually.
With respect to RGB-D camera-based gaze estimation, Refs. [17, 18] combine a Kinect camera with another high-resolution camera, and Refs. [19, 20] use a single Kinect camera. Ref. [19] uses an appearance-based method to learn a direct mapping from the eye image to gaze parameters, with the error of gaze direction reported to be more than 20° for a moving target under extreme head movements. Ref. [20] is regarded as a hybrid approach in the sense that an eye model is incorporated into the learning process, with the average gaze direction error reported to be 3.4° in an experiment with people looking at screen targets.
Since gaze estimation aims to measure the 3D direction of the visual axis of the eyeball, which is determined from eyeball and iris centers, as shown in Fig. 3.1, we believe that the eye-model-based method is a good choice, if we can calibrate the related eye model parameters accurately. With the appearance-based method, the mapping between the eye region image and the gaze direction is learned by training from samples. Gaze extrapolation must be conducted, and over-fitting can occur during the training phase.
29 3.3 Remote camera approach
When a remote camera is used, users’ head moves freely at the camera coordinate system. To estimate the optical axis of eyeball, we need to estimate the center position of eyeball continuously. Conventional methods calibrate the eyeball center in head coordinate system, and then estimate the head pose continuously. Iris fitting is also challenging because of the image’s low quality.
Xiong et al. [3] use a simple onetime calibration procedure to obtain the eyeball center. Nine points are predefined on the monitor screen to be looked at, the calibration is achieved by minimizing the sum of angles between predicted gaze direction and the ground truth. Although nine points pattern method is a very common way for eyeball calibration, there are various principles in different researches. Chen et al. [4] compute the 3D position of the eyeball center based on the middle point of two eye corners. While Li et al. [31] use the principle that the optical axis and visual axis have a fixed angle. Besides nine points pattern method, there is a more convenient method that does not need any offline step. Wang et al. [24] make use of the observation that the iris contour while being a circle in 3D is an ellipse in the image, the eyeball center can be estimated from the ellipse/circle correspondence, but this method requires an accurate iris contour detection. About iris fitting in less unconstrained environments, there are various methods are proposed. Mahadeo et al.
[21] propose a region based segmentation method for accurate eyelid detection in images with variable illumination and significant blur. Eyelashes are divided into two categories and eliminated. Du et al. [22] employ a coarse-to-fine segmentation scheme to improve the overall efficiency, uses a direct least squares fitting of ellipse
30
method to model the deformed pupil and limbic boundaries, and develops a window gradient-based method to remove noise in the iris region.
31 3.4 Head-mounted camera approach
Different from a remote camera, a head-mounted eye camera has a direct view of eye and no head pose is needed. Given a set of iris contour candidate feature points, we need to find the best fitting ellipse from the eye image.
To date, extensive research has been performed on this topic. The least squares fitting of an ellipse is a common choice [23], but gross errors made in the feature detection stage can strongly influence the accuracy of the results. Therefore, a more efficient fitting algorithm is proposed. Li et al. [2] fit an ellipse to a subset of the detected edge points using the random sample consensus (RANSAC) paradigm [25].
The best fitting parameters are then used to initialize a local model-based search for the ellipse parameters that maximize the fit to the image data. So far, the ellipse fitting method [2] is considered to be one of the most efficient methods and is applied in many studies. Zhang et al. [26] explore a new networking mechanism using smart glasses, through which users can express their interest and connect to a target simply by a gaze. Moreover, Takemura et al. [27] present more appropriate information about a persons’ gaze when moving over a wide area and include visualization of the scan paths when the user with a head-mounted device makes natural head movements.
32 CHAPTER 4
Gaze estimation from remote camera
In this chapter, we describe the proposed method of gaze estimation from a remote camera, using a RGB-D camera, Kinect.
Our method’s basic principle is similar to that of [31] and [28]. These studies track the iris center and calibrate the personalized eyeball center. Our method has these characteristics:
x The method is simple, based only on the eye model and known head pose.
x We introduce a method of eyeball center calibration by gazing at the camera center from different directions (Fig. 4.1b). Traditionally, a common point is used as a target for data training or parameter calibration (Fig. 4.1a). With our approach, the problem of the face being
Target
(a) (b)
Fig. 4.1: a) Gazing at a target for data training or parameter calibration. b) Gazing at the center of the RGB camera for data training or parameter calibration.
33
occluded by the target during eyeball center calibration can be eliminated.
x We estimate the iris center by fitting an ellipse on the RGB image using the eye model and coordinate transformation.
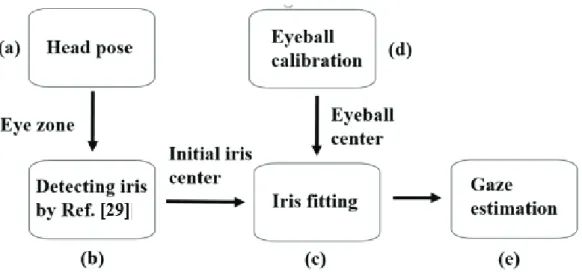
With Kinect, we can build a head coordinate system (Fig. 4.2a), using an iris- center tracking algorithm [29] to obtain the 2D position of the iris center (Fig. 4.2b) and fit the iris edge on images to obtain a more accurate iris center (Fig. 4.2c). A calibration method is used to determine the eyeball center position (Fig. 4.2d). As the iris and eyeball centers are both known, the gaze direction can be estimated (Fig.
4.2e). The following sections describe the details of each step.
34
Fig. 4.2: Main steps of method. a) Achieving head pose and facial feature points by Kinect, the eye zone can also be located. b) The initial position of iris center using the method in [29], and the 2D iris center would be transformed to 3D space by a model. c) From the eye-zone image, edge points of iris would be detected, and iris center position can be obtained by the proposed fitting algorithm. d) Calibrating the eyeball center in head coordinate system based on 3D eye model, we take the RGB camera of Kinect as a target for gazing at from different directions, as the fixed angle relationship, eyeball center can be calibrated. e) Gaze estimation can be calculated in real-time.
35 4.1 The RGB-D camera--Kinect
Kinect is an input device for motion sensing, which is produced by Microsoft for the Xbox 360 video game console and Windows PCs (Fig. 4.3). Based around a webcam-style add-on peripheral for the Xbox 360 console, it enables users to control and interact with the Xbox 360 without the need to touch a game controller, through a natural user interface using gestures and spoken commands.
Microsoft released Kinect software development kit (SDK) for Windows. This SDK will allow developers to write Kinect enabled apps in C++/CLI, C#, or Visual Basic .NET.
Fig. 4.3: Kinect sensor.
36 4.1.1 The sensor
The Kinect sensor is connected to a small base with a motorized pivot and is designed to be positioned lengthwise above or below the video display. The device has two versions i.e. Kinect for Xbox 360 and Kinect for Windows (for commercial purpose).
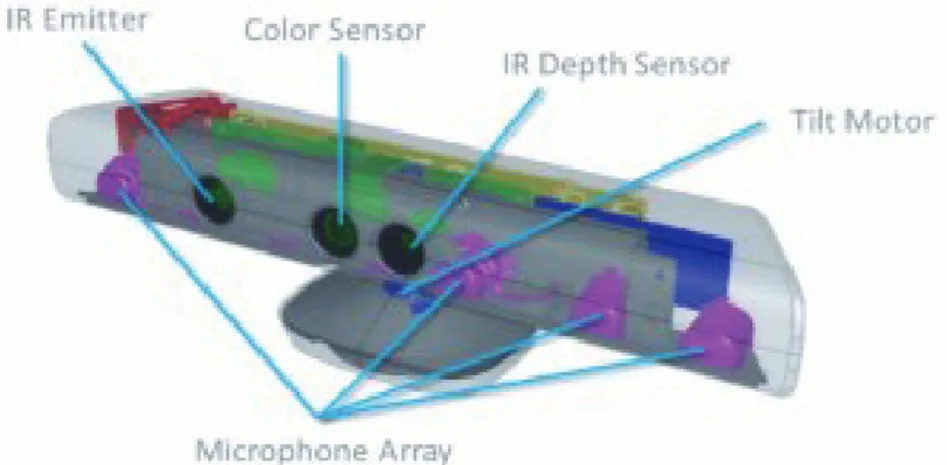
The device features (Fig. 4.4) x RGB camera.
x Depth sensor (IR).
x Multi-array microphone.
x Motor to adjust camera angle.
In addition to the above features, Kinect for Windows offer few extra features i.e.
x Facial recognition
enables to track multiple points in your face like Skeleton Tracking.
x Near Mode
enables the camera to see objects as close as 40 centimeters in front of the device without losing accuracy or precision, with graceful
degradation out to 3 meters.
x Seated or 10 Joints Mode
skeletal tracking which provides the capability to track the head, neck and arms of either a seated or standing user.
37 4.1.2 RGB camera
The default RGB video stream uses 8-bit VGA resolution (640 × 480 pixels) with a Bayer color filter, but the hardware is capable of resolutions up to 1280×960 (at a lower frame rate) and other formats such as UYVY.
4.1.3 Depth sensor (IR)
The depth sensor consists of an infrared laser projector combined with a monochrome CMOS sensor, which captures video data in 3D under any ambient light conditions. The sensing range of the depth sensor is adjustable, and the Kinect software is capable of automatically calibrating the sensor based on gameplay and the player’s physical environment, accommodating for the presence of furniture or other obstacles.
The monochrome depth sensing video stream is in VGA resolution (640 × 480 pixels) with 11-bit depth, which provides 2,048 levels of sensitivity. The Kinect sensor has a practical ranging limit of 3.9 – 11 ft. distance when used with the Xbox software.
Fig. 4.4: Kinect structure.
38 4.1.4 Field view
The area required to play Kinect is roughly 6 m2, although the sensor can maintain tracking through an extended range of approximately 2.3 – 20 ft.
The horizontal field of the Kinect sensor at the minimum viewing distance of
~0.8 m (2.6 ft.) is therefore ~87 cm (34 in), and the vertical field is ~63 cm (25 in), resulting in a resolution of just over 1.3 mm (0.051 in) per pixel.
4.1.5 Microphone array
The microphone array features four microphone capsules and operates with each channel processing 16-bit audio at a sampling rate of 16 kHz.
4.1.6 Face tracking and 3D head pose
The X,Y, and Z position of the user’s head are reported based on a right- handed coordinate system (with the origin at the sensor, Z pointed towards the user and Y pointed up – this is the same as the Kinect’s skeleton coordinate frame).
Translations are in meters. The user’s head pose is captured by three angles: pitch, roll, and yaw (Fig. 4.5).
The Face Tracking SDK tracks the eighty-seven 2D points indicated in the following image (Fig. 4.6)
39
Fig. 4.6: Face tracking.
Fig. 4.5: Head pose.
40 4.2 Coordinate systems
There are four coordinate systems in our method, which correspond to Kinect, head, eyeball and iris, as shown in Fig. 4.7. The coordinate system of the Kinect RGB camera is selected as the Kinect coordinate system, and the Kinect RGB camera is calibrated in advance.
Kinect coordinates are supplied by the Microsoft Face Tracking SDK for Kinect, which enables applications that track human faces in real time. The face- tracking engine of the Face Tracking SDK analyzes input from a Kinect camera, deduces head pose and facial expressions, and provides that information to an application in real time. Our method uses the Kinect face-tracking algorithm because of its reliability and convenience.
The Kinect coordinate system is based on a right-handed coordinate system whose origin is at the RGB camera sensor, with ZC pointing toward the user and YC pointing upward. The Kinect SDK can supply the head pose, which is captured by three angles: pitch, roll, and yaw. We can calculate the rotation matrix from these angles. As we know the translation and rotation matrices T and R, respectively, we can build a head coordinate system that is also based on a right-handed principle. ZH points to the back of the head, while YH points upward. The origin of the system is inside the head, as defined by the SDK. The other two coordinates are in the eyeball coordinate and iris coordinate systems.
41
Fig 4.7: Four coordinate systems: Kinect coordinate, head coordinate, eyeball coordinate, and iris coordinate systems.
42 4.3 Initial iris center detection
Before fitting the iris, we use the algorithm of [29] to achieve the initial iris center position on the image. As the face-tracking algorithm offered by Kinect can detect eye contours, we can obtain an initial eye region. Based on that region, the iris center-detecting algorithm is used, and an initial center is achieved. The accuracy of the algorithm in [29] decreases when the iris is partially occluded by eyelids. As the small white circle in Fig. 4.8(a) shows, the algorithm failed in locating the iris center accurately.
As the initial iris center is ൌ ൫࢛ǡ࢜൯ on the image, its 3D position ࡼ ൌ ൫࢞ǡ ࢟ǡ ࢠ൯ can be estimated using a geometric principle, assuming that the distance between iris center P and eyeball center C is a constant K because we can approximately take the eyeball to be a standard ball, with eyeball center C as its center and iris center P on its surface. On the other hand, if we know the internal parameters of the camera, a ray in 3D space passing through the 2D iris center point of the image also passes through the 3D iris center P, and the ray intersects the 3D eyeball (Fig.
4.8(b)). Related equations are as follows:
ቐ
௫
௨ି௨బ ൌ௩௬
ି௩బ ൌ௭
ඥሺݔെ ݔሻଶ ሺݕെ ݕሻଶ ሺݖെ ݖሻଶ ൌ ܭ (4.1) where ൫࢛ǡ࢜൯is the center of the image and f is the focal length. Eyeball center ൌ ሺ࢞ࢉǡ ࢟ࢉǡ ࢠࢉሻ can be estimated using calibration.
43
(a)
(b)
Fig 4.8: a) The small white circle inside the iris is the iris center detecting result of [29], with the detecting region determined by Kinect. It is the initial value, when fitting the iris. The white cross is the fitting result obtained using our method. b) According to the imaging principle, the ray passing through the 2D iris center on the image from the camera center also passes through the 3D iris center in space, and the 3D iris center is located on the surface of the eyeball. If the eyeball center is known, the intersection can be calculated.
The lower right corner is the image on the Kinect camera screen.
44 4.4 Fitting the iris
We calculate the iris center by fitting the iris because it is more accurate and stable. After projection, the iris, whose shape is nearly a circle in 3D space, can present as different ellipses on images. Here, we show that by using cues provided by Kinect, the ellipse corresponding to the iris contour in a Kinect RGB image can be described using two parameters.
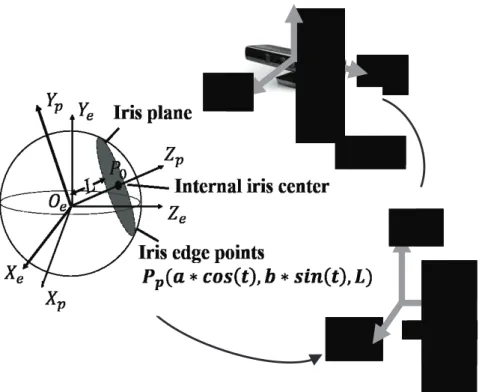
Let the iris and eyeball coordinate systems ࡻെ ࢄࢅࢆ andࡻࢋെ ࢄࢋࢅࢋࢆࢋ, respectively, be constructed as in Fig. 4.7. Note that these coordinate systems have the same origin.
In the iris coordinate system, the ZP axis passes through the iris center perpendicular to the iris plane. According to prior knowledge, the iris in 3D space is nearly a circle. For 3D iris edge pointsࡼሺࢇ כ ࢉ࢙ሺ࢚ሻǡ ࢈ כ ࢙ሺ࢚ሻǡ ࡸሻ, where a is the transverse radius, b is the longitudinal radius, L is the distance between eyeball center and ࡼ is the internal iris center. In Fig. 3.1, L is not the same as K, and t is a parameter. Transforming ࡼ to iris edge points in the eyeball coordinate system ࡼࢋ:
ܲ ൌ ܴכ ܲ (4.2) When the iris is rotating on the eyeball surface, the roll angle will not change relative to the eyeball; hence we can express ࡾ with roll, pitch, and yaw, while the roll is zero.
Then, we transform them to the head coordinate system. The axis of the eyeball coordinate system is set to the same directions as the head coordinate system, meaning that relative to the head coordinate system, the eyeball coordinate system will have translation but no rotation.
45
ܲ ൌ ܲୣ ܶ (4.3) where ࢀࢋ is actually the eyeball position, which can be calibrated to the head coordinate system.
Next, we transform points to the Kinect coordinate system.
ܲ ൌ ܴ כ ܲ ܶ (4.4) After obtaining the 3D pointsࡼࢉሺ࢞ࢉǡ ࢟ࢉǡ ࢠࢉሻ, we project them back to the 2D image. With Equations (4.2-4.4), the image points ࡵ൫࢛ǡ࢜൯ can be expressed as:
ܫ ൌ ܯ כ ܲ (4.5) where M is the internal camera parameters determined by chessboard calibration.
Taking all of these equations and parameters, we can express Equation (4.5) as:
൜ݑ ൌ ݂ሺሺݐሻǡ ሺݐሻǡ ݅ݐ݄ܿǡ ݕܽݓǡ ܴǡ ܶǡ ܽǡ ܾǡ ܮǡ ܯǡ ܶሻ
ݒ ൌ ݃ሺሺݐሻǡ ሺݐሻǡ ݅ݐ݄ܿǡ ݕܽݓǡ ܴǡ ܶǡ ܽǡ ܾǡ ܮǡ ܯǡ ܶሻ (4.6) And from Equation (4.6), we can obtain:
൜ሺݐሻ ൌ ݄ሺݑǡ ݒǡ ݅ݐ݄ܿǡ ݕܽݓǡ ܴǡ ܶǡ ܽǡ ܾǡ ܮǡ ܯǡ ܶሻ
ሺݐሻ ൌ ݇ሺݑǡ ݒǡ ݅ݐ݄ܿǡ ݕܽݓǡ ܴǡ ܶǡ ܽǡ ܾǡ ܮǡ ܯǡ ܶሻ (4.7) Sinceݏ݅݊ଶሺ ݐሻ ܿݏଶሺݐሻ ൌ ͳ, the final objective function is
Ȳሺݑǡ ݒǡ ݅ݐ݄ܿǡ ݕܽݓǡ ܴǡ ܶǡ ܽǡ ܾǡ ܮǡ ܯǡ ܶሻ ൌ Ͳ (4.8) Note that among the parameters of Equation (4.8), only pitch and yaw are unknowns, thanks to the head pose detection function of Kinect. This is a much simpler representation than the conventional ellipse representation with five parameters (The mathematic description can be found in the Appendix of this chapter).
Since Kinect SDK can offer the position of eye corners, we can obtain an eye mask image without eyelids. Then, a set of edge points can be detected from the image by the Canny edge detector. Moreover, the initial 3D iris center P introduced in
46
Section 4.3 can be obtained; hence, a credible initial pitch and yaw are available for iterations. This function can be solved using the Levenberg–Marquardt algorithm (LMA).
For the known edge points, there are outliers existed. To eliminate these outliers and increase calibration accuracy, random sample consensus (RANSAC) is used prior to LMA. After pitch and yaw are determined, the iris center P in the Kinect coordinate system can be obtained gradually from (0, 0, K) in the iris coordinate system using Equations (4.2-4.4). In this way, the accuracy of the iris center, the white cross shown in Fig. 4.8(a), can be improved.
47 4.5 Eyeball center calibration
The eyeball center can be regarded as fixed in the biological structure of the human head. In the proposed method, we calibrate the eyeball center position in the head coordinate system first and need to do that only once. Then, we transform it to the Kinect coordinate in real time.
To conduct the calibration, we use the 3D eye model. As Fig. 3.1 shows, when people are gazing at the target, there is a fixed angle ࣂ between visual and optical axes [5]. The visual and optical axes are expressed as the vectors ሬሬሬሬሬሬሬሬԦࡳ and ሬሬሬሬሬሬሬሬԦࡼ, respectively. The two vectors are related to the position ǡ which can be expressed by the eyeball center C. By using the iris fitting method which is introduced in section 4.4, the 2D iris center can be obtained. Next we obtain an accurate G point. Figure 4.1b illustrates how to calibrate the eyeball center. During the calibration, the observer keeps gazing at the Kinect RGB camera from different directions. In this case, the coordinate of the target point G must be the origin in the Kinect coordinate system.
For the equation, first assume that the eyeball center in the head coordinate system isࢀሺ࢞ǡ ࢟ǡ ࢠሻ. As a result of the calculation performed in the Kinect coordinate system, ࢀ܍ must also be transformed to Kinect coordinates using Equation (4.9):
ܥ ൌ ܴ כ ܶ ܶ (4.9) As Equation (4.1) describes, the 3D iris center P can be deduced from the 2D iris center from unknown C:
ܲ ൌ ݂ሺܥሻ (4.10) Since K and ࡷ are constants [5], can be estimated as follows:
48
ܥ ൌ ܥ బሺܲ െ ܥሻ (4.11) Then, according to a relationship between the two vectors, we obtain the following equation:
ሬሬሬሬሬሬሬሬԦήబீ ሬሬሬሬሬሬሬԦబ
ฮሬሬሬሬሬሬሬሬԦฮฮబீ ሬሬሬሬሬሬሬԦฮబ
ൌ ߠ
(4.12) Finally, the only unknown parameter isࢀࢋ. To solve the nonlinear equation, we use LMA and RANSAC.49 4.6 Gaze estimation
After calibration, the gaze direction can be estimated automatically in real time. First, we transform the calculated eyeball center to the Kinect coordinate system using the calculated rotation and translation matrices. The 3D eyeball position can be obtained in the Kinect coordinate system at this time and frame. The 3D position of the iris center P is obtained by fitting. Then, the eyeball center ࢀࢋ is calibrated. Thus, we can calculate the optical axis frame by frame. The direction of the gaze ࢍ can be estimated and expressed as horizontal and vertical angles ሺࢾǡ ࣐ሻ. Finally, the visual axis can be obtained by adding the constant angle values (ࢾࢋǡ ࣐ࢋ) (Fig. 4.9).
Fig. 4.9: Orientation of the optic axis of the eye (defined in Fig. 2 as in [5]).
50 4.7 Error analysis
To determine the gaze estimation errors corresponding to iris center errors, we first need to know the real distance that one pixel indicates. Assuming that the eyeball center is accurately estimated, the distance between Kinect and the person is d, and the focal length is f, one pixel indicates a distance of ࢊȀࢌ in the real situation resulting from the proportional relation. If the detecting result has an n-pixel error, then the real distance error is כ ࢊȀࢌ. As the eyeball radius is K, the gaze estimation angle errors can be expressed provably as follows:
ߠ ൌ ܽݎܿݐܽ݊ ሺ݊ כ ݀ ݂ כ ܭΤ ሻ (4.13) The gaze estimation errors with pixel errors at different distances are shown in Fig. 4.10: f = 1033, K = 1.31 cm. Since Kinect cannot detect the human structure if the distance between the human and Kinect is less than 50 cm, the analysis range is from 60 cm to 100 cm. Taking 60 cm as an example, when the iris detecting error is one pixel, the final gaze estimation has a 2.5-degree error. If the final gaze estimation error increases rapidly with increasing pixel error, then it would have a 12-degree error, when there was a five-pixel error in iris detection.
The error analysis yields three conclusions about the gaze estimation error:
In terms of (4.13), it is proportional to the iris center detecting error, as n increases,
In terms of (4.13), it is proportional to the distance between the Kinect and human, as d increases,
In terms of (4.13), it is inversely proportional to the image resolution, as f decreases.
51
With respect to how gaze estimation depends upon head pose estimation error, Reference [30] reported a position accuracy of 3-6 mm at a distance of 1-2.5 m when tracking the face by Kinect SDK. Thus, the additional error due to head estimation accuracy when the user is at 60cm would be 0.57 degrees or less.
Fig. 4.10: Gaze estimation errors when the distance changed or iris detecting errors occurred.
52 4.8 Evaluation
A series of experiments was conducted to verify the effects of the proposed method. The known eye parameters used in these experiments are the average human eye values [5] shown in Table 4.1.
The experiments are conducted on a 1,280 × 960 RGB image from Kinect.
The distance from camera to the subjects is approximately 60 cm. We realized this method using Visual C++ on a 2.5GHz Inter(R) Core(TM) i5-2400S processor and a 8GB RAM.
53 TABLE4.1
VALUES OF THE EYE PARAMETERS
Parameter
Description Value
K Distance between the center of the eyeball and the center of iris.
13.1 mm
L Distance between the center of the eyeball and the internal center of iris.
10.5 mm
ܭ Distance between the center of the eyeball and the center of corneal.
5.3 mm
a Transverse radius 6 mm
b Longitudinal radius 5.5 mm
ߜ Horizontal angle between visual and optical axis of the eye
−5° for the right eye, 5° for the left eye
߮ Vertical angle between visual and optical axis of the eye
1.5°