Kinect
堀 真弓 廣安 知之 山本 詩子
2014
年
9
月
19
日
IS Report No. 2014092901
Report
Medical Information
System Laboratory
Abstract
Kinect for Windows
とは2012
年2
月に発売されたRGB
カメラ,距離カメラ,マイクアレイを有するモーションセンサーデバイスである.また,新たに各センサーの性能を向上させた
Kinect for
Windows v2
が2014
年7
月に発売された.本稿では,そのKinect for Windows v2
の環境設定やカ ラー画像,距離画像などの基本機能について述べる.目 次
第1
章 はじめに. . . .
2
第2
章 環境設定. . . .
3
2.1
動作要件. . . .
3
2.2
環境構築. . . .
3
第3
章 基本機能. . . .
5
3.1
プログラム作成. . . .
5
3.2
画像表示. . . .
5
3.3
Body
表示. . . .
6
3.4
ポーズ認識. . . .
7
付 録A
プログラム. . . .
8
A.1
基本プログラム. . . .
8
A.2
ポーズ認識プログラム. . . .
11
第
1
章 はじめに
Kinect
とは,Microsoft
社が発売しているXbox 360
用のコントローラーであり,ハードウェア機能として
RGB
カメラ,距離カメラ,マイクアレイ,チルトモーターを有している.また,これらの機能,特に距離カメラを使用してプレイヤーの認識,骨格の認識を行うことが可能であり,それらを追 跡することによりプレイヤーの動きを
3
次元データとして取得することが可能となっている.しか し,従来のKinect
はXbox 360
以外の機器への接続をサポートされていない.そのため,2012
年2
月に
Windows PC
への接続がサポートされ,商用目的での利用制限もないKinect for Windows(
以降Kinect v1)
が発売された.Kinect v1
のハードウェア機能は従来のKinect
と変わらず,プレイヤーの骨格の認識・追跡機能を用いた開発が可能となった1) .さらに,
2014
年7
月にはRGB
カメラ・距離カメラの解像度や取得可能関節数の増加など,大幅に精度の向上された
kinect for Windows v2(
以降第
2
章 環境設定
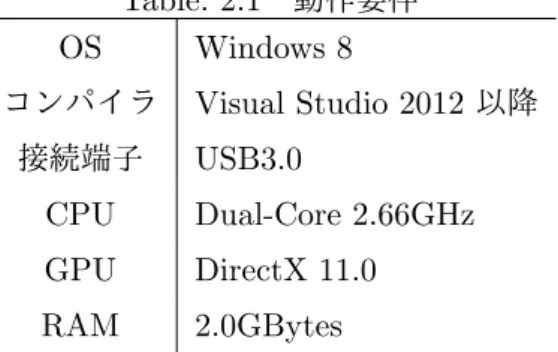
2.1
動作要件
Kinect v2
の動作要件をTable. 2.1
に表す.Table. 2.1
動作要件OS
Windows 8
コンパイラVisual Studio 2012
以降 接続端子USB3.0
CPU
Dual-Core 2.66GHz
GPU
DirectX 11.0
RAM
2.0GBytes
Kinect v1
はWindows 7
以降で動作したが,Kinect v2
ではWindows 8
で動作する.それに合わせ てVisual Studio
も2012
以降が要求されている.また,接続端子についても,Kinect v1
ではUSB2.0
で動作していたが
Kinect v2
では各センサーの性能の向上に伴い,データ転送速度の速いUSB3.0
が要求されている.
2.2
環境構築
Kinect v2
を用いた開発には,Microsoft
社が無償で公開しているKinect for Windows SDK
が必 要となる.以下にSDK
のインストール手順を示す.1.
以下のサイトより,最新版のSDK(Kinect for Windows SDK 2.0 Public Preview)
をダウンロードする.ダウンロードサイトの画面を
Fig. 2.1
に示す.http://www.microsoft.com/en-us/download/details.aspx?id=43661
Fig. 2.1
SDK
ダウンロードサイト(
自作)
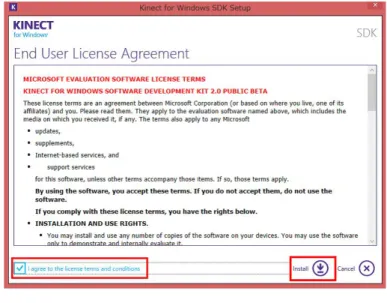
2. SDK
のインストーラーを起動し,Fig. 2.2
に示す確認画面より使用許諾契約を確認・同意しイ2.2
環境構築 第2
章 環境設定Fig. 2.2
使用許諾契約の確認(
自作)
3.
インストールが正常に完了した後,インストーラーを閉じ,Kinect v2
をPC
に接続すると,先 にインストールした各種ドライバーが自動的に適応される.インストールが終了すると,以下 のプログラムがPC
内に入る.• Gesture Builder
• Kinect Studio v2.0
• SDK Browser v2.0 (Kinect for Windows)
4.
動作確認の為にSDK Browser v2.0 (Kinect for Windows)
を起動するとFig. 2.3
に示す起動画面が表示される.
RUN
マークのあるサンプルを実行し,正常に動作すれば環境構築は終了である.また,この
SDK Browser v2.0 (Kinect for Windows)
では,Color
,Depth
,Body
など 様々なサンプルの実行,サンプルコードのインストールが可能となっている.第
3
章 基本機能
3.1
プログラム作成
Kinect v2
におけるプログラムの作成はVisual Studio 2013
を起動し,Visual C#
のWPF
アプリケーションを選択,プロジェクトの参照設定より「
Microsoft.Kinect
」を追加して行う.Fig. 3.1
にプログラム作成画面を示す.また,
Kinect v2
のセンサーを使用するためには,using Microsoft.Kinect
を追加する必要がある.本稿では,以下のサイトよりダウンロードしたサンプルプログラムを基に付 録の基本プログラムを作成した.
https://github.com/kaorun55/Kinect-for-Windows-SDK-v2.0-Samples
(a) WPFアプリケーションの選択 (b)参照追加Fig. 3.1
プログラム作成手順(
自作)
3.2
画像表示
基本プログラム
28
行目のCameraMode.color
のcolor
をDepth
,Infrared
に変更することにより,表示画像を変更することが可能となる.
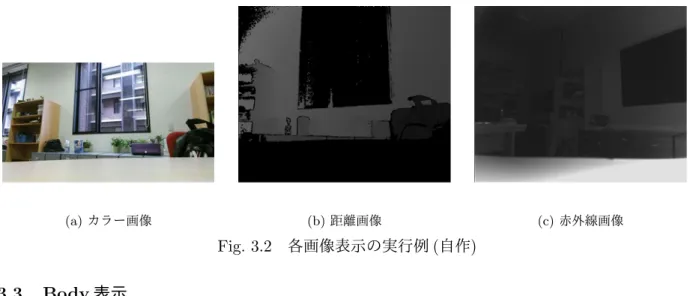
カラー画像表示では,
CameraMode.Color
とすることで,RGB
カメラから取得した情報をカラー 画像としてBitmap
形式で表示する.カラー画像の実行例をFig. 3.2(a)
に示す.距離画像表示では,CameraMode.Depth
とすることで,赤外線センサーを用いた距離カメラから取得した情報を距離画 像としてBitmap
形式で表示する.Kinect v2
では距離カメラ方式として,投射した赤外線が対象まで 往復する時間から距離を計測するTOF(Time Of Flight)
方式を採用している.距離画像の実行例をFig. 3.2(b)
に示す.赤外線画像表示では,CameraMode.Infrared
に変更することで,赤外線センサー から取得した情報を赤外線画像としてBitmap
形式で表示する.赤外線画像の実行例をFig. 3.2(c)
に 示す.3.3Body
表示 第3
章 基本機能(a)カラー画像 (b)距離画像 (c)赤外線画像
Fig. 3.2
各画像表示の実行例(
自作)
3.3
Body 表示
Body
表示では,距離カメラよりKinect
がプレイヤーを認知,6
人までの骨格情報を取得しそれぞれに
joint(
関節)
を打つ.取得可能なjoint
はFig. 3.3(a)
に示す25
点である.また,joint
を指定することにより,任意の
joint
のみを表示させることも可能である.joint
情報は3
軸座標として取得す るため,画像と同時に表示する場合は取得したデータを2
軸変換・画像との座標合わせを行う必要が ある.2
軸変換には下記のコード(1
:Color
,2
:Depth/Infrared)
に示すCoordinateMapper
を用いる.本稿で用いる基本プログラムでは,
1920
×1080
のカラー画像を4/10
に縮小した768
×432
のimage
に表示しているため,joint
の2
軸座標であるpointX
,pointY
をそれぞれ4/10
する必要がある.
Fig. 3.3(b)
にBody
表示の実行例を示す.1 ColorSpacePoint colorPoint = sensor.CoordinateMapper.MapCameraPointToColorSpace( jointPosition);
2 DepthSpacePoint depthPoint = sensor.CoordinateMapper.MapCameraPointToDepthSpace( jointPosition);
(a) joint箇所 (b) Body表示の実行例
3.4
ポーズ認識 第3
章 基本機能3.4
ポーズ認識
本節では,ポーズ認識として,肘を伸展・屈曲させた時の角度を
TextBox
を用いて表示させる.使用する
joint
はElbow Left
およびHand Left
の2
点である.MainWindow.xaml
をソースコード1
に,
MainWindow.xaml.cs
内body
の一部をソースコード2
に変更する.下記のコードを使用し,p1
に
Elbow Left
の2
軸座標を,p2
にHand Left
の2
軸座標を格納し,それらを用いて角度計算を行 う.計算結果を条件分けした後TextBox
に表示する.ポーズ認識の実行例をFig. 3.4
に示す.1 CameraSpacePoint jointPosition = joint.Position;
2 3 if (i == 0) 4 { // 3D space point 5 jointPosition = body.Joints[JointType.ElbowLeft].Position; 6 } 7 if (i == 1) 8 { // 3D space point 9 jointPosition = body.Joints[JointType.HandLeft].Position; 10 } 11 12 // 2D space point
13 System.Windows.Point point = new System.Windows.Point();
14
15 if ( mode == CameraMode.Color)
16 {
17 ColorSpacePoint colorPoint = sensor.CoordinateMapper.MapCameraPointToColorSpace(
jointPosition);
18
19 point.X = float.IsInfinity(colorPoint.X) ? 0 : colorPoint.X;
20 point.Y = float.IsInfinity(colorPoint.Y) ? 0 : colorPoint.Y; 21 22 if (i == 0) 23 { 24 p1 = point; 25 } 26 if (i == 1) 27 { 28 p2 = point; 29 } 30 }
Fig. 3.4
ポーズ認識の実行例(
自作)
付 録
A
章 プログラム
A.1
基本プログラム
MainWindow.xaml
1 <Window x:Class="奥行認識 v2.MainWindow"
2 xmlns="http://schemas.microsoft.com/winfx/2006/xaml/presentation"
3 xmlns:x="http://schemas.microsoft.com/winfx/2006/xaml"
4 Title="MainWindow" Height="550" Width="730"
5 Loaded="Window_Loaded" Closed="Window_Closed">
6
7 <Grid>
8 <Image Name="camera" Width="768" Height="432" />
9 <Canvas Name="canvas" Width="768" Height="432" />
10 <Button x:Name="_ScreenshotButton" Content="ScreenShot" Margin="0,480,620,0"
Click="_ScreenshotButton_Click" />
11 <Label x:Name="label1" Content="" HorizontalAlignment="Left" Margin="
107,487,0,0" VerticalAlignment="Top" Width="147"/> 12 </Grid> 13 </Window>
MainWindow.xaml.cs
1 using System; 2 using System.Collections.Generic; 3 using System.Linq; 4 using System.Text; 5 using System.Threading.Tasks; 6 using System.Windows; 7 using System.Windows.Controls; 8 using System.Windows.Data; 9 using System.Windows.Documents; 10 using System.Windows.Input; 11 using System.Windows.Media; 12 using System.Windows.Media.Imaging; 13 using System.Windows.Navigation; 14 using System.Windows.Shapes; 15 using Microsoft.Kinect; 16 17 namespace 奥行認識 v2 18 { 19 /// <summary> 20 /// MainWindow.xaml の相互作用ロジック 21 /// </summary>22 public partial class MainWindow : Window
23 {
24 KinectSensor sensor;
25 MultiSourceFrameReader reader;
26 IList<Body> bodies;
27
28 CameraMode mode = CameraMode.Color;
29 30 public MainWindow() 31 { 32 InitializeComponent(); 33 } 34
A.1
基本プログラム 第A
章 プログラム 37 sensor = KinectSensor.GetDefault(); 38 39 if ( sensor != null) 40 { 41 sensor.Open(); 42 43 reader = sensor.OpenMultiSourceFrameReader(FrameSourceTypes.Color| FrameSourceTypes.Depth| FrameSourceTypes.Infrared | FrameSourceTypes. Body);44 reader.MultiSourceFrameArrived += Reader MultiSourceFrameArrived;
45 }
46 } 47
48 private void Window Closed(object sender, EventArgs e)
49 { 50 if ( reader != null) 51 { 52 reader.Dispose(); 53 } 54 55 if ( bodies != null) 56 { 57 if ( bodies.Count() > 0) 58 {
59 foreach (var body in bodies)
60 { 61 // body.Dispose(); 62 } 63 } 64 } 65 66 if ( sensor != null) 67 { 68 sensor.Close(); 69 } 70 } 71
72 void Reader MultiSourceFrameArrived(object sender, MultiSourceFrameArrivedEventArgs
e)
73 {
74 var reference = e.FrameReference.AcquireFrame();
75
76 // Color
77 using (var frame = reference.ColorFrameReference.AcquireFrame())
78 { 79 if (frame != null) 80 { 81 if ( mode == CameraMode.Color) 82 { 83 camera.Source = frame.ToBitmap(); 84 } 85 } 86 } 87 88 // Depth
89 using (var frame = reference.DepthFrameReference.AcquireFrame())
90 { 91 if (frame != null) 92 { 93 if ( mode == CameraMode.Depth) 94 { 95 camera.Source = frame.ToBitmap(); 96 } 97 } 98 } 99 100 // Infrared
A.1
基本プログラム 第A
章 プログラム101 using (var frame = reference.InfraredFrameReference.AcquireFrame())
102 { 103 if (frame != null) 104 { 105 if ( mode == CameraMode.Infrared) 106 { 107 camera.Source = frame.ToBitmap(); 108 } 109 } 110 } 111 112 // Body
113 using (var frame = reference.BodyFrameReference.AcquireFrame())
114 {
115 if (frame != null)
116 {
117 canvas.Children.Clear();
118
119 bodies = new Body[frame.BodyFrameSource.BodyCount];
120
121 frame.GetAndRefreshBodyData( bodies);
122
123 foreach (var body in bodies)
124 {
125 if (body.IsTracked)
126 {
127 // COORDINATE MAPPING
128 foreach (Joint joint in body.Joints.Values)
129 {
130 if (joint.TrackingState == TrackingState.Tracked)
131 {
132 // 3D space point
133 CameraSpacePoint jointPosition = joint.Position;
134
135 // 2D space point
136 System.Windows.Point point = new System.Windows.Point();
137
138 if ( mode == CameraMode.Color)
139 {
140 ColorSpacePoint colorPoint = sensor.CoordinateMapper. MapCameraPointToColorSpace(jointPosition);
141
142 point.X = float.IsInfinity(colorPoint.X) ? 0 : colorPoint.X;
143 point.Y = float.IsInfinity(colorPoint.Y) ? 0 : colorPoint.Y;
144 }
145 else if ( mode == CameraMode.Depth|| mode ==
CameraMode.Infrared) // Change the Image and Canvas
dimensions to 512x424
146 {
147 DepthSpacePoint depthPoint = sensor.CoordinateMapper. MapCameraPointToDepthSpace(jointPosition);
148
149 point.X = float.IsInfinity(depthPoint.X) ? 0 : depthPoint. X;
150 point.Y = float.IsInfinity(depthPoint.Y) ? 0 : depthPoint. Y;
151 }
152
153 // Draw
154 Ellipse ellipse = new Ellipse
155 { 156 Fill = System.Windows.Media.Brushes.Red, 157 Width = 15, 158 Height = 15 159 }; 160
A.2
ポーズ認識プログラム 第A
章 プログラム162 Canvas.SetTop(ellipse, point.Y∗ 4 / 10 − ellipse.Height / 2);
163 164 canvas.Children.Add(ellipse); 165 } 166 } 167 } 168 169 } 170 } 171 } 172 } 173 174 /// <summary> 175 /// スクリーンショット 176 /// </summary> 177 int count = 0;
178 private void ScreenshotButton Click(object sender, RoutedEventArgs e)
179 {
180 count++;
181 string name = "capture" + count + ".bmp";
182 Bitmap bmp = new Bitmap(Screen.PrimaryScreen.Bounds.Width,
183 Screen.PrimaryScreen.Bounds.Height);
184 //Graphics の作成
185 Graphics g = Graphics.FromImage(bmp);
186 //画面全体をコピーする
187 g.CopyFromScreen(new System.Drawing.Point(0, 0), new System.Drawing.Point(0, 0), bmp.Size);
188 //解放
189 bmp.Save(name);
190 g.Dispose();
191 label1.Content = "save␣" + name;
192 } 193 } 194 195 enum CameraMode 196 { 197 Color, 198 Depth, 199 Infrared 200 } 201 }
A.2
ポーズ認識プログラム
ソースコード1
1 <Window x:Class="奥行認識 v2.MainWindow"
2 xmlns="http://schemas.microsoft.com/winfx/2006/xaml/presentation"
3 xmlns:x="http://schemas.microsoft.com/winfx/2006/xaml"
4 Title="MainWindow" Height="550" Width="730"
5 Loaded="Window_Loaded" Closed="Window_Closed"> 6
7 <Grid>
8 <Image Name="camera" Width="768" Height="432" />
9 <Canvas Name="canvas" Width="768" Height="432" />
10 <Button x:Name="_ScreenshotButton" Content="ScreenShot" Margin="0,480,620,0"
Click="_ScreenshotButton_Click" />
11 <Label x:Name="label1" Content="" HorizontalAlignment="Left" Margin="
107,487,0,0" VerticalAlignment="Top" Width="147"/>
12 <TextBox x:Name="Text1" Content="" HorizontalAlignment="Left" Height="40"
TextWrapping="Wrap" Margin="10,4,0,0" VerticalAlignment="Top" Width="117" FontSize="28" />
13 </Grid>
14 </Window>
A.2
ポーズ認識プログラム 第A
章 プログラム1 // COORDINATE MAPPING
2 foreach (Joint joint in body.Joints.Values)
3 {
4 if (joint.TrackingState == TrackingState.Tracked)
5 {
6 for (int i = 0; i < 2; i++)
7 {
8 CameraSpacePoint jointPosition = joint.Position; 9 10 if (i == 0) 11 { 12 // 3D space point 13 jointPosition = body.Joints[JointType.ElbowLeft].Position; 14 } 15 if (i == 1) 16 { 17 // 3D space point 18 jointPosition = body.Joints[JointType.HandLeft].Position; 19 } 20 21 // 2D space point
22 System.Windows.Point point = new System.Windows.Point();
23
24 if ( mode == CameraMode.Color)
25 {
26 ColorSpacePoint colorPoint = sensor.CoordinateMapper.MapCameraPointToColorSpace(
jointPosition);
27
28 point.X = float.IsInfinity(colorPoint.X) ? 0 : colorPoint.X;
29 point.Y = float.IsInfinity(colorPoint.Y) ? 0 : colorPoint.Y;
30 31 if (i == 0) 32 { 33 p1 = point; 34 } 35 if (i == 1) 36 { 37 p2 = point; 38 } 39 }
40 else if ( mode == CameraMode.Depth|| mode == CameraMode.Infrared) // Change
the Image and Canvas dimensions to 512x424
41 {
42 DepthSpacePoint depthPoint = sensor.CoordinateMapper. MapCameraPointToDepthSpace(jointPosition);
43
44 point.X = float.IsInfinity(depthPoint.X) ? 0 : depthPoint.X;
45 point.Y = float.IsInfinity(depthPoint.Y) ? 0 : depthPoint.Y;
46 }
47
48 // Draw
49 Ellipse ellipse = new Ellipse
50 { 51 Fill = System.Windows.Media.Brushes.Red, 52 Width = 15, 53 Height = 15 54 }; 55
56 Canvas.SetLeft(ellipse, point.X∗ 4 / 10 − ellipse.Width / 2); 57 Canvas.SetTop(ellipse, point.Y∗ 4 / 10 − ellipse.Height / 2);
58
59 canvas.Children.Add(ellipse);
60 }
61
A.2
ポーズ認識プログラム 第A
章 プログラム63 double v2 = Math.Sqrt((p2.X− p1.X) ∗ (p2.X − p1.X) + (p2.Y − p1.Y) ∗ (p2.Y − p1.Y
));
64 double v3 = (10∗ (p2.X −p1.X) + 0 ∗ (p2.Y −p1.Y));
65
66 double degree = (Math.Acos(v3 / v1 / v2))∗ 180 / Math.PI;
67 double deg = (180− degree);
68 69 if (p1.Y >p2.Y) 70 { 71 Text1.Text = ("+␣" + deg.ToString("F1")); 72 } 73
74 else if (p1.Y <p2.Y)
75 {
76 Text1.Text = ("-␣" + deg.ToString("F1"));
77 }
78 else if (p1.Y == p2.Y)
79 {
80 Text1.Text = ("± 0");
81 }
82 } 83 }