BIG-IP Virtual Edition デプロイ手順書 【Hyper-V 版】
Ver. 1.0
2014年 02 月 27 日
株式会社ネットワールド
インフラソリューション技術部
ネットワークソリューショングループ
- 目次 -
1 改訂履歴 ... 3
2 はじめに ... 4
3 事前準備 ... 5
3.1
作業
PC の準備 ... 5
3.2
BIG-IP Virtual Edition のメディア保存 ... 5
4 Hyper - V へのアクセス ... 7
5 BIG-IP Virtual Edition のデプロイ ... 9
6 事前設定 ... 13
6.1
ハードウェアシャットダウン時の動作設定 ... 13
6.2
ネットワークアダブタの追加 ... 14
6.3
CPU リソースの確保 ... 16
7 BIG-IP Virtual Edition 起動と初期設定 ... 17
7.1
BIG-IP Virtiual Edition の起動 ... 17
7.2
コンソールを開く ... 18
7.3
Mgmt IP の割り当て ... 19
7.4
tmsh コマンドでの Mgmt アドレス設定及び確認方法 ... 23
1 改訂履歴
変更履歴 番号 変更年月日 Version Page status 変更内容 1 2014/02/27 1.0 1-24 新規 作成 status: a(dd), d(elete), r(eplace), o(ther)
2 はじめに
本書は、Widows Server 2012 Hyper-V 環境へ BIG-IP Virtual Edition をデプロイする手順について説明します。 また本書では以下環境にて、手順を作成しています。
Product BIG-IP Version
11.5.0
Product Microsoft Hyper-V
Microsoft Windows Server 2012 R2 Version
Windows Server 2012 R2
<BIG-IP 仮想マシン環境> CPU 2 x virtual CPUs Memory 4 GB RAM
NIC 3 x virtual network adapters (minimum) DISK 1 x 100 GB IDE disk
Note#1 For each virtual machine, the Hyper-V virtual machine guest environment permits a
maximum
of 8 network adapters
or1 legacy virtual network adapter as a management port
and8 network adapters as dataplane ports
. The legacy network adapter is not supported forthe dataplane. For peak performance,
F5 recommends using only network adapters.
Note#2CPU reservation can be up to 100 percent
of the defined virtual machine hardware.For example, if the hypervisor has a 3 GHz core speed, the reservation of a virtual machine with 2 CPUs can be only 6 GHz or less.
Note#3 To achieve licensing performance limits, all allocated RAM must be reserved.
Note#4 For production environments, virtual disks should be deployed Thick (allocated up front). Thin deployments are acceptable for lab environments.
https://support.f5.com/kb/en-us/products/big-ip_ltm/manuals/product/bigip-ve-setup-msft-hyper-v-11-4-1/1. html#conceptid
<メモリ割り当てに対するサポート> PROVISIONED
MEMORY
SUPPORTED MODULE COMBINATIONS MODULE SPECIFIC CONCERNS 12 GB or more All module combinations are fully
supported.
N/A 8GB Provisioning more than three modules
together is not supported.
GTM and Link Controller do not count toward the module-combination limit
More than 4 GB, but less than 8 GB
Provisioning more than three modules together is not supported.
(See module-specific concerns relating to AAM).
Application Acceleration Manager (AAM) cannot be provisioned with any other module; AAM can only be provisioned as Standalone.
GTM and Link Controller do not count toward the module-combination limit.
4 GB or less Provisioning more than two modules together is not supported.
AAM can only be provisioned as Dedicated. https://support.f5.com/kb/en-us/products/big-ip_ltm/manuals/product/bigip-ve-setup-msft-hyper-v-11-4-1/1. html#conceptid
3 事前準備
本章では、デプロイする前段階で必要な事前準備について説明します。
3.1
作業 PC の準備
Hyper-V 環境に LAN ケーブルでアクセスできる Windows 端末を用意します。本環境では、リモートデスクト ップを使用してアクセスします。
また、後述する BIG-IP Virtual Edition (vhd ファイル) を HDD に保存する必要があります。
3.2
BIG-IP Virtual Edition のメディア保存
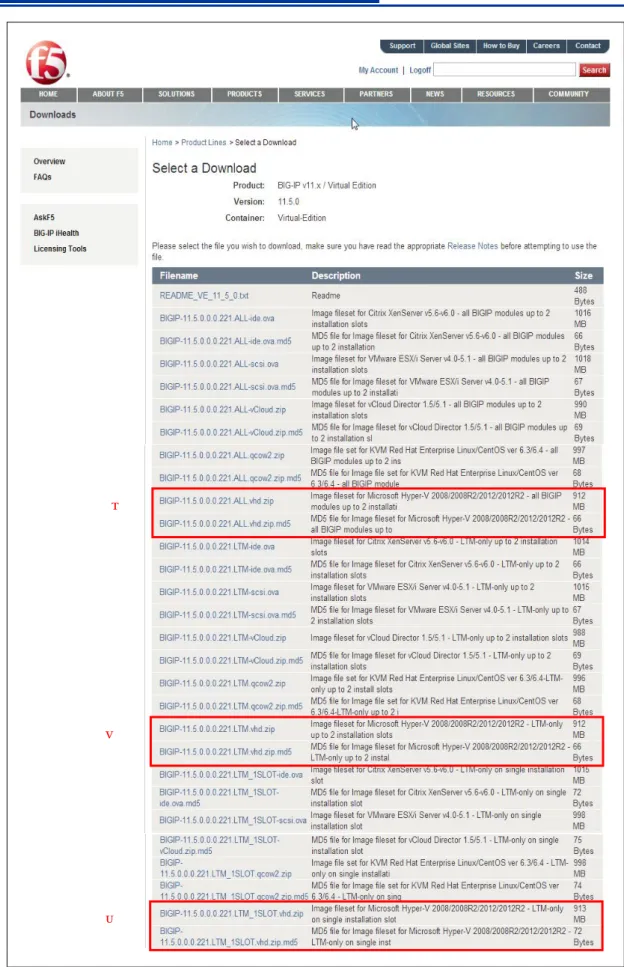
Ask F5(https://login.f5.com/resource/login.jsp) より Hyper-V の vhd ファイルをダウンロードします。 ※F5 アカウントが無い場合は、作成する必要があります。
ログイン → 左メニューより”Downloads” → “Find a Dwonloads” → “BIG-IP” →
“BIG-IP v11.x / Virtual Edition” → プルダウンよりバージョンを選択 → “Virtual Edition”をクリック。 作業用 PC に保存します。 vhd ファイルは Hyper-v の BIG-IP の OS イメージを保存する場所へコピーします。 尚、v11.5.0 よりイメージファイルが複数用意されているため、利用用途をご確認ください。(表 3.1) No VHD ファイル SLOT 数 使用可能 Module バージョン UP HF 適用 Image Size 1 Image fileset for Microsoft Hyper-V
2008/2008R2/2012/2012R2
- all BIGIP modules up to 2 installation slots
2 ALL 可 100G
2 Image fileset for Microsoft Hyper-V 2008/2008R2/2012/2012R2 - LTM-only up to 2 installation slots
2 LTM のみ 可 31G
3 Image fileset for Microsoft Hyper-V 2008/2008R2/2012/2012R2 - LTM-only on single installation slot
1 LTM のみ 不可 7G
https://support.f5.com/kb/en-us/solutions/public/14000/900/sol14946.html
表
3-1 イメージ種別
図
3-1 BIG-IP VHD ファイルダウンロードページ
①
③
4 Hyper - V へのアクセス
リモートデスクトップを使用して Wndows Server 2012 へ接続します。 Windows Server 2012 の IP アドレスを入力後、接続をクリックします。図
4-1 リモートデスクトップ起動
Windows Server 2012 に接続し、サーバマネージャーを起動した画面例です。図
4-2 Windows Server 2012 サーバマネージャー起動
左ペインの Hyper-V を選択し、仮想マシンをデプロイする Hyper-V(中央部)を右クリックし Hyper-V マネー ジャーを選択。
図
4-3 Hyper-V マネージャー選択
Hyper-V マネージャーが起動したことを確認します。
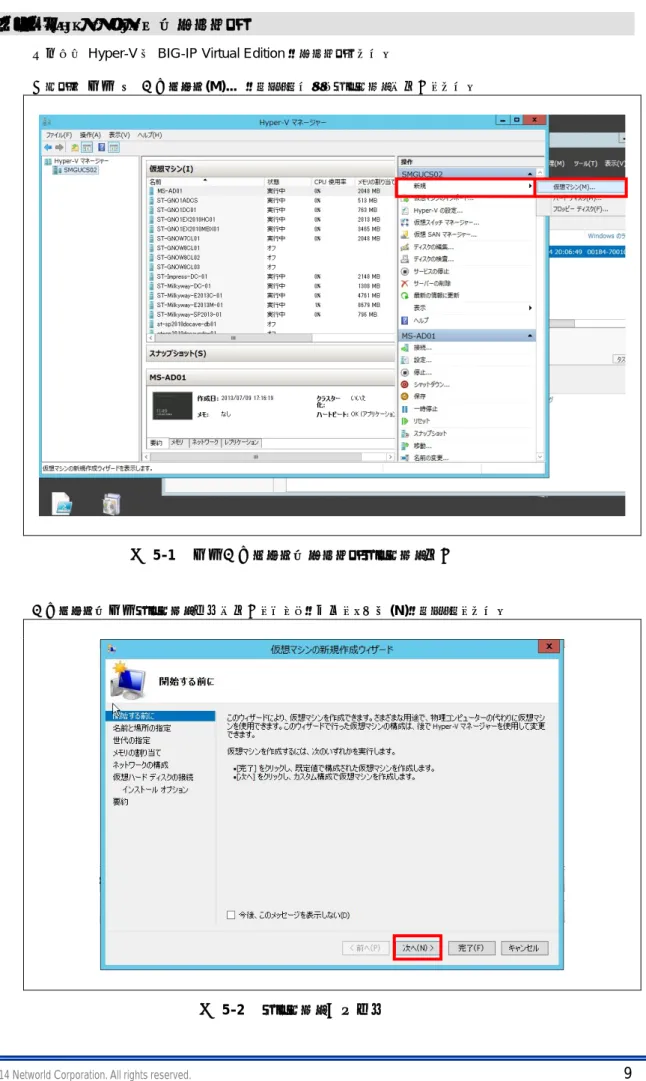
5 BIG-IP Virtual Edition のデプロイ
本章では Hyper-V へ BIG-IP Virtual Edition をデプロイします。
右ペイン 新規 → 仮想マシン(M)... をクリックするとウィザードが起動します。
図
5-1 新規仮想マシンのデプロイウィザード起動
仮想マシンの新規ウィザード画面が起動したことを確認し、次へ(N)をクリックします。
仮想マシンの名前を入力し、次へ(N)をクリックします。 ※仮想マシンを格納場所を変更する場合は、『仮想マシンを別の場所に格納する(S)』にチェックをいれ格納 場所を選択できます。
図
5-3 仮想マシンの名前設定
仮想マシンの世代は、第一世代(1)を選択し、次へ(N)をクリックします。図
5-4 仮想マシンの世代選択
メモリの割り当て では仮想マシンに割り当てるメモリを指定します。指定後、次へ(N)をクリックします。 ※BIG-IP Virtual Edition では 4096MB 以上が推奨となります。
※パフォーマンス UP のためには 8192MB 以上を選択してください。
図
5-5 仮想マシンにメモリの割り当て
ネットワークアダプタの選択を行います。デプロイ後にも選択することは可能です。 ※ここで作成したネットワークアダブタは Mgmt インターフェースに割り当てられます。
仮想ハードディスクの接続を行います。ダウンロードした vhd ファイルを選択し、次へ(N)をクリックします。
図
5-7 仮想ハードディスクの接続
要約画面が表示されますので、設定に問題がなければ完了をクリックすると、以下の画面が表示されます。 BIG-IP Virtual Edition のデプロイが完了していることを確認します。
6 事前設定
6.1
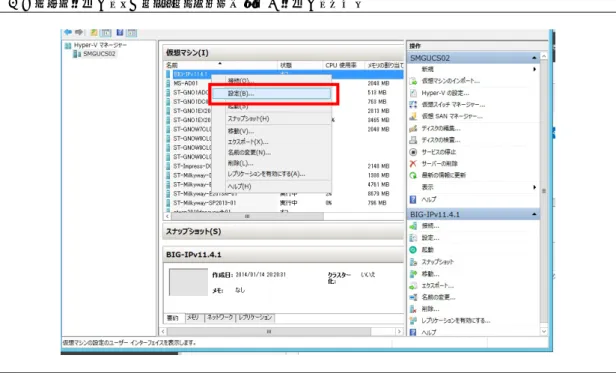
ハードウェアシャットダウン時の動作設定
物理コンピュータのシャットダウン時に、仮想マシンではどのような動作を実行させるかを決めます。 仮想マシンを右クリックし、設定を選択します。図
6-1 仮想マシンのプロパティ起動
左ペインの自動停止アクションシャットダウンを選択し、ゲストオペレーティングシステムをシャットダウンす る(D)を選択します。図
6-2 自動停止アクション設定
6.2
ネットワークアダブタの追加
仮想マシンでネットワークアダブタの追加設定を行います。 仮想マシンを右クリックし、設定を選択します。図
6-3 仮想マシンのプロパティ起動
左ペインのハードウェアを選択し、右ペインハードウェアの追加よりネットワークアダブタを選択します。図
6-4 仮想マシンのプロパティ
左ペインのネットワークアダブタ項目が追加されていることを確認し選択します。 右ペインの仮想スイッチ(s):のプルダウンより割り当てる仮想スイッチを選択し適用(A)をクリックします。
図
6-5 ネットワークアダプタ追加
ネットワークアダブタの追加順にインター フェースが割り当てられます。 ・Management ・Interface 1.1 ・Interface 1.2 ・Interface 1.3 ・ ・ ・ ネットワークアダブタの最大登録数は「8」6.3 CPU リソースの確保
本章では、BIG-IP Virtual Edition が使用する CPU リソースを事前に確保する方法を説明します。 仮想マシンを選択し、右クリックメニューから設定を選択します。
図
6-6 仮想マシンの設定
左ペインのプロセッサを選択し、仮想マシンの予約(%)を 100%へ変更します。
7 BIG-IP Virtual Edition 起動と初期設定
7.1
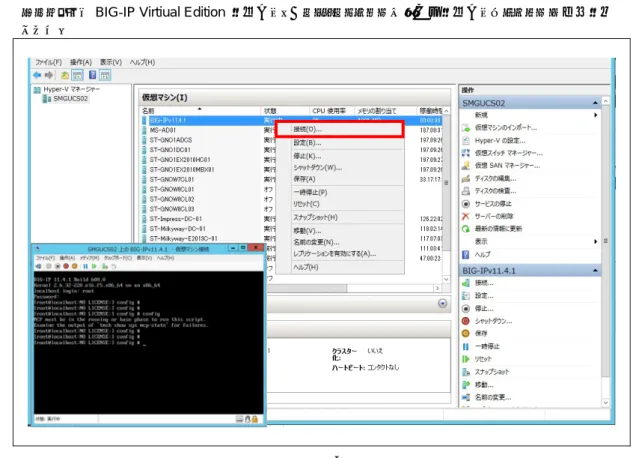
BIG-IP Virtiual Edition の起動
デプロイした BIG-IP Virtiual Edition を選択し、右クリックメニューから起動を選択して電源を投入します。
7.2
コンソールを開く
デプロイした BIG-IP Virtiual Edition を選択し、右クリックメニューから接続を選択してコンソール画面を開 きます。
7.3 Mgmt
IP の割り当て
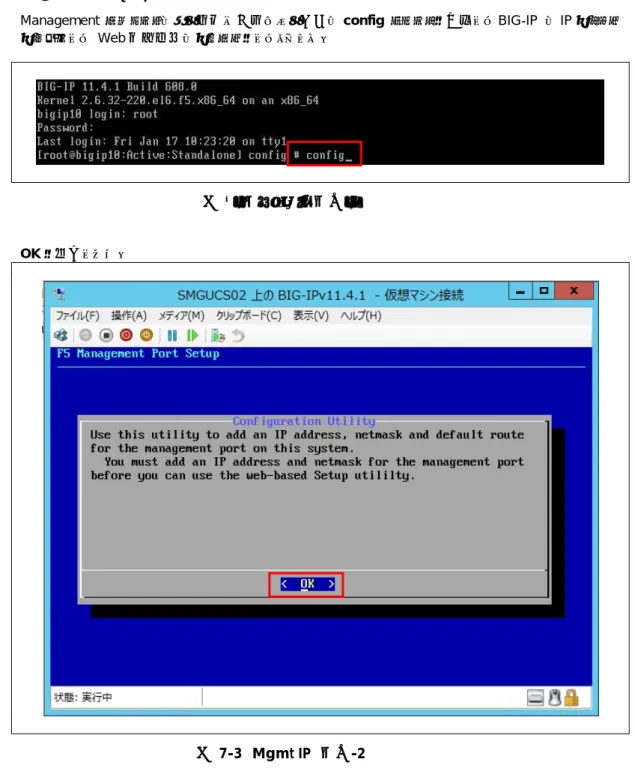
Management セグメントによる疎通が可能である場合は config コマンドを実行して BIG-IP に IP アドレス アサインして Web 管理画面にアクセスをしてください。
図 7-3 Mgmt IP 設定-1
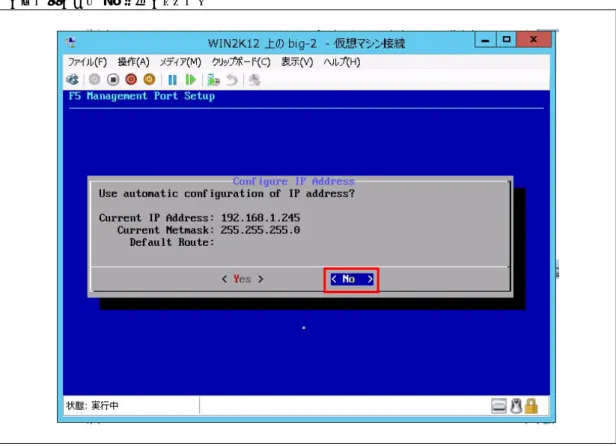
OK を選択します。
変更する場合は No を選択します。
図
7-4 Mgmt IP 画面-3
Management Port の IP Address を入力し OK を選択します。
Netmask を入力し OK を選択します。
図
7-6 Mgmt IP 設定-5
Management Port に Default Gateway を設定する場合は Yes を選択。
Management Port の Default Gateway を入力し OK を選択。
図
7-8 Mgmt IP 設定 7
IP Address、Netmask、Default Route を確認し問題なければ Yes を選択。
7.4 tmsh コマンドでの Mgmt アドレス設定及び確認方法
コマンドでの Mgmt アドレスの設定と確認を行う。(1)Mgmt ポートのアドレス設定
# tmsh modify sys management-ip 10.15.1.241/24 (1)Mgmt ポートのアドレス設定を保存 # tmsh save sys config
(3)Mgmt ポートの設定確認 # tmsh list sys management-ip
Saving running configuration... /config/bigip.conf /config/bigip_base.conf /config/bigip_user.conf sys management-ip 10.15.1.100/22 { description configured-statically }
7.5 tmsh コマンドでの VLAN&Self-IP アドレス設定及び確認方法
コマンドでの VLAN、Self-IP を設定し、Self-IP 経由で Web 管理画面アクセスを行う。 (1) Vlan の作成 (1.1 ポート:External 1.2 ポート:Internal)
# tmsh create net vlan external interfaces add {1.1} # tmsh create net vlan internal interfaces add {1.2} (2) 作成した Vlan へ IP を設定
# tmsh create net self 192.168.2.101/24 allow-service default vlan external # tmsh create net self 192.168.3.101/24 allow-service default vlan internal (3) save sys config コマンドで設定を保存
# tmsh save sys config
(4) 設定した Self-IP を確認 # tmsh list net self
(5) 設定した Vlan を確認
(6) Internal Self-IP 経由で WEB 管理画面へアクセスして確認する。 https://192.168.3.101
以上
net self 192.168.3.101/24 { address 192.168.3.101/24 allow-service { default } traffic-group traffic-group-local-only vlan internal } net self 192.168.2.101/24 { address 192.168.2.101/24 allow-service { default } traffic-group traffic-group-local-only vlan external }# tmsh list net vlan net vlan external { if-index 96 interfaces { 1.1 { } } tag 4094 }
net vlan internal { if-index 112 interfaces { 1.2 { } } tag 4093 }
Saving running configuration... /config/bigip.conf
/config/bigip_base.conf /config/bigip_user.conf