Avaya Solution & Interoperability Test Lab
Application Notes for VoiceCyber Technologies VCLog with
Avaya Aura
®
Communication Manager 6.2 Using Avaya
Aura
®
Application Enablement Services 6.2 and CDR - Issue
1.0
Abstract
このアプリケーションノートは株式会社ボイスサイバーテクノロジーズ・ジャパンの
通話録音ソリューションである VCLog を Avaya Aura
®Communication Manager 並びに
Avaya Aura
®Application Enablement Services および CDR 環境に導入する際の設定例を
記載しております。また、相互接続検証試験実施時の機器構成、各製品のバージョ
ン、確認作業内容についても記述しております。
These Application Notes describe the configuration steps required for VoiceCyber
Technologies VCLog to interoperate with Avaya Aura
®Communication Manager using
Avaya Aura
®Application Enablement Services and CDR.
Information in these Application Notes has been obtained through DevConnect compliance
testing and additional technical discussions. Testing was conducted via the DevConnect
Program at the Avaya Solution and Interoperability Test Lab.
Table of Contents
1.
Introduction ... 4
2.
General Test Approach and Test Results ... 4
2.1.
Interoperability Compliance Testing ... 4
2.2.
Test Results ... 5
2.3.
Support ... 5
3.
Reference Configuration ... 5
4.
Equipment and Software Validated ... 6
5.
Configure Avaya Aura
®Communication Manager ... 7
5.1.
Verify Communication Manager License ... 7
5.2.
Administer IP Node Name ... 7
5.3.
Administer IP Services for AES ... 8
5.4.
Administer IP Service for CDR ... 8
5.5.
Administer TSAPI CTI Link ... 9
5.6.
Administer System Parameters features ... 9
5.7.
Administer Feature Access Code ... 10
5.8.
Administer Trunk Group... 10
5.9.
Administer VDN ... 12
5.10.
Administer Hunt Group ... 12
5.11.
Administer Vector ... 13
5.12.
Administer Station ... 13
5.13.
Administer Agent Login-ID ... 15
5.14.
Administer System Parameters CDR ... 16
6.
Configure Avaya Aura
®Application Enablement Services ... 18
6.1.
Login to OAM... 18
6.2.
Administer CTI User... 19
6.3.
Administer Local IP ... 20
6.4.
Administer Switch Connection ... 21
6.5.
Administer TSAPI Link ... 22
6.6.
Verify Tlink Name ... 23
7.
Configure VCLog ... 23
7.1.
IP 電話機用設定 ... 24
7.2.
DCP 電話機用設定 ... 25
7.3.
CTI の設定 ... 26
7.4.
PRI トランクの録音用設定 ... 27
7.5.
DCP 用ボードの設定 ... 28
7.6.
PRI 用ボードの設定 ... 29
8.
Verification Steps... 30
8.1.
Avaya Aura
®Communication Manager ... 30
8.2.
Avaya Aura
®Application Enablement Services... 31
8.3.
VCLog... 31
9.
Conclusion ... 32
1. Introduction
このアプリケーションノートは株式会社ボイスサイバーテクノロジーズ・ジャパンの通
話録音ソリューションである VCLog を Avaya Aura
®Communication Manager 並びに
Avaya Aura
®Application Enablement Services および CDR を利用した構成での相互接続検
証試験において確認した内容と結果を記述します。株式会社ボイスサイバーテクノロジ
ーズ・ジャパン社の VCLog は通話録音ソリューションであり、AES, CDR, トランク情
報、Avaya 内線電話機のシグナリング情報を利用しています。
2. General Test Approach and Test Results
VCLog は通話録音ソリューションであり、AES, CDR, トランク情報、電話機のシグナ
リング情報を使って VoIP またはトランクから取得した通話録音情報に検索キーとして
タグ付けをしています。本検証では、すでに検証済みの VCLog と Avaya Aura
®Communication Manager5.2 並びに Avaya Aura
®Application Enablement Services5.2.2 との
連携ソリューションの更新版であり、Avaya Aura
®Communication Manager6.2 並びに
Avaya Aura
®Application Enablement Services6.2 と VCLog の最新版ソフトウェアを使って
の検証となっています。
2.1. Interoperability Compliance Testing
相互接続検証試験は以下の項目に焦点を合わせて実施されました。
外線及び内線(IP 電話機/DCP 電話機)の発信呼並びに着信呼の録音
録音された音声レコードの検索
録音された音声レコードの再生
通話録音時の保留、転送、会議通話のような基本的な電話機能の操作
TSAPI, CDR, トランク情報、内線電話機シグナリング情報取得により、PRI/BRI ト
ランク方式および VoIP での録音記録に内線番号、もしくはエージェント ID が紐付
けられること
検証項目は Table 1 の表であり、この呼種での録音音声の再生およびタグ内容を確認し
ています。
Table 1 lists the Test objective used for this testing.
ID
Test Objective
Remarks
1
外線着信
ハンドセット利用時の録音・再生確認
ヘッドセット利用時の録音・再生確認
2
外線発信
ハンドセット利用の録音・再生確認
ヘッドセット利用の録音・再生確認
3
保留
外線着信呼通話 > 保留 > 通話 > 切断
外線発信呼通話 > 保留 > 通話 > 切断
4
転送
ブラインド転送時録音・再生確認
責任転送時録音・再生確認
5
会議通話
PSTN/内線電話機での 3 者会議通話時録音・再生確認
6
代理応答
代理応答時の録音・再生確認
7
コールパーク
通話 > コールパーク > アンサーバック
Table 1 – Test Objective
2.2. Test Results
すべてのテストケースを実施し、問題なく動作することを確認しています。
2.3. Support
ボイスサイバーテクノロジーズ・ジャパン VCLog のサポートについては、下記窓口にお
問い合わせ下さい。
Tel: 050(5835)0925
E-Mail: [email protected]
Web: http://www.voicecyber.co.jp/index.html
3. Reference Configuration
ここでは相互接続検証時の機器構成について記述します。以下の図にもあるように、
Avaya Communication Manager と Avaya Application Enablement Services で構成されます。
CTI Client として TSAPI Client、CDR 情報、トランクのシグナリング、内線電話機のシ
グナリングから呼情報を取得し、録音ファイルにタギングします。
具体的には、CM6.2 の S8300D を G430 に収容しています。CallCenter Agent 用に IP 電話
機 2 台を設置しています。またこの G430 には MM710 と MM721 を収容しており、そ
れに NTT INS ネット 1500 回線(ダイヤルイン契約あり)と INS ネット 64 回線を接続して、
内線電話機との外線発着信用に使っています。INS ネット回線と DCP 電話機は分岐コ
ネクターを使って、VCLog に接続しています。
Figure 1: VoiceCyber VCLog System with Avaya Solution
Table 2 lists the extensions and TSAPI information used for this testing.
Station Extension
4101(IP), 4102(IP), 4201(DCP), 4202(DCP)
Agent ID
6501, 6502
Skill
1 (Hunt Extension 4601)
VDN
6701
Vector
1
CTI Link
1 (extension 4998)
AES TLINK NAME
AVAYA#NYOKOCM#CSTA#HANAAES
CTI User
vctj
Table 2 – Extension Setup and TSAPI Information
4. Equipment and Software Validated
ここでは相互接続検証時のソフトウェアバージョンについて記述します。
以下の表を参照ください。
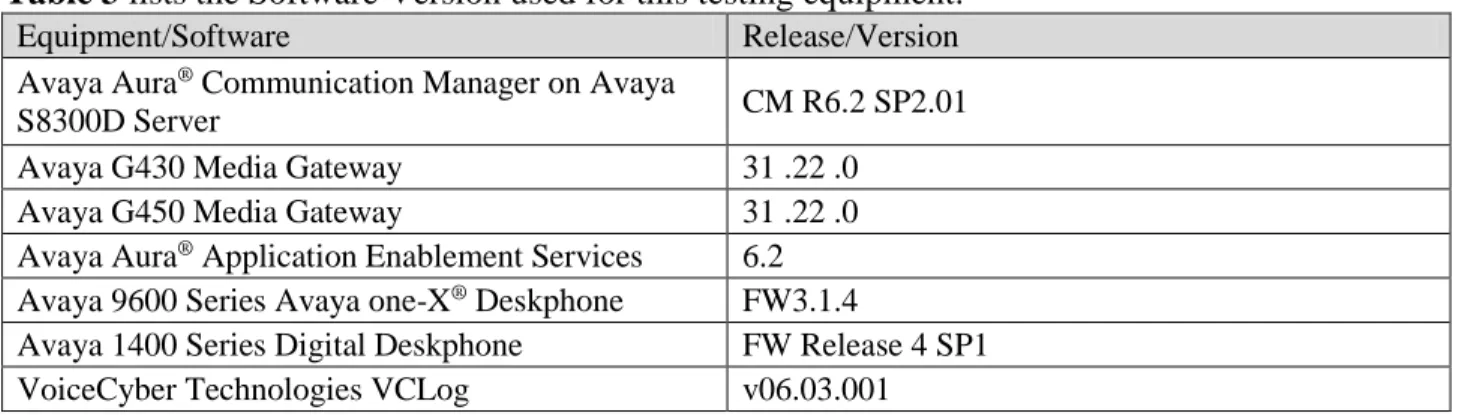
Table 3 lists the Software Version used for this testing equipment.
Equipment/Software
Release/Version
Avaya Aura
®Communication Manager on Avaya
S8300D Server
CM R6.2 SP2.01
Avaya G430 Media Gateway
31 .22 .0
Avaya G450 Media Gateway
31 .22 .0
Avaya Aura
®Application Enablement Services
6.2
Avaya 9600 Series Avaya one-X
®Deskphone
FW3.1.4
Avaya 1400 Series Digital Deskphone
FW Release 4 SP1
VoiceCyber Technologies VCLog
v06.03.001
AudioCodes SmartWORKS
®v5.7.0
Client PC for VCLogCQC
Windows PC
Table 3 – Equipment and Software Version
5. Configure Avaya Aura
®
Communication Manager
ここでは Avaya Aura
®Communication Manager の設定例を示します。確認、設定を行う
為に System Access Terminal (SAT) にログインします。
Verify Avaya Aura
®Communication Manager License
Administer IP Node Name
Administer IP Services
Administer TSAPI CTI Link
Administer System Parameter Features
Administer Feature Access Code
Administer Trunk Group
Administer VDN
Administer Hunt Group
Administer Vector
Administer Station
Administer Agent Login-ID
Administer System Parameter CDR
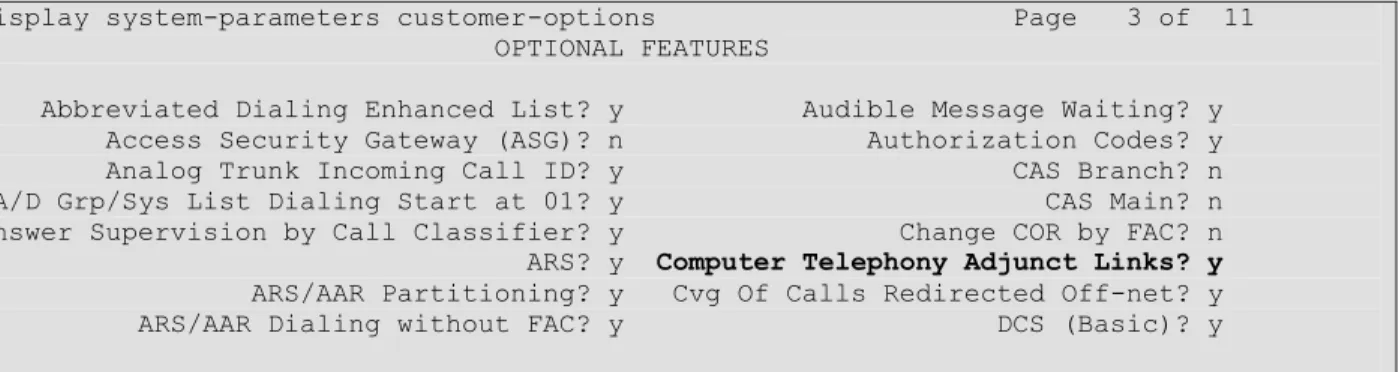
5.1. Verify Communication Manager License
“display system-parameters customer-options”コマンドを使用します。
Page 3 の以下の項目の値を確認します。
“Computer Telephony Adjunct Links?” が “y” に設定されている事。
5.2. Administer IP Node Name
"change node-name ip"コマンドを使用して VClog サーバの IP アドレスを設定します。実
際のノードの名前と IP アドレスは異なる場合があります。
本例では、node-name “vctj”を IP Address “192.168.50.155”としています。
display system-parameters customer-options Page 3 of 11 OPTIONAL FEATURES
Abbreviated Dialing Enhanced List? y Audible Message Waiting? y Access Security Gateway (ASG)? n Authorization Codes? y Analog Trunk Incoming Call ID? y CAS Branch? n A/D Grp/Sys List Dialing Start at 01? y CAS Main? n Answer Supervision by Call Classifier? y Change COR by FAC? n ARS? y Computer Telephony Adjunct Links? y ARS/AAR Partitioning? y Cvg Of Calls Redirected Off-net? y ARS/AAR Dialing without FAC? y DCS (Basic)? y
5.3. Administer IP Services for AES
“change ip-services” コマンドを使用して AES サーバへのリンクを設定します。
Page 1 で以下の項目を設定します。
Service Type: “AESVCS”
Enabled: “y”
Local Node: “procr”
Local Port: “8765” (初期値)
Page 4 で以下の項目を設定します。
AE Services Server: AES サーバの hostname。本検証の AES は “hanaaes”です。
Password: AES サーバのログインパスワード(AES 側設定と合わせます)
Enable: “y”
5.4. Administer IP Service for CDR
“change ip-services” コマンドを使用して CDR 用インタフェースの設定します。
Page 1 で以下の項目を設定します。
Service Type: “CDR1”
Enabled: “y”
Local Node: “procr”
Local Port: “0”
Remote Node: “vctj” ("5.2"項での設定に合わせる)
change node-names ip Page 1 of 2 IP NODE NAMES Name IP Address default 0.0.0.0 procr 192.168.0.172 procr6 :: vctj 192.168.50.155
change ip-services Page 1 of 4 IP SERVICES
Service Enabled Local Local Remote Remote Type Node Port Node Port AESVCS y procr 8765
change ip-services Page 4 of 4 AE Services Administration
Server ID AE Services Password Enabled Status Server
1: hanaaes * y in use 2:
Remote Port: “5005” (VCLog 設定と合わせる)
Page 3 で以下の項目を設定します。
Service Type: CDR1
Reliable Protocol: n
Packet Resp Timer: 30
Session Connect Message Cntr: 3
SPDU Cntr: 3
Connectivity Timer: 60
5.5. Administer TSAPI CTI Link
“add cti-link x” コマンドを使用して TSAPI 用 CTI Link を設定します。
以下に設定例を示します。
5.6. Administer System Parameters features
“change system-parameters features” コマンドを使用し、以下の設定を行います。
Page 5 の以下の項目を設定します。
Create Universal Call ID (UCID)?: “y”
UCID Network Node ID: 未設定の node ID (本例では 11111)
change ip-services Page 1 of 4 IP SERVICES
Service Enabled Local Local Remote Remote Type Node Port Node Port AESVCS y procr 8765
CDR1 procr 0 vctj 5005
change ip-services Page 3 of 4 SESSION LAYER TIMERS
Service Reliable Packet Resp Session Connect SPDU Connectivity Type Protocol Timer Message Cntr Cntr Timer CDR1 n 30 3 3 60 CDR2 n 30 3 3 60
display cti-link 1 Page 1 of 3 CTI LINK CTI Link: 1 Extension: 4998 Type: ADJ-IP COR: 1 Name: Hana
change system-parameters features Page 5 of 19 FEATURE-RELATED SYSTEM PARAMETERS
UNIVERSAL CALL ID
Page 6 の以下の項目を設定します。
Conference Tone?: “n”
Intrusion Tone?: “n”
5.7. Administer Feature Access Code
“change feature-access-codes”コマンドを使用し、本例では以下の設定を行います。
Answer Back Access Code : “*41”
Call Pickup Access Code : “*13”
Login Access Code : “*00”
Logout Access Code : “*99”
5.8. Administer Trunk Group
“add trunk-group xx”コマンドで PRI と BRI の Trunk Group の設定をします。これらは日
本の NTTINS1500, INS64 と接続するための標準的な設定となっています。
以下に PRI(INS1500 接続)の設定例を示します。
change system-parameters features Page 6 of 19 Short Interdigit Timer (seconds): 3 Conference Tone? n Unanswered DID Call Timer (seconds): Intrusion Tone? n
change trunk-group 1 Page 1 of 22 TRUNK GROUP
Group Number: 1 Group Type: isdn CDR Reports: y Group Name: ins1500-1 COR: 1 TN: 1 TAC: #01 Direction: two-way Outgoing Display? n Carrier Medium: PRI/BRI Dial Access? n Busy Threshold: 255 Night Service:
Queue Length: 0
Service Type: public-ntwrk Auth Code? n TestCall ITC: rest Far End Test Line No:
TestCall BCC: 4
change trunk-group 1 Page 2 of 22 Group Type: isdn
TRUNK PARAMETERS
Codeset to Send Display: 6 Codeset to Send National IEs: 6 Max Message Size to Send: 260 Charge Advice: none
Supplementary Service Protocol: a Digit Handling (in/out): enbloc/enbloc Trunk Hunt: cyclical
Digital Loss Group: 13 Incoming Calling Number - Delete: Insert: Format: Bit Rate: 1200 Synchronization: async Duplex: full Disconnect Supervision - In? y Out? y
以下に BRI(INS64 接続)の設定例を示します。
Answer Supervision Timeout: 0
Administer Timers? n CONNECT Reliable When Call Leaves ISDN? n XOIP Treatment: auto Delay Call Setup When Accessed Via IGAR? n
change trunk-group 1 Page 3 of 22 TRUNK FEATURES
ACA Assignment? n Measured: none Wideband Support? n Maintenance Tests? y Data Restriction? n NCA-TSC Trunk Member: Send Name: n Send Calling Number: y Used for DCS? n Send EMU Visitor CPN? n Suppress # Outpulsing? n Format: pub-unk
Outgoing Channel ID Encoding: preferred UUI IE Treatment: service-provider Replace Restricted Numbers? n Replace Unavailable Numbers? n Send Connected Number: n Network Call Redirection: none Hold/Unhold Notifications? n Send UUI IE? y Modify Tandem Calling Number: no
Send UCID? n
Send Codeset 6/7 LAI IE? y Ds1 Echo Cancellation? n Apply Local Ringback? n US NI Delayed Calling Name Update? n Show ANSWERED BY on Display? y
Network (Japan) Needs Connect Before Disconnect? n
change trunk-group 2 Page 1 of 22 TRUNK GROUP
Group Number: 2 Group Type: isdn CDR Reports: y Group Name: INS64 COR: 1 TN: 1 TAC: #02 Direction: two-way Outgoing Display? n Carrier Medium: PRI/BRI Dial Access? y Busy Threshold: 255 Night Service:
Queue Length: 0
Service Type: public-ntwrk Auth Code? n TestCall ITC: rest Far End Test Line No:
TestCall BCC: 4
change trunk-group 2 Page 2 of 22 Group Type: isdn
TRUNK PARAMETERS
Codeset to Send Display: 6 Codeset to Send National IEs: 6 Max Message Size to Send: 260 Charge Advice: none
Supplementary Service Protocol: a Digit Handling (in/out): enbloc/enbloc Trunk Hunt: cyclical
Digital Loss Group: 13 Incoming Calling Number - Delete: Insert: Format: Bit Rate: 1200 Synchronization: async Duplex: full Disconnect Supervision - In? y Out? y
Answer Supervision Timeout: 0
Administer Timers? n CONNECT Reliable When Call Leaves ISDN? n XOIP Treatment: auto Delay Call Setup When Accessed Via IGAR? n
5.9. Administer VDN
“add vdn xxxx”コマンドを使って VDN を設定します。本例では Vector の番号を”1”と
しています(5.10 が具体的な設定例となります)。
以下に設定例を示します。
5.10.
Administer Hunt Group
“add hunt-group x”コマンドを使って Hunt Group を設定します。
以下に設定例を示します。
display hunt-group 1 Page 1 of 4 HUNT GROUP
Group Number: 1 ACD? y Group Name: test1 Queue? y
change trunk-group 2 Page 3 of 22 TRUNK FEATURES
ACA Assignment? n Measured: none Wideband Support? n Maintenance Tests? y Data Restriction? n NCA-TSC Trunk Member: Send Name: n Send Calling Number: y Used for DCS? n Send EMU Visitor CPN? n Suppress # Outpulsing? y Format: pub-unk
Outgoing Channel ID Encoding: preferred UUI IE Treatment: service-provider Replace Restricted Numbers? n Replace Unavailable Numbers? n Send Connected Number: n Network Call Redirection: none Hold/Unhold Notifications? n Send UUI IE? y Modify Tandem Calling Number: no
Send UCID? n
Send Codeset 6/7 LAI IE? y Ds1 Echo Cancellation? n Apply Local Ringback? n US NI Delayed Calling Name Update? n Show ANSWERED BY on Display? y
Network (Japan) Needs Connect Before Disconnect? n
display vdn 6701 Page 1 of 3 VECTOR DIRECTORY NUMBER
Extension: 6701 Name*: vdn-1
Destination: Vector Number 1 Attendant Vectoring? n Meet-me Conferencing? n Allow VDN Override? n COR: 1 TN*: 1 Measured: none
Group Extension: 4601 Vector? y Group Type: ead-mia
TN: 1
COR: 1 MM Early Answer? n Security Code: Local Agent Preference? n ISDN/SIP Caller Display:
Queue Limit: unlimited Calls Warning Threshold: Port: Time Warning Threshold: Port:
display hunt-group 1 Page 2 of 4 HUNT GROUP
Skill? y Expected Call Handling Time (sec): 180 AAS? n Service Level Target (% in sec): 80 in 20 Measured: both Service Objective (sec): 20 Supervisor Extension: Service Level Supervisor? n Controlling Adjunct: none
VuStats Objective:
Dynamic Queue Position? n Multiple Call Handling: none
Timed ACW Interval (sec): After Xfer or Held Call Drops? N
5.11.
Administer Vector
“change vector xxx”コマンドを使って Vector を設定します。以下に設定例を示します。
display vector 1 Page 1 of 6 CALL VECTOR
Number: 1 Name: test1
Multimedia? n Attendant Vectoring? n Meet-me Conf? n Lock? n Basic? y EAS? y G3V4 Enhanced? y ANI/II-Digits? y ASAI Routing? y Prompting? y LAI? y G3V4 Adv Route? y CINFO? y BSR? y Holidays? y Variables? y 3.0 Enhanced? y
01 queue-to skill 1 pri m 02 wait-time 999 secs hearing music 03 stop
5.12.
Administer Station
“add station xxxx” コマンドを使って電話機を設定します。Station はコールセンター用
の機能ボタン(manual-in, after-call, aux-work)を設定します。
以下に IP 電話機の設定例を示します。
change station 4101 Page 1 of 5 STATION
Extension: 4101 Lock Messages? n BCC: 0 Type: 9630 Security Code: * TN: 1
以下に DCP 電話機の設定例を示します。
Port: S00011 Coverage Path 1: COR: 1 Name: kuma1 Coverage Path 2: COS: 1 Hunt-to Station:
STATION OPTIONS
Location: Time of Day Lock Table: Loss Group: 19 Personalized Ringing Pattern: 1 Message Lamp Ext: 4101 Speakerphone: 2-way Mute Button Enabled? y Display Language: unicode Button Modules: 0 Survivable GK Node Name:
Survivable COR: internal Media Complex Ext: Survivable Trunk Dest? y IP SoftPhone? y IP Video Softphone? n Short/Prefixed Registration Allowed: default Customizable Labels? y
change station 4101 Page 4 of 5 STATION
SITE DATA
Room: Headset? n Jack: Speaker? n Cable: Mounting: d Floor: Cord Length: 0 Building: Set Color: ABBREVIATED DIALING
List1: List2: List3:
BUTTON ASSIGNMENTS 1: call-appr 5: after-call Grp: 2: call-appr 6: aux-work RC: Grp: 3: auto-in Grp: 7: call-park 4: manual-in Grp: 8: call-pkup voice-mail
change station 4101 Page 4 of 5 STATION
BUTTON ASSIGNMENTS 9: release
10:
change station 4201 Page 1 of 5 STATION
Extension: 4201 Lock Messages? n BCC: 0 Type: 1416 Security Code: TN: 1 Port: 004V401 Coverage Path 1: COR: 1 Name: dcp-1 Coverage Path 2: COS: 1
5.13.
Administer Agent Login-ID
“add agent-loginID xxxx” コマンドを使ってエージェントログイン ID を設定します。
5.10.で設定した Skill を割り当てます。
以下に設定例を示します。
Hunt-to Station: STATION OPTIONSTime of Day Lock Table: Loss Group: 2 Personalized Ringing Pattern: 1 Message Lamp Ext: 4201 Speakerphone: 2-way Mute Button Enabled? y Display Language: unicode Button Modules: 0 Survivable COR: internal
Survivable Trunk Dest? y IP SoftPhone? n Remote Office Phone? n IP Video? n
cchange station 4201 Page 4 of 5 STATION
SITE DATA
Room: Headset? n Jack: Speaker? n Cable: Mounting: d Floor: Cord Length: 0 Building: Set Color: ABBREVIATED DIALING
List1: List2: List3:
BUTTON ASSIGNMENTS 1: call-appr 5: after-call Grp: 2: call-appr 6: aux-work RC: Grp: 3: auto-in Grp: 7: 4: manual-in Grp: 8: voice-mail change station 4201 Page 5 of 5 STATION
FEATURE BUTTON ASSIGNMENTS 9: 10: 11: 12: 13: 14: release 15: call-park 16: call-pkup
5.14.
Administer System Parameters CDR
“change system-parameters cdr” コマンドを使用します。
Page 1 の以下の項目を設定します。
Primary Output Format: “customized”
Primary Output Endpoint: “CDR”
Use ISDN Layouts?: “n”
Use Enhanced Formats?: “n”
Use Legacy CDR Formats?: “y”
Modified Circuit ID Display?: “n”
Record Outgoing Calls Only?: “n”
Suppress CDR for Ineffective Call Attempts?: “y”
Disconnect Information in Place of FRL?: “n”
Enable CDR Storage on Disk?: “n”
Condition Code 'T' For Redirected Calls?: “n”
Remove # From Called Number?: “n”
Intra-switch CDR?: “n”
Outg Trk Call Splitting?: “y”
Outg Attd Call Record?: “y”
Interworking Feat-flag?: “n”
Force Entry of Acct Code for Calls Marked on Toll Analysis Form?: “n”
Calls to Hunt Group - Record: “member-ext”
Record Agent ID on Incoming?: “y”または”n”(検索キーの要望に応じる)
Record Agent ID on Outgoing?: “y”または”n” (検索キーの要望に応じる)
display agent-loginID 6501 Page 1 of 2 AGENT LOGINID
Login ID: 6501 AAS? n Name: agent-1 AUDIX? n TN: 1 LWC Reception: spe COR: 1 LWC Log External Calls? n Coverage Path: AUDIX Name for Messaging: Security Code:
LoginID for ISDN/SIP Display? n
display agent-loginID 6501 Page 2 of 2 AGENT LOGINID
Direct Agent Skill: Service Objective? n Call Handling Preference: skill-level Local Call Preference? n SN RL SL SN RL SL 1: 1 1 16: 2: 17: 3: 18: 4: 19: 5: 20: 6:
Inc Trk Call Splitting?: “n”
Record Non-Call-Assoc TSC?: “n”
Record Call-Assoc TSC?: “n”
Privacy - Digits to Hide: “0”
Call Record Handling Option: “warning”
Digits to Record for Outgoing Calls: “dialed”
CDR Account Code Length: “15”
Page 2 に以下の項目を設定します(以下 Data Item – Length で示します) 。
date - 6
space - 1
time - 4
space - 1
sec-dur - 5
space - 1
cond-code - 1
space - 1
code-dial - 4
code-used - 4
space - 1
dialed-num - 23
space - 1
calling-num - 15
space - 1
acct-code - 15
space - 1
ppm - 5
space - 1
in-crt-id - 3
change system-parameters cdr Page 1 of 2 CDR SYSTEM PARAMETERS
Node Number (Local PBX ID): CDR Date Format: month/day Primary Output Format: customized Primary Output Endpoint: CDR1 Secondary Output Format:
Use ISDN Layouts? n Enable CDR Storage on Disk? n Use Enhanced Formats? n Condition Code 'T' For Redirected Calls? n Use Legacy CDR Formats? y Remove # From Called Number? n Modified Circuit ID Display? n Intra-switch CDR? n Record Outgoing Calls Only? n Outg Trk Call Splitting? y Suppress CDR for Ineffective Call Attempts? y Outg Attd Call Record? y Disconnect Information in Place of FRL? n Interworking Feat-flag? n Force Entry of Acct Code for Calls Marked on Toll Analysis Form? n
Calls to Hunt Group - Record: member-ext Record Called Vector Directory Number Instead of Group or Member? n
Record Agent ID on Incoming? y Record Agent ID on Outgoing? y Inc Trk Call Splitting? n
Record Non-Call-Assoc TSC? n Call Record Handling Option: warning Record Call-Assoc TSC? n Digits to Record for Outgoing Calls: dialed Privacy - Digits to Hide: 0 CDR Account Code Length: 15
space - 1
out-crt-id - 3
space - 1
in-trk-code - 4
return - 1
line-feed - 1
6. Configure Avaya Aura
®
Application Enablement Services
ここでは Avaya Aura
®Application Enablement Services の設定例を示します。
Login to OAM
Administer CTI User
Administer Local IP
Administer Switch Connection
Administer TSAPI Link
Verify Tlink Name
6.1. Login to OAM
インターネットブラウザを使用して OAM にアクセスします。
URL: “https://ip-address” (ip-address は AES サーバの IP アドレス)
Username: 認証された User name
Password: 認証されたパスワード
change system-parameters cdr Page 2 of 2 CDR SYSTEM PARAMETERS
Data Item - Length Data Item - Length Data Item - Length 1: date - 6 17: space - 1 33: - 2: space - 1 18: ppm - 5 34: - 3: time - 4 19: space - 1 35: - 4: space - 1 20: in-crt-id - 3 36: - 5: sec-dur - 5 21: space - 1 37: - 6: space - 1 22: out-crt-id - 3 38: - 7: cond-code - 1 23: space - 1 39: - 8: space - 1 24: in-trk-code - 4 40: - 9: code-dial - 4 25: return - 1 41: - 10: code-used - 4 26: line-feed - 1 42: - 11: space - 1 27: - 43: - 12: dialed-num - 23 28: - 44: - 13: space - 1 29: - 45: - 14: calling-num - 15 30: - 46: - 15: space - 1 31: - 47: - 16: acct-code - 15 32: - 48: - Record length = 105
OAM へのログインが完了すると以下の“Welcome to OAM”画面が表示されます。
6.2. Administer CTI User
画面左のペインから “User Management” > “User Admin” > "Add User"を選択します。
以下に今回の設定例を示します。この CTI User が VCLog の CTI 設定と関連する事に注
意して下さい。
User id: vctj
CT User: yes
6.3. Administer Local IP
画面左のペインから “Networking” > “AE Service IP (Local IP)”を選択します。当検
証試験では、AES は eth0 のみの利用としており、その IP アドレスは 192.168.0.190 です。
以下に今回の設定例を示します。
6.4. Administer Switch Connection
画面左のペインから “Communication manager Interface” > “Switch Connections”を選
択します。
Switch Connection の名前を入力し、“Add Connection”をクリックします。ここでは
Switch Connection 名は”nyokocm”としています。
以下に今回の設定例を示します。
Switch Password: セクション 5.3.の設定に従う (change ip-services の P.4)
Confirm Switch Password: 同じくセクション 5.3.の設定に従う
SSL: チェック
Processor Ethernet: チェック
また、
”Edit CLAN/PE IPs”をクリックして以下の項目を設定します。
Add/Edit Name or IP: Communication Manager の PE の IP アドレス(ここでは
192.168.0.172)
6.5. Administer TSAPI Link
“AE Services” > “TSAPI” > “TSAPI Links” > “Add Link” をクリックします。
ここで設定する”Switch CTI Link Number は、5.5.で設定した CTI Link 番号を指定します。
以下に TSAPI Link の設定例を示します。
6.6. Verify Tlink Name
“Security” > “Security Database” > “Tlinks” を選択します。
この画面にこの AES で利用可能な Tlink 名が一覧されます。VCLog で設定する Tlink は
暗号化の AVAYA#NYOKOCM#CSTA#HANAAES です。
Tlink Name は AES サーバで Switch Connection が新たに登録された際に自動的に生成さ
れます。この Tlink Name が VCLog の CTI の設定と関連する事に注意して下さい。
7. Configure VCLog
ここでは VCLog の本連携のための設定例を示します。設定内容の詳細はボイスサイバ
ーテクノロジーズ・ジャパン社にお問い合わせください。
IP 電話機用設定
DCP 電話機用設定
CTI(TSAPI)の設定
PRI トランクの録音用設定
DCP 用ボード設定
PRI 用ボード設定
7.1. IP 電話機用設定
以下に設定例を示します。
7.2. DCP 電話機用設定
以下に設定例を示します。
7.3. CTI の設定
以下に設定例を示します。
Server Name が 6.6.で確認した TLINK Name になります。また、User Name/Password は
6.2.で設定した CTI User の Name と Password を設定します。※VCLog では CTI の Server
(Server Name)を 2 つ設定することができ、障害時の切り替えも可能になっており、この
設定例では Server の 2 つめの設定も入っていることに注意してください。
7.4. PRI トランクの録音用設定
以下に設定例を示します。
7.5. DCP 用ボードの設定
以下に設定例を示します。
PBX Type を”Avaya DEFINITY 2W”と設定し、Avaya のデジタル内線基板と接続するこ
とを指定します。
7.6. PRI 用ボードの設定
以下に設定例を示します。
Board タブの TDM Encoding は日本の環境なので、μ-Low を選択します。
Digital Network タブでは、日本の INS1500 と接続することになるため、T1E1 Option で
は”T1”、Framing は”ESF”、Line Coding は”B8ZS”を選択します。
8. Verification Steps
8.1. Avaya Aura
®Communication Manager
CTI Link のステータス確認
SAT の “status aesvcs cti-link” コマンドを使用して CTI Link のステータスを確認しま
す。Service State が”established”になっている必要があります。
status aesvcs cti-link
AE SERVICES CTI LINK STATUS
CTI Version Mnt AE Services Service Msgs Msgs Link Busy Server State Sent Rcvd 1 4 no hanaaes established 15 15
CDR ポートのステータス確認
SAT の "status cdr"コマンドを使用して CDR Link のステータスを確認します。Link State
が”up”になっている必要があります。
status cdr-link
CDR LINK STATUS
Primary Secondary Link State: up down Number of Retries: 999
Date & Time: 2013/03/07 14:29:56 0000/00/00 00:00:00 Forward Seq. No: 0 0
Backward Seq. No: 0 0 CDR Buffer % Full: 0.00 2.43 Reason Code: OK
8.2. Avaya Aura
®Application Enablement Services
“Status” > “Status and Control” > “TSAPI Service Summary” で該当 Tlink の
“Status” が “Talking” になっている事を確認します。
8.3. VCLog
VCLog のクライアントである VCLogCQC から正常に検索でき、録音内容の再生および
呼情報が正常かどうかを確認します。
以下に外線から VDN 経由エージェントに着信したときの録音内容聞き起こし時の様子
の画面例を示します。
9. Conclusion
株式会社ボイスサイバーテクノロジーズ・ジャパンの通話録音ソリューションである
VCLog は、今回検証した項目において正当に動作しました。
このアプリケーションノートは株式会社ボイスサイバーテクノロジーズ・ジャパンの通
話録音ソリューションである VCLog を Avaya Aura
®Communication Manager 並びに
Avaya Aura
®Application Enablement Services 環境および CDR 環境を連携した場合の構成
例、設定例を示すものであり、全てのバージョンにおける動作を保証するものではあり
ません。
10. Additional References
下記のドキュメントは http://support.avaya.com からダウンロードが可能です。
[1] Administering Avaya Aura
®Communication Manager, Release 6.2, Doc ID 03-300509,
December 2012.
[2] Avaya Aura
®Application Enablement Services Administration and Maintenance Guide,
Release 6.2, Issue 1, July 2012.
株式会社ボイスサイバーテクノロジーズ・ジャパン社製品については、
http://www.voicecyber.co.jp
をご参照ください。
11. Change History
Issue
Date
Reason
©