Legal Notices
© 2014 Avid Technology, Inc., (“Avid”), all rights reserved. This guide may not be duplicated in whole or in part without the written consent of Avid.
003, 192 Digital I/O, 192 I/O, 96 I/O, 96i I/O, Adrenaline, AirSpeed, ALEX, Alienbrain, AME, AniMatte, Archive, Archive II, Assistant Station, AudioPages, AudioStation, AutoLoop, AutoSync, Avid, Avid Active, Avid Advanced Response, Avid DNA, Avid DNxcel, Avid DNxHD, Avid DS Assist Station, Avid Ignite, Avid Liquid, Avid Media Engine, Avid Media Processor, Avid MEDIArray, Avid Mojo, Avid Remote Response, Avid Unity, Avid Unity ISIS, Avid VideoRAID, AvidRAID, AvidShare, AVIDstripe, AVX, Beat Detective, Beauty Without The Bandwidth,
Beyond Reality, BF Essentials, Bomb Factory, Bruno, C|24, CaptureManager, ChromaCurve, ChromaWheel, Cineractive Engine, Cineractive Player, Cineractive Viewer, Color Conductor, Command|8, Control|24, Cosmonaut Voice, CountDown, d2, d3, DAE, D-Command, D-Control, Deko, DekoCast, D-Fi, D-fx, Digi 002, Digi 003, DigiBase, Digidesign, Digidesign Audio Engine, Digidesign Development Partners, Digidesign Intelligent Noise Reduction, Digidesign TDM Bus, DigiLink, DigiMeter, DigiPanner, DigiProNet, DigiRack, DigiSerial, DigiSnake, DigiSystem, Digital Choreography, Digital Nonlinear Accelerator, DigiTest, DigiTranslator, DigiWear, DINR, DNxchange, Do More, DPP-1, D-Show, DSP Manager, DS-StorageCalc, DV Toolkit, DVD Complete, D-Verb, Eleven, EM, Euphonix, EUCON, EveryPhase, Expander,
ExpertRender, Fairchild, FastBreak, Fast Track, Film Cutter, FilmScribe, Flexevent, FluidMotion, Frame Chase, FXDeko, HD Core, HD Process, HDpack, Home-to-Hollywood, HyperSPACE, HyperSPACE HDCAM, iKnowledge, Impact, Improv, iNEWS, iNEWS Assign, iNEWS ControlAir, InGame, Instantwrite, Instinct, Intelligent Content Management, Intelligent Digital Actor Technology, IntelliRender, Intelli-Sat, Intelli-Sat Broadcasting Recording Manager, InterFX, Interplay, inTONE, Intraframe, iS Expander, iS9, iS18, iS23, iS36, ISIS, IsoSync, LaunchPad, LeaderPlus, LFX, Lightning, Link & Sync, ListSync, LKT-200, Lo-Fi, MachineControl, Magic Mask, Make Anything Hollywood,
make manage move|media, Marquee, MassivePack, MassivePack Pro, Maxim, Mbox, Media Composer, MediaFlow, MediaLog, MediaMix, Media Reader, Media Recorder, MEDIArray, MediaServer, MediaShare, MetaFuze, MetaSync, MIDI I/O, Mix Rack, Moviestar, MultiShell, NaturalMatch, NewsCutter, NewsView, NewsVision, Nitris, NL3D, NLP, NSDOS, NSWIN, OMF, OMF Interchange, OMM, OnDVD, Open Media Framework, Open Media Management, Painterly Effects, Palladiium, Personal Q, PET, Podcast Factory, PowerSwap, PRE, ProControl, ProEncode, Profiler, Pro Tools, Pro Tools|HD, Pro Tools LE, Pro Tools M-Powered, Pro Transfer, QuickPunch, QuietDrive, Realtime Motion Synthesis, Recti-Fi, Reel Tape Delay, Reel Tape Flanger, Reel Tape Saturation, Reprise, Res Rocket Surfer, Reso, RetroLoop, Reverb One, ReVibe, Revolution, rS9, rS18, RTAS, Salesview, Sci-Fi, Scorch, ScriptSync, SecureProductionEnvironment, Shape-to-Shape,
Sundance Digital, SurroundScope, Symphony, SYNC HD, SYNC I/O, Synchronic, SynchroScope, Syntax, TDM FlexCable, TechFlix, Tel-Ray, Thunder, TimeLiner, Titansync, Titan, TL Aggro, TL AutoPan, TL Drum Rehab, TL Everyphase, TL Fauxlder, TL In Tune, TL MasterMeter, TL Metro, TL Space, TL Utilities, tools for storytellers, Transit, TransJammer, Trillium Lane Labs, TruTouch, UnityRAID, Vari-Fi, Video the Web Way, VideoRAID, VideoSPACE, VTEM, Work-N-Play, Xdeck, X-Form, and XMON are either registered trademarks or trademarks of Avid Technology, Inc. in the United States and/or other countries.
Bonjour, the Bonjour logo, and the Bonjour symbol are trademarks of Apple Computer, Inc.
Thunderbolt and the Thunderbolt logo are trademarks of Intel Corporation in the U.S. and/or other countries.
This product may be protected by one or more U.S. and non-U.S. patents. Details are available at www.avid.com/patents. Product features, specifications, system requirements, and availability are subject to change without notice.
Chapter 1. Welcome to Pro Tools | HDX. . . 1
Pro Tools | HDX Package. . . 1
Pro Tools | HDX Hardware-Accelerated Pro Tools | HD Systems. . . 2
Registration . . . 2
System Requirements and Compatibility. . . 3
Conventions Used in This Guide . . . 4
About www.avid.com. . . 4
Chapter 2. Pro Tools | HDX Hardware Overview . . . 5
Pro Tools | HDX Hardware. . . 5
DigiLink Mini Cables . . . 7
Avid HD Audio Interfaces . . . 7
Chapter 3. Installing Pro Tools | HDX Cards. . . 11
Installing Pro Tools | HDX Cards in a Mac Pro. . . 11
Installing Pro Tools | HDX Cards in a PC . . . 17
Connecting Multiple Pro Tools | HDX PCIe Cards Using HDX TDM Cables . . . 21
Connecting Audio Interfaces. . . 22
Installing Pro Tools | HD Software and Pro Tools | HDX Hardware Drivers. . . 25
Configuring Your Pro Tools System. . . 25
Chapter 4. Configuring Core Audio (Mac OS X Only). . . 27
Avid Core Audio Driver Capabilities. . . 27
Installing the Avid Core Audio Driver. . . 28
CoreAudio Manager . . . 28
Configuring HD Audio Interfaces for Third-Party Applications. . . 31
Configuring the Apple Sound Preferences or Apple Audio MIDI Setup. . . 32
Chapter 5. Configuring ASIO (Windows Only) . . . 35
ASIO Driver Capabilities. . . 35
Installing the ASIO Driver . . . 35
Chapter 6. Pro Tools | HDXについ . . . 39
Pro Tools | HDXパッケージ. . . 39
Pro Tools | HDXハードウェア・アクセラレーター付きPro Tools | HDシステム . . . 40
システム要件と互換性. . . 40
本ガイドで使用される表記規則 . . . 41
www.avid.com について . . . 42
Chapter 7. Pro Tools | HDXハードウェアの概要 . . . 43
Pro Tools | HDXハードウェア . . . 43
DigiLink Miniケーブル . . . 45
Avid HDオーディオ・インターフェース. . . 45
Chapter 8. Pro Tools | HDXカードをインストールする. . . 49
Mac ProにPro Tools | HDXカードをインストールする . . . 49
PCコンピューターにPro Tools | HDXカードをインストールする. . . 55
複数のPro Tools | HDX PCleカードをHDX TDMケーブルで接続する . . . 58
オーディオ・インターフェイスの接続. . . 59
Pro Tools | HDソフトウェアおよびPro Tools | HDXハードウェア・ドライバーのインストール . 62 Pro Toolsシステムを設定する. . . 62
Chapter 9. Core Audioの構成(Mac OS X のみ) . . . 63
Avid Core Audio Driverの機能. . . 63
Avid Core Audio Driverのインストール. . . 64
CoreAudio Manager . . . 64
サードパーティ製アプリケーション用にHDオーディオ・インターフェイスを設定する . . . 67
Appleサウンド環境設定またはAppleオーディオMIDI設定の構成. . . 68
Chapter 10. ASIOの設定(Windowsのみ). . . 71
ASIOドライバーの性能 . . . 71
ASIOドライバーのインストール. . . 71
Avid ASIOコントロール・パネル. . . 72
Appendix A. Compliance Information. . . 75
Environmental Compliance. . . 75
EMC (Electromagnetic Compliance) . . . 76
Safety Compliance . . . 77
Chapter 1: Welcome to Pro Tools | HDX
Avid® Pro Tools®| HDX PCIe cards providededi-cated digital signal processing (DSP) for high-definition digital audio recording, editing, signal processing, mixing, and I/O capabilities with Avid Pro Tools®| HD software and Avid HD audio
interfaces and synchronization peripherals. HDX hardware with HD audio interfaces can also be used with Core Audio and ASIO-compatible digital audio software, and supports up to 64 chan-nels of I/O with the first HDX card in your system. However, HDX DSP and multiple card configura-tions for expanded I/O can only be used with Pro Tools | HD Software.
This guide covers the installation and configura-tion of HDX cards and hardware drivers on Mac and Windows platforms.
Pro Tools | HDX Package
The Pro Tools | HDX package includes the following:
• HDX PCIe card • HDX TDM cable
• HDX PCIe power cable for Mac • HDX PCIe power cable for PC
• 12 ft DigiLink™ Mini cable for connecting the HDX card to an audio interface
• Registration Information Card
• Pro Tools | HDX Card Installation Guide • Health and Safety Guide
For information about installing Pro Tools software, see the Pro Tools Installation Guide included with your Pro Tools software package (sold separately). For information about using Pro Tools software, see the Pro Tools Reference Guide.
Pro Tools | HDX
Hardware-Accelerated Pro Tools | HD
Systems
HDX hardware-accelerated Pro Tools HD systems include the following:
• Pro Tools | HD Software • One or more HDX PCIe cards • Power cable for powering the card
• HDX TDM cable (multi-card systems only) to connect HDX cards to each other
• DigiLink™ Mini cable for connecting HDX cards to audio interfaces
• At least one (up to sixteen) of the following Avid HD audio interfaces (sold separately):
• Pro Tools | HD OMNI • Pro Tools | HD I/O • Pro Tools | HD MADI
• A qualified synchronization peripheral (optional, sold separately)
• A qualified MIDI interface (optional, sold separately)
Registration
Review the enclosed Registration Information Card and follow the instructions on it to quickly register your purchase online. By registering, you become eligible to receive the following:
• Information regarding technical support • Software update and upgrade notices • Limited warranty on hardware
Hardware Warranty
Your warranty can be found on the Registration In-formation Card.
Only one HD OMNI can be used in a single system.
System Requirements and
Compatibility
HDX PCIe cards can be installed in any qualified Mac or Windows computer.
Avid can only assure compatibility and provide support for hardware and software it has tested and approved.
For complete system requirements and a list of qualified computers, operating systems, hard drives, and third-party devices, visit: www.avid.com/compatibility
Important Installation Notes
HDX is a high-performance PCIe card. Ensure that the host system into which you are going to install your HDX cards provides direct airflow of a mini-mum of 275 lfm (linear feet per minute) over any HDX card. Failure to comply with this minimum requirement may result in permanent damage to your host system and to the HDX cards in your sys-tem. Damage caused by excessive heat or failure to maintain adequate airflow in accordance with these instructions is not covered by the Avid Lim-ited Warranty.
Check the compatibility pages on the Avid website (www.avid.com) for fully compliant systems.
Important Safety Notes
1 Only use HDX in compatible systems, tested and certified by Avid (see www.avid.com).
2 The host system needs to have a minimum air-flow of 275 lfm. Failure to comply could result in a hazardous situation and damage the host as well as any HDX cards in your system.
3 Do not obstruct airflow of the host system (either intake on the host system or exhaust through the perforated mounting brackets).
4 DigiLink connectors will get hot over an extended period of use. Allow the system to cool down before making modifications.
5 The area surrounding the HDX cards in your host system will get hot. Leave sufficient air-flow around your host system, and do not place any combustible material, such as cloth or pa-per, on the host system.
6 Do not exceed the maximum ambient tempera-ture specification of your host system.
You can test your HDX hardware using Avid DigiTest. For more information, see the Avid DigiTest Guide (available online and also in-stalled with Pro Tools).
Conventions Used in This
Guide
All of our guides use the following conventions to indicate menu choices and key commands:
The names of Commands, Options, and Settings
that appear on-screen are in a different font. The following symbols are used to highlight important information:
About www.avid.com
The Avid website (www.avid.com) is your best online source for information to help you get the most out of your Pro Tools system. The following are just a few of the services and features available. Product Registration Register your purchase online.
Support and Downloads Contact Avid Customer Success (technical support); download software updates and the latest online manuals; browse the Compatibility documents for system requirements; search the online Knowledge Base or join the worldwide Pro Tools community on the User Con-ference.
Training and Education Study on your own using courses available online or find out how you can learn in a classroom setting at a certified Pro Tools training center.
Products and Developers Learn about Avid products; download demo software or learn about our Development Partners and their plug-ins, ap-plications, and hardware.
News and Events Get the latest news from Avid or sign up for a Pro Tools demo.
Convention Action
File > Save Choose Save from the File menu
Control+N Hold down the Control key and press the N key Control-click Hold down the Control
key and click the mouse button
Right-click Click with the right mouse button
User Tips are helpful hints for getting the most from your Pro Tools system.
Important Notices include information that could affect your Pro Tools session data or the performance of your Pro Tools system. Shortcuts show you useful keyboard or mouse shortcuts.
Cross References point to related sections in the Pro Tools Guides.
Chapter 2: Pro Tools | HDX Hardware
Overview
This chapter describes each component of a Pro Tools | HDX system. The number of HDX cards in your system will differ depending on your system configuration.
Pro Tools | HDX Hardware
Pro Tools | HDX PCIe Card
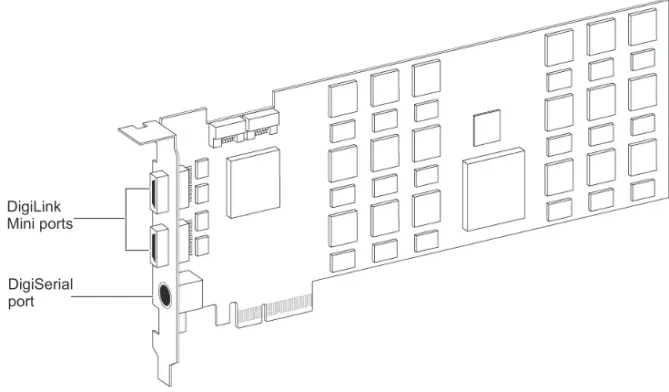
A single HDX PCIe card provides up to 256 voiceable tracks of direct-to-disk recording and playback, as well as DSP power for mixing and plug-in processing. The HDX card supports up to 24-bit, 192 kHz Pro Tools sessions.
Figure 1. HDX PCIe card
DigiLink Mini ports
DigiSerial port
DigiLink Mini Ports
The HDX card provides two DigiLink Mini ports for connecting up to four HD audio interfaces for up to 64 channels of audio input and output. DigiSerial Port
The Serial port on the HDX card is for connecting a SYNC peripheral. This connector is an 8-pin mini-DIN.
HDX TDM Cable
Use the included HDX TDM cable (a SATA cable) to connect a pair of HDX cards in your system so they can share data along the TDM bus. One HDX TDM cable comes with each HDX card.
Power Cable
HDX PCIe cards require power beyond what the PCIe bus can deliver. A custom power cable (included) is used to connect HDX PCIe cards to the motherboard in your Mac or to a hard drive power source in your PC.
The Serial port on an HDX card does not support MachineControl connections. If you have more than one HDX card with a SYNC peripheral, you must connect the SYNC peripheral to the first card in the system.
HDX TDM cable
HDX card power cable (Mac)
DigiLink Mini Cables
Use DigiLink Mini cables to connect HD I/O, HD OMNI, and HD MADI audio interfaces to HDX cards. There are five different lengths of DigiLink Mini cables:
• 18 in (0.46m) (included with HD I/O, HD OMNI, and HD MADI audio interfaces) • 12 ft (3.6m) (one included with each HDX card) • 25 ft (7.62m) (sold separately)
• 50 ft (15.25m), the maximum length supported for 176.4 kHz and 192 kHz sessions (sold sepa-rately)
• 100 ft (30.5m), the maximum length supported by 88.2 kHz and 96 kHz sessions (sold sepa-rately)
Avid HD Audio Interfaces
To record and play audio with Pro Tools (or with a qualified third-party Core Audio-compatible or ASIO-compatible application), you must have at least one Avid HD audio interface connected to the first port of the first HDX card in your system.
Pro Tools | HD OMNI Audio
Interface
HD OMNI provides a compact preamp, monitor-ing, and I/O solution for music production and re-cording, and post production studios.
Pro Tools | HD OMNI Features
HD OMNI provides up to 8 discrete channels of Pro Tools input and output, with 4-segment LED meters for input or output (selectable).
Analog I/O
• 24-bit analog-to-digital (A/D) and digital-to-an-alog (D/A) converters, with support for sample rates up to 192 kHz
• 2 high-quality Mic/DI preamps (Channels 1–2) • 2 combined XLR and 1/4-inch TRS front panel
inputs for microphone and instrument level in-put
• 2 XLR back panel microphone inputs • 2 1/4-inch TRS Send and 2 1/4-inch TRS
Return back panel jacks for hardware inserts on channels 1 and 2
• 4 analog TRS line level back panel inputs (Channels 1–4)
• Soft Clip and Curv limiting circuits to protect against clipping on analog input
• 8 channels of analog back panel output using a DB-25 breakout cable (sold separately) with variable output gain
• 2 channels of analog back panel output using TRS (Mirrors channels 1–2 or 7–8 on DB-25 connector)
• Front panel stereo 1/4” headphone jack For more information, see the HD OMNI
Guide.
Only one HD OMNI can be used in a single system.
HD OMNI provides up to four channels of simultaneous analog input from any of sev-eral possible analog input connection.
Digital I/O
• 8 channels of AES/EBU output (up to 192 kHz Single Wire) using a DB-25 breakout cable (sold separately)
• 2 channels of AES/EBU XLR input (up to 192 kHz Single Wire)
• 2 channels of S/PDIF RCA input and output (up to 192 kHz)
• 8 channels of ADAT TOSLINK input and output • Support for ADAT S/MUX Optical for sample
rates of 88.2 kHz, 96 kHz, 176.4 kHz, and 192 kHz
• Support for two channels of S/PDIF Optical with sample rates of up to 96 kHz
• Real-time sample rate conversion (SRC) on Dig-ital Inputs 1–2 of either AES/EBU, S/PDIF, or Optical (S/PDIF)
Monitoring
• An additional stereo “CUE” output path in Pro Tools for headphone monitoring from the front panel headphone jack
• Front panel Control Room (MAIN/ALT) and Headphone monitoring volume control
• Flexible monitoring with fold-down from all ste-reo and surround formats (up to 7.1 surround) • Input mixer for low latency direct monitoring of
a variety of incoming signals (configured in the Pro Tools Hardware Setup)
Synchronization
• Loop Sync input and output for connecting addi-tional HD interfaces and peripherals
• External Clock input and output for synchroniz-ing HD OMNI with external Word Clock de-vices
Pro Tools | HD I/O Audio
Interface
HD I/O features exceptionally high quality 24-bit analog-to-digital (A/D) and digital-to-analog (D/A) converters, and supports sample rates of up to 192 kHz.
HD I/O comes in three standard configurations: • 8 x 8 x 8 (8 analog in, 8 analog out, and 8 digital
in and out)
• 16 x 16 analog in and out • 16 x 16 digital in and out
You can also add or remove HD I/O Analog Ex-pansion cards (ADC and DAC) and HD I/O Digital Expansion cards for custom configurations.
Pro Tools | HD I/O Features
HD I/O provides up to 16 discrete channels of Pro Tools input and output, with 4-segment LED meters for input and output.
Analog I/O
• Up to sixteen channels of 24-bit D/A and A/D converters for superior analog input and output at sample rates of 44.1 kHz, 48 kHz, 88.2 kHz, 96 kHz, 176.4 kHz, and 192 kHz with Analog In and Analog Out HD I/O cards • Soft Clip and Curv limiting circuits to protect
against clipping on analog input Digital I/O
• Up to sixteen channels of 24-bit digital I/O, us-ing AES/EBU, TDIF DB-25, or Optical at sam-ple rates of 44.1 kHz, 48 kHz, 88.2 kHz, 96 kHz, 176.4 kHz, and 192 kHz with a Digital HD I/O card
SRC is not supported with ADAT S/MUX.
• Real-time sample rate conversion on digital in-puts with a Digital I/O card (up to sixteen chan-nels of AES/EBU, Optical, or TDIF)
• Support for S/MUX Optical for sample rates of 88.2 kHz and higher
• Support for 2 channels of S/PDIF Optical (en-closed) with sample rates of up to 96 kHz • 2 channels of AES/EBU I/O (enclosed) with
support for sample rates up to 192 kHz • 2 channels of 24-bit-capable S/PDIF I/O
(en-closed) with support for sample rates up to 192 kHz
Synchronization
• Loop Sync input and output for connecting addi-tional HD interfaces and peripherals
• External Clock input and output for synchroniz-ing HD I/O with external Word Clock
devices Expandability
• Optional addition of I/O cards to expand analog or digital I/O
• Simultaneous use of multiple Avid HD audio in-terfaces to further expand system input and out-put (for more information see the
Expanded Systems Guide)
Pro Tools | HD MADI Digital
Audio Interface
HD MADI provides up to 64 channels of digital audio. HD MADI supports the Multichannel Au-dio Digital Interface (MADI) format and sample rates of up to 192 kHz. HD MADI provides simpli-fied connectivity between your digital audio work-station and MADI-compatible audio equipment, such as routers, digital mixing consoles, and con-verters.
`
Pro Tools | HD MADI Features
• 2 MADI Optical and Coaxial inputs and 2 MADI Optical and Coaxial outputs for up to 64 discrete channels of digital input and out-put (32 channels per DigiLink Mini port) • Supports sample rates of 44.1 kHz, 48 kHz,
88.2 kHz, 96 kHz, 176.4 kHz, and 192 kHz • 24- or 16-bit resolution
• Sample Rate Conversion (SRC) on input or out-put
• Front panel clock and SRC indicators • Front panel signal present LEDs for input and
output
• BNC Word Clock I/O for synchronizing HD MADI with external 1x Word Clock • BNC Loop Sync I/O for synchronizing
HD MADI with additional HD audio interfaces and peripherals (such as HD I/O, HD OMNI, or SYNC HD)
• Dedicated BNC Word Clock input and XLR AES/EBU input (clock input only) for external MADI synchronization (when using SRC on output)
• Clock support for the following formats: Inter-nal, Loop Sync, Word Clock, AES/EBU, and MADI
• Varispeed modes (supports both 64- and 56-channel standards)
For more information, see the HD MADI Guide.
Chapter 3: Installing Pro Tools | HDX Cards
Install HDX PCIe cards in your computer beforeinstalling Pro Tools. For systems with more than one card, connect the cards using the included HDX TDM cables. Once the cards are installed, connect HD audio interfaces.
Installing Pro Tools | HDX
Cards in a Mac Pro
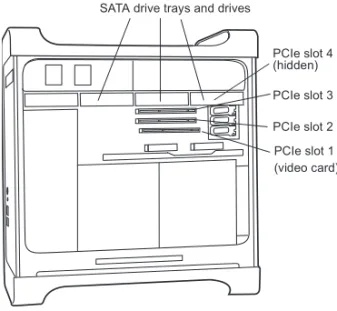
This section shows how to install HDX cards in a Mac Pro. The PCI Express-equipped Mac Pro has three PCI Express (PCIe) slots (named slots 2, 3, and 4). The PCI Express slot numbers increase from bottom to top as you face the open computer case from the side. Install the first HDX card into PCIe slot 2.
To install cards into an expansion chassis, see the HDX Expanded Systems Guide. Install Pro Tools software only after you have installed your HDX cards and HD audio interfaces. For information on installing Pro Tools software, see the Pro Tools Installation Guide that came with your Pro Tools software package.
Figure 2. Mac Pro
Follow these instructions carefully to avoid damaging the card and its components.
PCIe slot 1 (video card) PCIe slot 2 PCIe slot 3 PCIe slot 4 (hidden) SATA drive trays and drives
To install Pro Tools cards in a Mac Pro: 1 Turn off your computer and any peripherals.
Leave your computer’s power cable plugged in so the computer is grounded.
2 Disconnect all cables attached to the computer (such as hard drives, displays, USB and Fire-Wire devices) except for the power cable.
3 Lay the computer on its side so the access panel is facing up.
4 Open the computer case using the latch located on the back of the computer.
5 Remove the clamp that secures the metal access port covers to the chassis.
6 Remove the metal access port covers for the
slots you want to use.
7 Remove your computer’s SATA drive trays. If
any extra SATA drives are installed, remove them also. Refer to your computer’s documen-tation for information on removing SATA drives and SATA drive trays.
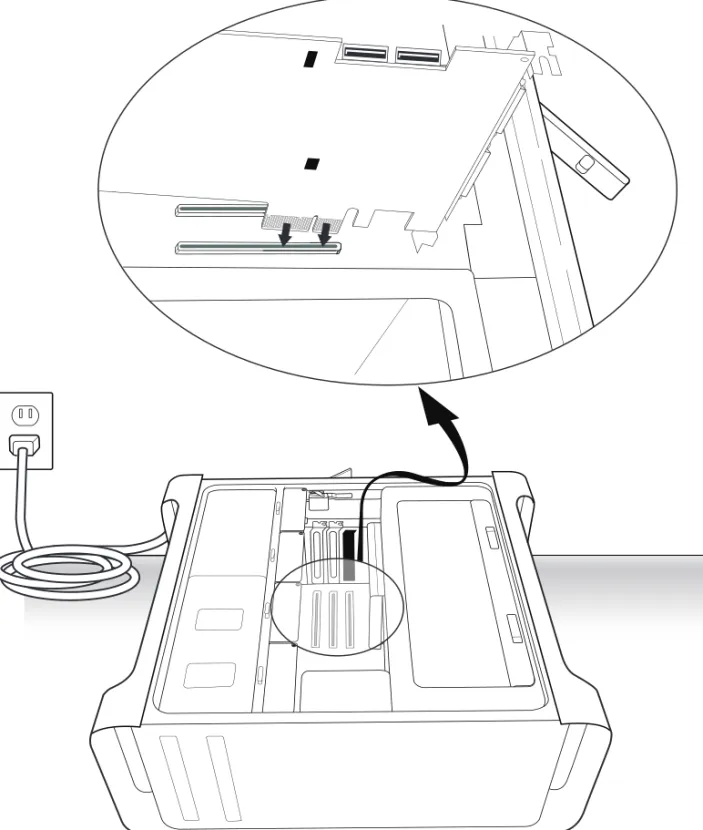
8 Connect the included custom power cable to the
motherboard and move the cable away from the PCIe card slots. (See Figure 3 on page 12).
Before handling any card, discharge static electricity from your clothes or body by touching a grounded metal surface, such as the power supply case inside your computer with the power cable connected.
Figure 3. HDX card power cable connected to the motherboard 2
4
3
9 Install the first HDX card into the
lowest-num-bered available PCIe slot in the computer. (See Figure 4 on page 14).
Do the following:
• Hold the card above the PCIe slot at a slight angle so that the back of the card is higher than the front of the card (where the DigiLink Mini connectors are located on the card). • With the card at an angle, rest the card’s front
bracket against the edge of the chassis, where the computer’s slot access port is located. • Carefully slide the back of the card down into
the PCIe slot’s grey plastic PCIe card support (where the slot numbers appear). (See Figure 5 on page 15.)
• With the card PCIe connectors facing down, carefully slide the card straight down and firmly seat the PCIe connector into the PCIe slot, making sure that all card components on the back of the card have clearance from the grey plastic PCIe card support.
On Mac Pro “Westmere” machines, you may need to carefully push the grey plastic PCIe card support back to install the HDX PCIe card without damaging it.
Do not force the card into the PCIe card support slot. When you have the correct installation angle, the card should slide in easily. If you do not have the correct angle, reposition the card.
Figure 4. Installing an HDX card into a Mac Pro 3 2 1 4 22 1
Figure 5. HDX card sliding into the grey plastic PCIe card support 3 2 1 4 1 2 4 22
10If you are installing additional HDX cards (or other cards), install any additional HDX PCIe cards in the remaining consecutive PCIe slots. Otherwise, skip to step 12.
11If you have installed more than one HDX PCIe card, connect the cards using the included HDX TDM cable (see “Connecting Multiple Pro Tools | HDX PCIe Cards Using HDX TDM Cables” on page 21).
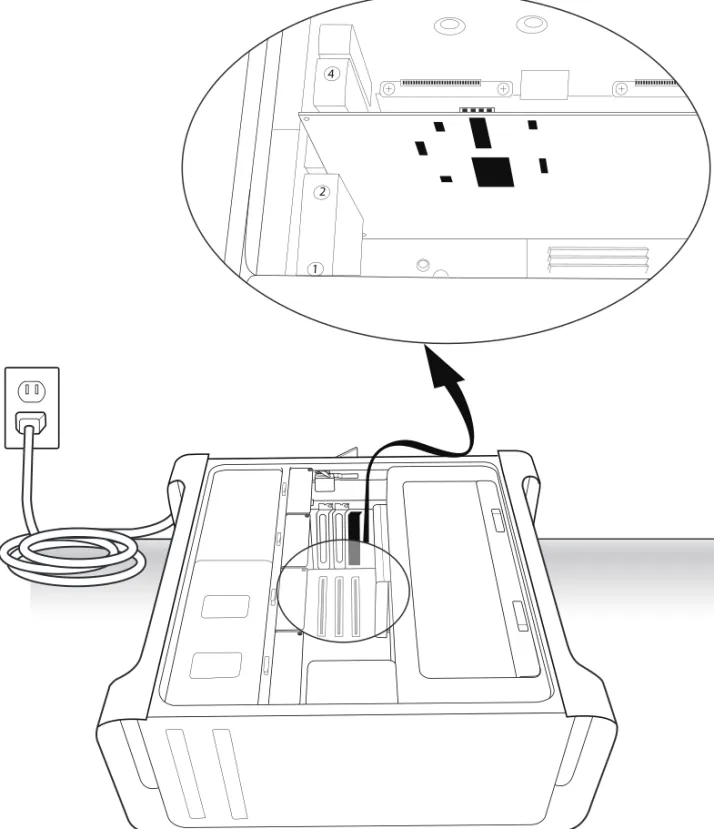
12Connect the power cable to the installed HDX PCIe cards. (See Figure 6 above).
13Check to be sure that your cards are installed in the proper order for your system, starting with the lowest numeric slot:
• Display card for your computer monitor • HDX cards
• Avid-approved video capture card (optional) • Host Bus Adapter (HBA) card (optional)
14Reattach the clamp that secures the cards and the slot covers to the chassis.
15Replace the SATA drives.
16Close the computer case. Figure 6. Connecting the power cable to an installed HDX card
1 2
4
The card’s PCIe connectors will not seat completely until you have replaced the clamp that secures the cards and the metal access port covers to the chassis.
Installing Pro Tools | HDX
Cards in a PC
This section shows how to install HDX cards in a PC.
To install Pro Tools cards:
1 Turn off your computer and any peripherals.
Leave your computer’s power cable plugged in so the computer is grounded.
2 Disconnect all cables attached to the computer
(such as hard drives, displays, USB and Fire-Wire devices) except for the power cable.
3 Open the computer case.
4 Connect the included custom power cable to
any available hard drive power connector com-ing from the main power supply. (See Figure 7 on page 18.)
5 Remove the metal access port cover behind the
slot you want to use by removing the screw and sliding the cover out from the access port.
6 Install the first HDX PCIe card in the
recom-mended PCIe slot (typically this is the first PCIe slot, closest to the video card). (See Figure 8 on page 19.)
7 If you are installing additional HDX cards (or
other cards), install them in the remaining con-secutive PCIe slots. Otherwise, skip to step 9.
8 If you have installed more than one HDX PCIe
card, connect the cards using the included HDX TDM cable (see “Connecting Multiple Pro Tools | HDX PCIe Cards Using HDX TDM Cables” on page 21).
For the latest slot order and configurations for Windows computers, visit www.avid.com. It is recommended that you have it available for reference before opening the computer and in-stalling Pro Tools hardware.
Before handling any card, discharge static electricity from your clothes or body by touching a grounded metal surface, such as the power supply case inside your computer.
For slot order recommendations in qualified Windows computers, visit the com-patibility pages on the Avid website: (www.avid.com/compatibility).
9 Connect the power cable to the installed HDX
PCIe cards. (See Figure 9 above.)
10Check to be sure that all cards are installed in
the proper order for your system (this may vary depending on your machine):
• Display card for your computer monitor • HDX cards
• Host Bus Adapter (HBA) card (optional)
11Secure each card in place with the slot access
port screws you removed earlier.
12Close the computer case.
13Connect your HD audio interfaces (see
“Con-necting Audio Interfaces” on page 22). Figure 9. Connecting the HDX card power cable (PC)
Connecting Multiple
Pro Tools | HDX PCIe Cards
Using HDX TDM Cables
In systems that have more than one card, you must connect all the HDX PCIe cards to each other with HDX TDM cables (custom SATA
cables). Each HDX card has two ports along the top of the card, labeled IN and OUT. Data commu-nication across multiple cards is achieved by con-necting the OUT port of the first card to the IN port of the next card with an HDX TDM
cable.
To connect HDX PCIe cards with an HDX TDM cable:
1 Connect the end of the HDX TDM cable labeled OUT to the OUT port of the first HDX card.
2 Connect the other end of the HDX TDM cable, labeled IN, to the IN port of the second HDX card.
3 For systems with more than two cards, connect each additional card to its preceding card. Use additional HDX TDM cables to connect card pairs together, as described above, until all cards are connected. (Each HDX card is pack-aged with an HDX TDM cable.)
Connecting Audio Interfaces
Each Avid HD audio interface provides several different input and output options. For example, HD OMNI supplies up to 8 channels of input and output to your Pro Tools system, HD I/O supplies up to 16 channels of input and output, and HD MADI provides up to 64 channels. Audio inter-faces can be connected directly to HDX cards, or through the Expansion ports on other HD audio in-terfaces.
Each HDX card supports up to 64 channels of au-dio input and output. To get a full 64 channels of I/O, you can connect up to four 16-channel HD I/O to an HDX card. Two of the interfaces connect di-rectly to DigiLink Mini Ports 1 and 2, and the other 2 HD I/O connect to the Expansion ports on first two HD I/O.
You can also get a full 64 channels of I/O with a single HD MADI connected to an HDX card using 2 DigiLink Mini cables.
Refer to the HD OMNI Guide, HD I/O Guide, or
HD MADI Guide for specific details regarding:
• Front and back panel connectors and indicators • Installation of optional expansion I/O cards (HD
I/O only)
To connect HD audio interfaces:
1 Do one or more of the following depending on the audio interface you are connecting: • If you are using a single HD OMNI or
HD I/O, connect its Primary Port to DigiLink Mini Port 1 on the first HDX card in your sys-tem using the provided DigiLink Mini cable.
• If you are connecting an additional HD audio interface (such as HD I/O), you can connect its Primary Port to DigiLink Mini Port 2 on the first HDX card in your system using the provided DigiLink Mini cable.
• If you are connecting HD MADI to your sys-tem, connect HD MADI Primary Port 1 to DigiLink Mini Port 1 on the HDX card using a DigiLink Mini cable (included). For the full 64 channels of I/O possible with HD MADI, connect HD MADI Primary Port 2 to Dig-iLink Mini Port 2 on the HDX card using a DigiLink Mini cable (included).
2 Connect additional HD audio interfaces to sub-sequent HDX cards, or daisy-chain the inter-faces (by connecting the Primary Port of the secondary interface to the Expansion Port of the primary interface).
You can also connect up to two HD interfaces di-rectly to each HDX card in your system using the provided DigiLink Mini cables. (Note that there is no advantage or disadvantage to this configuration over daisy-chaining interfaces.)
In an expanded system, you should connect audio interfaces only to the first 4 HDX cards in your system.
At least one HD audio interface must be con-nected to the first port on the first HDX card in your system.
Pro Tools HD supports only one HD OMNI per system. If you are connecting HD OMNI to your system, it is generally recommended that you connect it directly to the first port on the first HDX card in your system.
Connecting the DigiLink Mini ports of the HD MADI to separate HDX cards is not supported.
Connecting Loop Sync
If you are using two or more HD audio interfaces or a SYNC peripheral, Loop Sync must be con-nected to maintain proper clock among the devices.
To make Loop Sync connections:
1 Connect the Loop Sync Out of each interface to the Loop Sync In of the next interface with the BNC cables included in your I/O packaging.
2 Connect the Loop Sync Out of the last inter-face to the Loop Sync In of the primary interinter-face or SYNC peripheral.
Figure 11. Making DigiLink and Loop Sync connections with HD OMNI and HD I/O.
12-foot DigiLink Mini
A single HDX card cable
Loop Sync cables
18-inch DigiLink Mini cable
Figure 12. Making DigiLink and Loop Sync connections with HD OMNI and five HD I/Os
12-foot DigiLink Mini First HDX card cable
Loop Sync cables 18-inch DigiLink
Mini cable
Maximum I/O Configurations
Pro Tools HD with HDX cards supports up to a maximum combination of 16 total of the following audio interfaces:• HD OMNI (only one HD OMNI is supported in a single system)
• HD I/O (up to 16 HD I/O can be used simultaneously—requires 4 HDX cards) • HD MADI (up to 4 HD MADI can be used
simultaneously—requires 4 HDX cards) For examples of connecting multiple I/Os, see Figure 11 on page 23 and Figure 12 on page 24.
Installing Pro Tools | HD
Software and Pro Tools | HDX
Hardware Drivers
Once you have installed your HDX cards and con-nected your HD audio interfaces, you can install and authorize your Pro Tools HD software (sold separately).
To use your HDX hardware with Pro Tools | HD Software, and Core Audio (Mac) or ASIO (Win-dows) compatible digital audio software (such as
hardware drivers for HDX. On Windows, if you stall Pro Tools | HD Software, these drivers are stalled automatically. On Mac, or if you are not in-stalling Pro Tools, you can download the driver installer from the Avid web site
(www.avid.com/drivers).
To install the Avid HD Driver on Mac:
1 Ensure that your HDX hardware is correctly
in-stalled.
2 Download the Avid HD Driver installer from
our website (www.avid.com/drivers).
3 Locate and double-click HD Driver
In-staller.dmg. The contents of the disk image are displayed in the Finder.
4 Locate and double-click Avid HD Driver.pkg on the Avid HD Driver disk image.
5 Follow the on-screen instructions to complete
the installation.
6 When the installation is complete, click Restart.
Configuring Your Pro Tools
System
After you have installed, authorized, and launched Pro Tools, you can configure your system to meet the specific needs of your studio. For detailed in-formation on configuring your Pro Tools software, see the Pro Tools Reference Guide (which is avail-able from the Help menu in Pro Tools).
HD audio interfaces need room at their sides to maintain proper air flow for cooling. Do not block the sides of the unit or disconnect the internal fan. If the units are rack-mounted in a case, remove the case lids or doors before operating the system. Failure to do so can result in the units overheating, which can permanently damage sensitive components.
For complete installation and authorization instructions, see the Pro Tools Installation Guide that came with your Pro Tools software package.
For instructions on installing the Core Audio driver, see “Installing the Avid Core Audio Driver” on page 27.
For instructions on installing the ASIO driver, see “Installing the ASIO Driver” on page 35.
Chapter 4: Configuring Core Audio
(Mac OS X Only)
Avid HD Core Audio Driver
Capabilities
The Avid HD Core Audio Driver is a multi-client, multichannel sound driver that lets Core Au-dio–compatible applications record and play back through Pro Tools | HDX hardware.
Full-duplex recording and playback of 24-bit audio is supported at sample rates up to 96 kHz, depending on your Pro Tools hardware and CoreAudio client application.
The Avid HD Core Audio Driver provides up to 64 channels of I/O with the first HDX card in your system.
Limitations of the Avid HD CoreAudio Driver
The Avid HD Core Audio Driver has the following limitations:
The Avid HD Core Audio Driver cannot be used
to preview sound files from the Mac Finder. When a sound file is located in the Mac OS X navigation window, a QuickTime transport bar is displayed next to it. The QuickTime transport bar lets you au-dition the sound file. The sound will always play back though the Mac’s built-in audio controller (through the Mac speaker or headphone jack). However, if you double-click a sound file, the QuickTime application will launch, and can use the CoreAudio Driver for playback.
The Avid HD Core Audio Driver cannot be used
for playback of Mac System Sounds. The Core Audio Driver does not support
more than the first HDX card in your system.
Installing the Avid HD Core
Audio Driver
The Avid HD Core Audio Driver can be installed as a standalone driver on Mac systems that do not have Pro Tools software installed. The installer for the standalone Avid HD Core Audio Driver is available from our website (www.avid.com/driv-ers).
To install the standalone Avid HD Core Audio Driver:
1 Ensure that your HDX hardware is correctly in-stalled.
2 Download the Avid HD Driver installer from the Avid website (www.avid.com/drivers).
3 Locate and double-click HD Driver
In-staller.dmg. The contents of the disk image are displayed in the Finder.
4 Locate and double-click Avid HD Driver.pkg on the Avid HD Driver disk.
5 Follow the on-screen instructions to complete the installation.
6 When the installation is complete, click Restart.
CoreAudio Manager
You can configure the Avid HD Core Audio Driver using CoreAudio Manager, or from within most third-party CoreAudio-compatible client ap-plications. Refer to the manufacturer’s documenta-tion for more informadocumenta-tion.
Some applications (such as Apple’s iTunes or QuickTime Player), also require that you configure either the Apple Sound Preferences or Apple dio MIDI Setup (AMS) to use the Avid Core Au-dio Driver.
The Avid Core Audio Manager is configured to auto-hide when first launched. To bring it to the foreground, click on its icon in the dock. The Avid Core Audio Manager is not used by Pro Tools. It is only used by other Core Audio ap-plications.
Accessing the CoreAudio
Manager
The Avid Core Audio Manager application launches automatically when the first client appli-cation accesses the Avid Core Audio Driver.
Avid Core Audio Manager cannot be accessed un-der the following circumstances:
• When Pro Tools is running
• When another application is using Direct IO
Preventing an Application from Accessing the Avid HD Core Audio Driver
You can prevent an application from accessing the Avid HD Core Audio Driver by holding down the Shift key just before the application would access the Avid HD Core Audio Driver, typically when launching the application. Certain applications (such as Apple Mail and iChat), do not access the Avid HD Core Audio Driver until they first play a sound, so you will need to hold down the Shift key just prior to sound playback in order to prevent the use of your Avid hardware for playback.
Using the Avid Core Audio
Manager
Use the Avid Core Audio Manager to change the Core Audio Buffer Size setting, access the Hard-ware Setup dialog for your Avid hardHard-ware, and control volume and mute for the Avid HD Core Audio Driver. The Avid Core Audio Manager also identifies your Avid hardware, the supported num-ber of Input and Output Channels and the numnum-ber of attached clients (applications).
Buffer Size
You can select from the following buffer sizes (de-pending on your Avid hardware):
• 64 samples • 128 samples • 256 samples • 512 samples • 1024 samples • 2048 samples
Changing the Buffer Size for the Avid HD Core Audio Driver does not affect the H/W Buffer Size
setting in the Pro Tools Playback Engine dialog.
To configure Avid Core Audio Hardware Buffer Size:
1 Double-click the Avid Core Audio Manager file (located in /Applications/Avid/).
2 From the Buffer Size pop-up menu, select the desired Core Audio buffer size (in samples). Generally, smaller buffer sizes are preferable. However, if you experience any problems with performance (such as clicks and pops during re-cording or playback), try increasing the Core Audio Buffer Size setting. You can also change the buffer size from within the client application if it is the only client attached to the Core Audio Driver. Once two or more clients are active, you will not be able to change the sample rate or the buffer size.
To ensure proper playback with the Avid HD Core Audio Driver, launch the Avid Core Au-dio Manager first, making sure that its status is “Connected.”
HW Setup Button
The HW Setup button opens the Hardware Setup dialog for your Avid hardware. The HW Setup but-ton is only available when no clients are using the Avid HD Core Audio Driver.
To configure Core Audio HW Setup: 1 Quit any Core Audio client applications.
2 Double-click the Avid Core Audio Manager file (located in /Applications/Avid/).
3 Click the HW Setup button to open the Hard-ware Setup dialog.
4 Configure the Hardware Setup dialog for your Avid audio hardware. If you have more than one HDX card in your system, be sure to select and configure only the audio interfaces connected to the first HDX card.
5 When you are finished, click OK to close the Hardware Setup dialog.
Prefs Button
The Prefs button opens the Avid Core Audio Man-ager Preferences dialog. There are several options available configuring the Manager application. When finished setting these options, click OK to close the Avid Core Audio Manager Preferences window.
Hide Manager if Auto-Launched by Client En-able this option to hide the Manager panel after the first client application accesses the Avid Core Au-dio Driver. To open the Manager panel, click on the Avid Core Audio Manager application icon in the Dock.
Auto-Quit Manager when Last Client Quits En-able this option to make the Manager application quit when there are no longer any clients using the Avid Core Audio Driver.
Use C|24 Stereo Routing (L/R to 1/3) When using C|24, enable this option to configure the Avid Core Audio Driver to output through the C|24 standard stereo routing (outputs 1 and 3).
Use XMON Stereo Routing (L/R to 1/5) When us-ing D-Control or D-Command, enable this option to configure the Avid Core Audio Driver to output through the D-Control or D-Command standard stereo routing (outputs 1 and 5).
Hardware Setup dialog, HD I/O shown
For more information on the Hardware Setup dialog, refer to the Pro Tools Reference Guide.
Mirror Analog Outs 1 & 2 to Digital Outs (002/003) This option is grayed out for systems using an HDX card. When using 003, 003 Rack, 003 Rack+, Digi 002, or Digi 002 Rack, enable this op-tion to mirror the main outputs through the digital outputs that are selected in the Hardware Setup di-alog.
Connect Button
The Connect button is available when the Avid Core Audio Manager is launched and cannot con-nect with the Pro Tools hardware (such as when Pro Tools is launched and the hardware is discon-nected or disabled). Before trying to connect, make sure to quit Pro Tools and make sure that your hardware is connected and turned on. You can then click on the Connect button to acquire the hard-ware.
Quit Button
Use the Quit button to quit the Avid Core Audio Manger. Be sure to quit any client applications be-fore using the Quit button in the Manager. If any applications are currently attached to the Manager application when quitting, you may get an error message indicating that the Pro Tools hardware is no longer available. You may have to change the application’s preferences to use different hardware for playback or possibly quit and relaunch the ap-plication for proper playback to be resumed.
Configuring HD Audio
Interfaces for Third-Party
Applications
When using an HDX card with an application other than Pro Tools (such as Apple GarageBand), you can configure hardware settings using the audio preference settings available in that application.
To configure hardware settings through a Core Audio application (such as Apple GarageBand): 1 Select Avid HW (HDX) for Audio Output and
Audio Input.
2 Select a buffer size for your system from one of the following options:
• Maximum/Large buffer size • Minimum/Small buffer size If any application is launched prior to
press-ing the Connect button and you want that ap-plication to use the Avid Core Audio Driver for playback, you will need to quit and re-launch the application for it to connect prop-erly to the CoreAudio Manager.
For more information about the hardware settings options for your specific Core Audio application, refer to the manufacturer’s documentation.
Configuring the Apple Sound
Preferences or Apple Audio
MIDI Setup
(Required for Using Avid Audio Interfaces with Apple iTunes or QuickTime Player)
To use your Avid audio interface with certain Core Audio–compatible playback applications (such as Apple iTunes or QuickTime Player), you will need to configure either Sound Preferences or Audio MIDI Setup in addition to Avid Core Audio Man-ager. However, for most Core Audio–compatible client applications (such as BIAS Peak or Ableton Live) this is unnecessary since you can configure the Core Audio Buffer Size setting and audio input and output channels from within the client applica-tion.
Apple Sound Preferences
To configure the Apple Sound Preferences: 1 Launch System Preferences (Apple menu >
System Preferences).
2 Click Sound.
3 Click Output and select HDX as the device for sound output.
4 Click Input and select HDX as the device for sound input.
5 Quit System Preferences.
Sound Preferences, Output settings
Sound Preferences, Input settings (Pro Tools HD shown)
Apple Audio MIDI Setup
To configure the Apple Audio MIDI Setup: 1 Launch Audio MIDI Setup (located in
Home/Applications/Utilities).
2 In the Audio Devices window, click the Input
tab.
3 From the Audio Devices list on the left, select
HDX.
4 In the Audio Devices window, click the Output
tab.
5 From the Audio Devices list on the left, select
HDX.
6 In the Audio Input or Audio Output page, select the Format (sample rate). Note that the input sample rate and output rate are linked.
7 Choose Audio MIDI Setup > Quit Audio MIDI Setup.
Apple Audio MIDI Setup application, Audio Devices Input settings
Apple Audio MIDI Setup application, Audio Devices Output settings
Chapter 5: Configuring ASIO (Windows Only)
ASIO Driver Capabilities
The Avid HD ASIO Driver is a single-client, mul-tichannel sound driver that allows third-party au-dio programs that support the ASIO Driver stan-dard to record and play back through qualified Avid audio interfaces.
Full-duplex playback of 24- and 16-bit audio are supported at sample rates up to 96 kHz, depending on your Avid hardware and ASIO-client program (such as Cubase, Live, or Reason).
The Avid HD ASIO Driver provides up to 64 chan-nels of input and output with the first HDX card in your system.
Limitations of the ASIO Driver
The Avid HD ASIO Driver has the following lim-itations: The Avid HD ASIO Driver is a single-client
driver and cannot be used with multiple applica-tions at the same time. Only one application at a time can use the Avid HD ASIO Driver.
The Avid HD ASIO Driver cannot be used for
playback of Windows system sounds.
It is also recommended that you use a separate
sound card for games or other general work.
Installing the Avid HD Driver
The Avid HD driver is installed by default when you install Pro Tools. The Avid HD driver can also be installed as a standalone driver on Windows systems that do not have Pro Tools software in-stalled. The installer for the Avid HD Driver is available from our website (www.avid.com/driv-ers).
To install the standalone ASIO Driver: 1 Ensure that your HDX card is correctly
installed.
2 Download the Avid HD Driver installer from our website (www.avid.com/drivers).
3 Locate and double-click HD Driver Installer Setup.exe.
4 Follow the on-screen instructions to complete the installation.
5 When the installation is complete, click Finish
to quit the installer and restart your computer. If you uninstall Pro Tools, the ASIO Driver is automatically uninstalled at that time.
Avid ASIO Control Panel
Configuring the Avid ASIO Driver settings can be done using the Avid ASIO Control Panel, which can accessed from compatible third-party ASIO-compatible client applications.
Accessing the Avid ASIO Driver
Control Panel
To access the Avid ASIO Control Panel from a third-party application:
Refer to your ASIO-client program’s
documen-tation.
The Avid ASIO Control Panel cannot be accessed under the following circumstances:
• When Pro Tools is running.
• When playing or recording in an audio pro-gram that does not support the Avid ASIO driver.
• When using a third-party audio program that has an option to keep the ASIO Driver open even when you are not playing or recording. (You must close the audio program before you can open the ASIO Driver Control Panel.)
Example: Accessing the Avid ASIO Control Panel from Ableton Live
To access the Avid ASIO Control Panel from Ableton Live, do the following:
1 Open the Live Preferences.
2 Select the Audio tab.
3 Select ASIO from the Driver Type pop-up menu.
4 Select ASIO Avid Driver from the Audio Devices
pop-up menu.
5 Click the Hardware Setup button to open the Avid ASIO Control Panel.
Using the ASIO Driver Control
Panel
From the ASIO Driver Control Panel, you can change the Buffer Size setting or access the Hard-ware Setup dialog for your Avid hardHard-ware. Setup Example, Ableton Live 8 shown
Buffer Size
You may select from the following buffer sizes (depending on your Pro Tools hardware):
• 64 samples • 128 samples • 256 samples • 512 samples • 1024 samples • 2048 samples
Small buffers have the advantage of low
latency in the record monitor path. (Latency is the time delay between a signal entering the
audio inputs and leaving the outputs during recording.)
Larger buffers have the advantage of making
the ASIO Driver more immune to audio dropouts during playback and recording.
In some ASIO-compatible audio programs, per-forming various tasks will interrupt the ASIO Driver and may result in clicks and pops in audio playback or recording. Choosing medium or large buffers (such as 256, 512, or 1024) can help allevi-ate this problem.
Changing the Buffer Size setting for the ASIO Driver does not affect the H/W Buffer Size settings in the Pro Tools Playback Engine dialog.
Device
The Device setting is always set to your installed Pro Tools hardware.
Advanced Button
The Advanced button opens the Hardware Setup dialog for the Avid hardware that you are using.
Hardware Setup dialog, HD I/O shown
For more information on the Hardware Setup dialog, refer to the Pro Tools Reference Guide.
第
1
章:
Pro Tools | HDX
につい
Avid® Pro Tools® } HDX PCIeカードは、高精度デ ジタル・オーディオのレコーディング、編集、信 号処理、ミキシング、入出力に対して、専用のデ ジタル信号処理(DSP)を提供し、Pro Tools® | HD ソフトウェアおよびAvid HDオーディオ・イン ターフェース、同期周辺機器に使用できます。 また、HDXハードウェアは、HDオーディオ・イ ンターフェースを使用して、Core Audio、ASIO互換の デジタル・オーディオ・ソフトウェアにも使用で き、一枚のHDXカードで最大64チャンネルのI/O をサポートします。しかし、HDX DSPおよび複数 の カ ー ド を 使 用 す る 構 成 で の I / O の 拡 張 は、 Pro Tools HDソフトウェアでのみ可能です。 このガイドでは、HDXカードおよびハードウェ ア・ドライバーのインストールと設定(Mac用と Windows用)について説明します。
Pro Tools | HDX
パッケージ HDXパッケージには、以下のものが含まれていま す: • HDX PCIeカード • HDX TDMケーブル • HDX PCIe電源ケーブル(Mac用) • HDX PCIe電源ケーブル(PC用) • HDX カードをオーディオ・インターフェー スに接続するための12’ DigiLink™ Miniケー ブル • オンライン登録カード • このインストール・ガイドでは、HDXハードウェ アのインストールと設定の詳細について説明し ます。 • HDXカード・クイック・セットアップでは、基本 的なハードウェアのインストールを説明し ます。 Pro Tools ソフトウェアのインストールにつ いて詳しくは、Pro Tools ソフトウェア・パッ ケージ(別売)に付属の『Pro Toolsインス トール・ガイド』をご参照ください。Pro Tools | HDX
ハードウェア・アク セラレーター付きPro Tools | HD
シ ステム HDXハードウェア・アクセラレーター付きPro Tools HDシステムには以下が含まれます: • Pro Tools HDソフトウェア(別売) • 1つ以上のHDX PCIeカード • カード用電源ケーブル(同梱) • HDX カードとカードを相互に接続するための HDX TDMケーブル(マルチカード・システム のみ)(同梱) • HDXカードをオーディオ・インターフェースに 接続するDigiLink™ Miniケーブル(同梱) • 以下に挙げる、最少1つ(最大16)のAvid HD オーディオ・インターフェース(別売)が必要 です:• Pro Tools | HD OMNI • Pro Tools | HD I/O • Pro Tools | HD MADI
• 認定済み同期周辺機器(オプション、別売)
• 認定済みMIDIインターフェース(オプション、別売)
システム要件と互換性
HDX PCIeカードは、認定されたMacおよび Win-dowsコンピューターにインストールできます。 Avidは、動作が確認されたハードウェアとソフト ウェアに対してのみ互換性の保証とサポートの提 供を行っています。 完全なシステム要件および認定されたコンピュー ター、オペレーティング・システム、ハードディ スク、サードパーティデバイスのリストについて は、次のサイトにアクセスしてください: www.avid.com/compatibility 1つのシステムでは1つのHD OMNIが使用で きます。 Pro Toolsソフトウェアのインストールにつ いて詳しくは、Pro Toolsソフトウェア・パッ ケージ(別売)に付属の『Pro Toolsインストー ル・ガイド』をご参照ください。Pro Toolsソ フ ト ウ ェ ア の 詳 し い 使 い 方 に つ い て は、 『Pro Toolsリファレンス・ガイド』をご参照 ください。 ご使用のHDXハードウェアをAvid DigiTest で テ ス ト で き ま す。詳 し い 情 報 は、Avid DigiTest Guide.pdf(オ ン ラ イ ン ま た は Pro Toolsをインストールすることでご覧に なれます)を参照してください。
重要なインストールの注意事項
HDXは高性能PCIe カードです。HDXカードをイ ンストールするシステムが、HDXカードに対し て、最低275lfm(linear feet per minute)の直接
送風量があることを確認してください。この要件に 満たない場合、ご使用のシステムおよびHDXカー ドに致命的な障害を起す場合があります。十分な送 風量が無いことによる障害はAvidハードウェアの 限定保証の保証対象外です。 適正なシステムについては、Avidのウェブサイト (www.avid.com)の互換性ページでご確認くださ い。 重要な安全の注意 1 Avidがテストし検証したシステムでのみHDXを ご使用ください(www.avid.com を参照)。 2 ホスト・システムは最低275lfmの風量が必要で す。この要件に満たない場合、有害な状態になり、 ホストおよびHDXカードに障害を生じる場合があ ります。 3 ホスト・システムの送風を妨げないようにしてくだ さい(送風の入り口、出口にご注意ください)。 4 DigiLinkコネクターは⻑時間の使用で⾼温になりま す。変更をする前に、システムをクールダウンし てください。 5 HDXカード周辺のエリアは高温になります。シ ステム周辺に十分な送風を確保し、服や紙などの 可燃物を周辺に置かないでください。 6 ホスト・システムが仕様温度を超えないように してください。 本ガイドで使用される表記規則 本書では、メニュー・アイテムの選び方やマウスの操作 方法を簡略化するために、以下のような方法で表記して います。 画面に表示されるコマンド、オプション、設定の名前は、 フォントが異なります。 以下の記号は重要な情報を示すために使用します: 表記法 アクション [ファイル](File)> [保存](Save) ファイルメニューから保存を選択す る Control+N Controlキーを押しながらNキーを 押す Control-クリック Controlキーを押しながらクリック する 右クリック 右側のマウスボタンをクリックする Pro Toolsシステムを有効活用する上で、ヒン トになるようなポイントを紹介しています。 Pro ToolsセッションのデータやPro Toolsシ ステムの処理能力に影響がある重要な注意が 含まれています。 コンピューターのキーボードやマウスを使っ たショートカットを紹介しています。 クロスリファレンスはPro Toolsガイド中の 関連あるセクションを指しています。
www.avid.com
について A v i d の ウ ェ ブ サ イ ト(w w w . a v i d . c o m)は、 Pro Toolsシステムを最大限に活用するための最 良のオンライン情報源です。以下に利用可能な サービスと機能の一部を紹介します。 製品登録購入した製品をオンラインで登録でき ます。サポートとダウンロードAvidCu stom er Suc cess
(技術サポート)にアクセスします。ソフトウェ ア・アップデートと最新のオンライン・マニュアル のダウンロード、互換性に関するマニュアルでのシス テム要件の参照、オンライン・ナレッジベースの検 索、ユ ー ザ ー・フ ォ ー ラ ム お よ び 世 界 規 模 の Pro Toolsコミュニティへの参加などを行えます。 トレーニングと教育オンラインで利用可能なコー ス を 通 じ て 自 己 学 習 を 行 っ た り、認 定 さ れ た Pro Toolsトレーニング・センターのクラスルー ム設定で学習方法を見つけたりできます。 製品と開発者Avid製品に関する情報、ソフトウェ アのデモ版のダウンロード、デベロップメント・ パートナーとそのプラグイン、アプリケーション、 ハードウェアに関する情報をご覧いただけます。 ニュースとイベントAvidの 最新 ニュ ースを 取得 したり、Pro Toolsデモにサイン・アップしたり します。
第
2
章:
Pro Tools | HDX
ハードウェアの概要
この章ではHDXハードウェアでアクセラレートした Pro Tools HDシステムの各コンポーネントについて説明します(拡
張シャーシで最大7つのカードが使用できます)。使用するHDXカードの数は、システムの構成により異なります。
Pro Tools | HDX
ハードウェアPro Tools | HDX PCIe
カードHDX PCIeカードは、最大256トラックのダイレクト・ディスク・レコーディングとプレイバックを可能にし、 さらにミキシングとプラグイン・プロセッシングにDSPパワーを提供します。HDXカードは、最大24-bit/192 kHz のPro Toolsセッションに対応しています。 図 1 HDX PCIeカード DigiLink Mini ポート DigiSerial ポート
DigiLink Miniポート HDXカードには2つのDigiLink Miniポートがあ り、最大4つのHDオーディオ・インターフェー スに接続します。これらは、最大64のオーディ オ・インプット、オーディオ・アウトプットに接 続します。 DigiSerialポート HDXカードのシリアル・ポートはSYNC同期機器の 接続に使用します。このコネクターは8ピンのミニ DINです。
HDX TDM
ケーブル 同梱のHDX TDMケーブル(SATAケーブル)を使用 して、HDXカ ードのペア を接続し てくださ い。 TDMバスを介してデータを共有できます。1つの HDX TDMケーブルが各HDXカードに付属しま す。 電源コード HDX PCIeカードはPCleバスが供給する以上の電力 を必要とします。カスタム電源ケーブル(同梱)を使 用して、ご使用のMacのマザーボードまたは、ご 使用のPCのハード・ドライブ電源にHDX PCleカー ドを接続してください。 HDXカードのシリアル・ポートは、 Machine-Controlの接続には対応していません。 2つ以上のHDXカードでSYNC同期機器を使 用 す る 場 合、SYNC同 期 機 器 は 第 一 のHDX カードに接続することが必要です。 HDX TDMケーブル HDXカード電源ケーブル(Mac) HDXカード電源ケーブル(PC)DigiLink Mini
ケーブルHDXカードとHD I/O、HD OMNI、HD MADIオー
ディオ・インターフェースの接続にはDigiLink Miniケ ー ブ ル を 使 用 し て く だ さ い。DigiLink Miniケーブルには5種類の⻑さがあります:
• 18”(0.46m)(HD I/O、HD OMNI、HD MADIに 含まれています) • 12’(3.6m)(各HDXカードに1つ含まれています) • 25’(7.62m)(別売) • 50’(15.25m)、176.4 kHzと192 kHzのセッショ ンに対する最⼤⻑(別売) • 100’(30.5m)、88.2 kHzと96 kHzのセッション に対する最⼤⻑(別売)
Avid HD
オーディオ・インターフェース Pro Tools(ま た は 認 定 さ れ た サ ー ド パ ー テ ィ のCore Audio互換またはASIO互換アプリケーション)
でレコード、再生するには、Avid HDオーディオ・イン
ターフェースがご使用のシステムの第一HDXカードの第
一ポートに接続されている必要があります。
Pro Tools | HD OMNI
オーディオ・イン ターフェースHD OMNIは、音楽制作、レコーディング、ポストプ
ロダクションの各スタジオにおいて、コンパクトなプ リアンプ、モニタリング、I/Oソリューションを提
供します。
Pro Tools HD | OMNIの機能
HD OMNIは、Pro Toolsのインプットとアウト プットの最大8のディスクリート・チャンネルを 提供し、インプットまたはアウトプット(選択可 能)用の4セグメントLEDメーターを搭載してい ます。 アナログI/O • 24-bitのAD/DAコンバーター、サンプルレー トは最大192kHzまで対応 • 高品質Mic/DIプリアンプ x 2(チャンネル1-2) • マイクと楽器レベル入力用のXLRと1/4インチ TRSのフロントパネル・インプット x 2 • XLRバックパネル・マイク・インプット x 2 • チャンネル1と2のハードウェア・インサート 用 の バ ッ ク パ ネ ル の1/4イ ン チTRSセ ン ド・ ジャック x 2と1/4インチTRSリターン・ジャッ ク x 2 • アナログTRSライン・レベル・バックパネル・イ ンプット x 4(チャンネル1-4) • アナログ入力のクリッピングを防ぐ「ソフトク リップ」および「カーブ」リミッティング回路 • バックパネルにDB-25ブレイクアウト・ケーブル(別売) 使用を使用した可変アウトプット・ゲイン付き8チャ ンネルのアナログ・アウトプット • TRSを使用した、2チャンネルのアナログ・バッ クパネル・アウトプット(DB-25コネクターの チャンネル1-2または7-8を反映) • フロントパネル・ステレオ1/4”ヘッドフォン・ ジャック デジタルI/O • DB-25ブレイクアウト・ケーブル(別売)を使用した、 8チャンネルのAES/EBUアウトプット(最大192kHz のシングルワイヤ) • 2チ ャ ン ネ ル のAES/EBU XLRイ ン プ ッ ト(最 大 192kHzのシングルワイヤ) • 2チャンネルのS/PDIF RCAインプットとアウトプッ ト(最大192kHz) HD OMNIについて、詳しくは『HD OMNIガ イド』をご参照ください。 HD OMNIは最大4チャンネルの同時アナロ グ・インプットを提供し、複数のアナログ・イ ンプット接続が可能です。