† 愛知工業大学 基礎教育センター (豊田市)
ムードルレッスンモジユールを使った英語ウェブサイトの紹介
Using the Moodle Lesson Module to Introduce English Websites
Bruce Vorland †ブルース ボーランド
Abstract: Useful English Websites can be introduced to EFL students to benefit them in their daily lives. However, these sites can be quite intimidating to first-time users because of their numerous features so it is important to introduce an English site’s most useful features carefully and systematically while checking the students’ understanding along the way. Lessons made with the Moodle Lesson Module are a very effective way to introduce English websites because the students’ path through the website can be controlled and their understanding can be tested along the way. Students can be shown different pages of the lesson depending on their interest and understanding. The Moodle Lesson Module will be explained and an example lesson will be shown.
1. Introduction
Introducing useful English websites to EFL students can have a number of positive outcomes. Students can switch gears and go from ‘studying’ to ‘using’ English leading to yet more English exposure. Students may adapt a more goal-oriented approach to using English where they become less concerned with their mistakes and shortcomings and focus more on their successes and the benefits of using English as a tool. Students may also learn that something doesn’t have to be mastered and understood completely before it can be used to their advantage. These positive outcomes will lead to students having more confidence in their language skills and in themselves.
When making a lesson introducing a useful English website, it is important to choose a site with content and features that will benefit students and also interest them. Immature sites that may change often or even disappear should be avoided. One must keep in mind that anytime a site’s features change, a lesson based on the site will probably need to be updated. Keeping this in mind, some possible choices for lessons would be IMDb (Internet Movie Database), CIA-The World Factbook,
Project Gutenberg, All Recipes, or iTunes (introducing free podcasts).
Once the site is decided, the lesson should be constructed keeping several things in mind. Enough of the site and features should be shown so that students learn basic navigation and appreciate the usefulness of the site but not in such detail that students become discouraged. The site should be introduced in such a manner that students will realize that the site is a useful tool that can benefit them or entertain them. The lesson should encourage students to look for necessary and useful information in a website without trying to read or understand everything on each page. Finally, depending on the site it should be taken into consideration that some students may be seeing the site for the first time while others may know it quite well.
To successfully do the above it is necessary to choose what the students should know about a site and to present that information in an orderly and organized fashion. It is helpful to be able to check along the way whether students are really understanding what is being introduced. The author has found that the Lesson Module Activity in Moodle offers ideal features for introducing an English website in this way.
2. Using a Course Management System 2.1 Moodle background
Moodle is a free open-source Course Management System application that the author and his colleagues have been using to supplement in-class work with announcements, assignments, quizzes, blogs, and forums. The Moodle Lesson Module is one of the activity modules available in Moodle.
2.2 The Moodle Lesson Module
The Moodle Lesson Module is very adaptive and an ideal way to introduce subject matter in a pre-determined order while testing students’ understanding along the way. Subject matter can be presented on pages and then tested on question pages. The teacher can include appropriate responses for correct and incorrect answers and can designate a different page a student will be sent to for each answer. In addition, both the pages and the question pages can contain content, links, photos, graphics, audio and video.
Figure 1: Linear progression
The lessons can be written in a linear fashion (fig.1) where the student is presented with information following a question for each step. In this case students are sent to the following explanation page regardless of whether their answers are correct or not. This is an effective way if testing is the most important consideration.
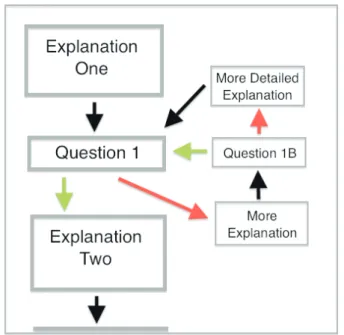
Figure 2: Non-linear progression
Moodle lessons can also be created in a non-linear fashion where an explanation page is followed by a question page with correct and incorrect answers sending students to different pages. Correct answers can be set to send a student to the next explanation page while an incorrect answer can be set to send the student either back to the previous page or to a sub-series of pages which further explain the concept. (fig.2) In the sub-series, another question can test the student’s understanding of the additional explanation before sending the student back to the previous page. There can be as many sub-series and as many pages and question pages in each sub-series as the teacher feels are necessary.
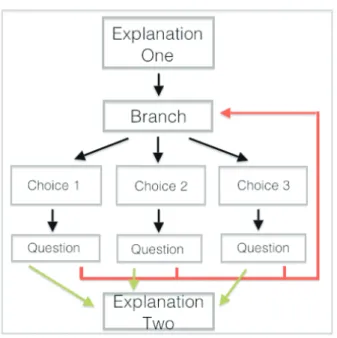
Yet another way to organize a lesson is to use one or more branch pages which can be positioned anywhere in the lesson. On a branch page, a student can be given the choice of a number of sub-topics and then proceeds on to a series of pages and questions. (fig.3) In the sub-topics, the questions can be set so that a student is sent on to the next stage after a correct answer but back to the branch page after an incorrect answer. Once back at the branch page, the student can choose to redo the same sub-topic or choose one of the other sub-topics. Either way, with the settings in figure 3 the student cannot proceed to the next stage of the lesson until answering one sub-topic question correctly.
Figure 3: Non-linear progression with branch
As can be imagined, there are a plethora of possibilities when organizing the paths through a lesson using variations of non-linear progression. Lessons have a tendency to grow and become quite complex because the Moodle Lesson Module makes it very easy to improve by adding new sub-topics or branches. Luckily, the complexity of the lesson as seen from the creator-side does not burden the student who will still see a straightforward path through the lesson.
Lessons made with the Moodle Lesson Module allow the teacher to control the path the student takes through the lesson while offering variety and choices. This means that individual students will have different experiences within the same lesson. In addition, with multiple lessons the order a student takes the lessons can be controlled using dependency settings. The teacher can set a lesson so that a student must complete one lesson before he/she can access another, effectively daisy-chaining lessons.
3. An example lesson 3.1 Choosing Google maps
For this lesson, Google maps was chosen because it is a stable and lasting site and it can be useful and entertaining to students. Although Google maps may be a familiar site to many students, there are features that the casual visitor to the site may not be aware of.
3.2 Objectives of the Google maps lesson
The main objective of the lesson is to demonstrate to students how the Google maps site could be useful to them. The lesson is organized to show the most useful features without overwhelming the students with details or unimportant information. Because Google maps is such a famous site, students might be familiar with some of the features of the site already so the lesson should be organized accordingly.
3.3 Organization and flow
The Google maps lesson (fig.4) is organized to take varying levels of familiarity into consideration by asking students what they know about the site at the beginning of the lesson and then sending them to different pages depending on their answers.
Figure 4: Google maps lesson outline 3.4 Beginning of lesson
The lesson begins with a simple introduction followed by a page (fig.5) asking students if they have used the Google maps site before. Students who answer ‘no’ are sent through a series of five introductory pages that explain the basic features of the site. Students who answer ‘yes’ are sent to another question page (fig.6) where they are asked what features of the site they are
familiar with. Depending on their answers they will be sent to different pages in the introductory series.
Figure 5: Starting question
For example, a student who knows how to search and find directions in Google maps but doesn’t know how to see street views will be sent to the page explaining street views, skipping the pages that explain search and finding directions.
Figure 6: Branch page 3.5 Introductory pages
There are five introductory pages in all. The first four pages have embedded images and the last has an embedded video screen capture. The first page mentions
three things that can be done in Google maps: see maps and photos, see street view photos, and find directions.
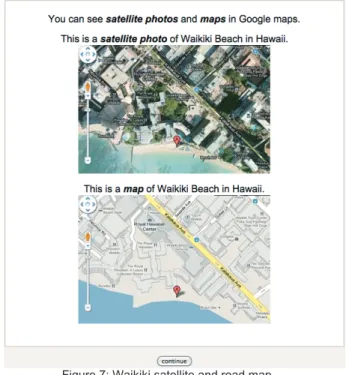
Figure 7: Waikiki satellite and road map
The second page (fig.7) shows an example of Waikiki Beach in photo mode and in map mode.
Figure 8: Waikiki Beach in street view mode
The third page (fig.8) shows a street view photo of Waikiki Beach using Google’s ‘little orange man.’ These pages are meant to tweak the students’ interest and introduce some vocabulary rather than teach them how to do anything at this point.
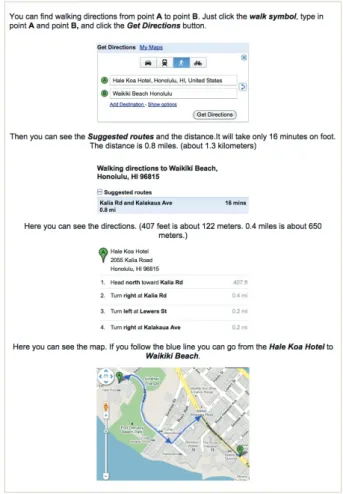
Figure 9: Finding directions in Hawaii
The fourth introductory page (fig.9) previews how Google maps can be used to find walking directions and distances. Students who have the English ability and the patience to read through the page carefully will get somewhat of an idea of how to read a Google maps directions page.
The final introductory page (fig.10) gives a few details about the Sapporo Clock Tower and has a forty-five second embedded video screen capture for students to watch. The video was made to show an example of searching for the Sapporo Clock Tower, zooming in on a map using the zoom bar, and using the ‘little orange man’ to see street view photos of the clock tower. There is no audio track so the students learn just by watching. At this point even after students have looked through each of the five introductory pages they still might not be sure how to navigate Google maps on their own. The question section includes two questions that will provide students with video screen capture examples that will review what they have learned so far.
Figure 10: Introductory video 3.6 Questions
After the last introductory page, students arrive at a branch page with six choices: five choices lead to questions and the sixth choice allows students to exit the lesson. (fig.11) Students choose a question, answer the question, and are returned to the branch page to choose the next question. Once they have completed each of the five questions they choose ‘finish’ and are taken to the end page of the lesson.
Figure 11: Question branch 3.6.1 Text questions
In this lesson, three of the questions have only text; there are no images or videos. Each of these question pages gives some information about a famous man-made
structure and then poses a question that can be answered using Google maps.
Figure 12: Statue of Liberty question
One of these question pages (fig.12) first gives some information about the Statue of Liberty followed by the question: How many rays does the Statue of Liberty have in her crown? The question is designed to induce the student to use the Google maps street views of the Statue of Liberty to count the rays. A ‘click here’ link to Google maps is included in the page to encourage the student to use Google maps rather that some other method.
The teacher can enter responses for each correct or incorrect answer. In this case, the response for incorrect answers is a simple “Oops!” and the response for the correct answer, seven rays, is “The 7 rays represent the 7 continents and the 7 seas.”
3.6.2 Video questions
The remaining two question pages use embedded screen captures so the student must watch the videos to answer the questions. These question pages function as instruction pages that show students how to navigate Google maps.
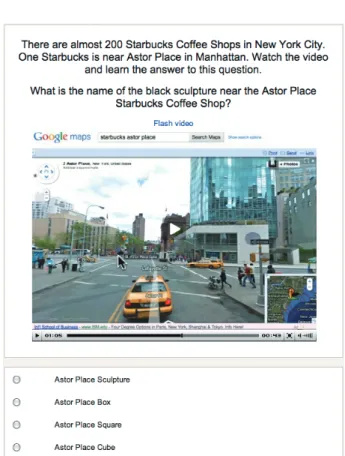
The first of these is a question about New York. The question page has some text about Starbucks Coffee Shops in New York and asks the student to find the ‘black sculpture’ near the Astor Place Starbucks Coffee Shop. The students are then asked to watch an
embedded video to find the answer to the question. The one minute and forty-seven second video includes audio and walks the student through the process of finding the Astor Place Starbucks and exploring the area of the coffee shop using street view. The student who watches the video to the end will learn the answer to the question. Additionally, the student will have learned how to go to a specific place and explore an area using street view in Google maps.
Figure 13: Astor Place question
The second of the embedded-video question pages teaches how to find directions from the Nagoya TV Tower to the Nagoya Hilton Hotel. The student is asked to watch the one minute and fifteen second video and choose the best answers to the two questions. The answers are simply given in the video but in the process of watching students will learn how to find directions from point A to point B, how to tell the distance between the two points, and how to see street views of points along the way.
Figure 14: Finding-directions question
3.7 End of lesson
Because the questions can be answered in any order and because instructional question pages with video are included, students will eventually learn all the skills that are needed to find the answers to the questions. Once a student has gone to all five of the question pages he/she chooses the ‘finish’ button and exits the lesson. The final page shows “Congratulations – end of lesson reached” and gives the student’s score.
The questions can be set to be worth any number of points. Because questions in lesson format generally take more time and effort than regular quiz questions, the teacher can choose a higher value for lesson questions. The lesson can be set so that students can re-take the lesson and improve their score either with or without penalties. The maximum number of allowed re-takes can be set up to 10.
In this particular lesson with all the questions originating from a branch page and students asked to
answer all of the questions, the ‘Minimum number of questions’ setting is set to 5. If this is not done, a student could get 100% score from attempting and answering only one question correctly.
The Google maps lesson is a total of fifteen pages including three branch pages and five question pages. (fig.15)
Figure 15: Google maps collapsed lesson edit view
4. Conclusion
A lesson made using the Moodle Lesson Module involves a great deal of thought and planning and a great many pages, many of which will not be used by all the students. The lessons are based on web sites that might change without notice and at any time, making it necessary for teachers to periodically update their lessons.
In making a website introductory lesson, it is important to identify what features of the site are the most interesting and useful to the students. The goal of the lesson should be to guide the students through the process of understanding those features by creating explanatory pages as well as question pages to force the student to understand concepts before continuing on to the next feature. A well-made lesson will meet the needs of individual students and will lead the student to concentrate on his/her weak points.
By using the Moodle Lesson Module to introduce English websites, students will be exposed to and learn how to use up-to-date English websites that they will be able to access and use time and time again in the future. Introducing useful English websites is one way to incorporate English into a student’s life.
References
1) Moodle.org documentation < http://docs.moodle.org/en>
2) Rice, William. “Moodle Teaching Techniques” Packt Publishing. 20 September, 2007
3) Smith Nash, Susan and Rice, William. “Moodle 1.9 Teaching Techniques” Packt Publishing. 20 January, 2010
4) Stanford, Jeff. “Moodle 1.9 for Second Language Teaching” Pact Publishing. 15 October, 2009
Notes on equipment and software
I use an iMac with Firefox as my browser; some of the audio and image linking seems to be easier using Firefox.
Audio – I record using Audacity software (free) and a USB mic. I export from Audacity as MP3 files; I generally use 126kbs but 96kbs is probably more than sufficient for spoken.
Video Screen Capture – I use Snapz Pro X for screen video and image capture. The video screen captures are .mov files. It is difficult to know what kind of files to use because different browsers support different files but in this case I used FLv Crunch (free) to change the .mov files to .flv files because at this point .flv seems to work in most browsers.