奈良教育大学学術リポジトリNEAR
Teaching Equipment and Materials for Students' Self‑Discovery in Chemical Education
著者 Ikeo Kazuko, Iwasaki Hiroshi, Ueda Masaie, Torimoto Noboru, Ikeo Bunji
journal or
publication title
奈良教育大学教育工学センター研究報告
volume 13
page range 25‑40
year 1990‑03‑16
URL http://hdl.handle.net/10105/4535
Self-Discovery in Chemical Education
Kazuko Ikeo, Hiroshi Iwasaki Masaie Ueda, Noboru Torimoto Bunji Ikeo
Science Education Research Project Nara University of Education
Nara Japan
Summary
Due to the rapid progress in the realm of science and technology in recent years the volume of knowledge and information for the student to be imparted with has grown enormously. This means that students are required to memorize an immense volume of knowledge which forces them to neglect their personal involvement in the experimental phase of science education, depriving them of their interest in science as a whole.
Additionally, nowadays students tend to obtain ready-made equipment and materials.
Since they had few experiences to develope equipment during their school years, they do not know how to make them by hand and how to develop an ideal material by themselves.
Our members of the Science Education Research Project have been trying to make
new teaching equipment and to develop new teaching materials.
In this paper , we introduce some of them.
Key words ; Chemical education
New equipment and materials I. In the Beginning
In Japan there is a proverb "Love makes labor easy" (Suki koso Monono Jyozu nare, in Japanese) ; We believe students have an interest in science. Their minds can be set to do anything (not only in science, but also in their other studies) if they enjoy the learning process. We believe that a child introduced to curiosity at an early age will develop an understanding of science. In the first instance, curi-
osity will do, and then, under good leadership the student is made to develop his
interest in search of the truth. However, any important knowledge in science may drive
Kazuko Ikeo •EHiroshi Iwasaki •EMasaie Ueda •ENoboru Torimoto •EBunji Ikeo
children away from their interest in science if it is not given in a proper manner.
It is very easy for students to enjoy the experience of using equipment and in enjoy-
ing experimental work in science. On the other hand, it is very hard for them to
be experienced in making equipment with their own ideas and to enjoy constructing them. Moreover, it is very hard for them to find an ideal material which is suitable for the subject. Our project staff are trying particulary hard to create suitable equipment-materials. We have been developing new methods to teach with the equipment-
materials developed by us. A list of new teaching materials and equipment is as
follows:
New teaching materials i. Golden foil ii . Flower of Urea
in. Dyeing by use of green leaves of Indigo plant iv. Paper by use of leaves of Banana
v. Colorprint by Light New equipment
i. Simple Gas-generator
i i . New equipment for Analytical chemistry iii. Manual equipment for O2 gas-absorption
II. Method of Making Equipment and Materials
( i ) Golden-foil sheet
How to make a sheet of golden foil:
Practical instructions for dyeing aluminium sheet or foil.
1. Prepare 2096 H2SO4 solution.
2. Prepare aluminium foil and soak it in 2M-NaOH solution so as to clear the
surface of the aluminium foil for 2 to 3 minutes. When the aluminium is soaking in NaOH, H2 gas is evolved, and Na3A103/Na2A102 is generated.
So it must be short time for soaking the aluminium foil is recommended. Anyhow, the sodium aluminate produced, mentioned above, is water soluble.
3. Wash the aluminium foil in water. A clean aluminium surface will remain.
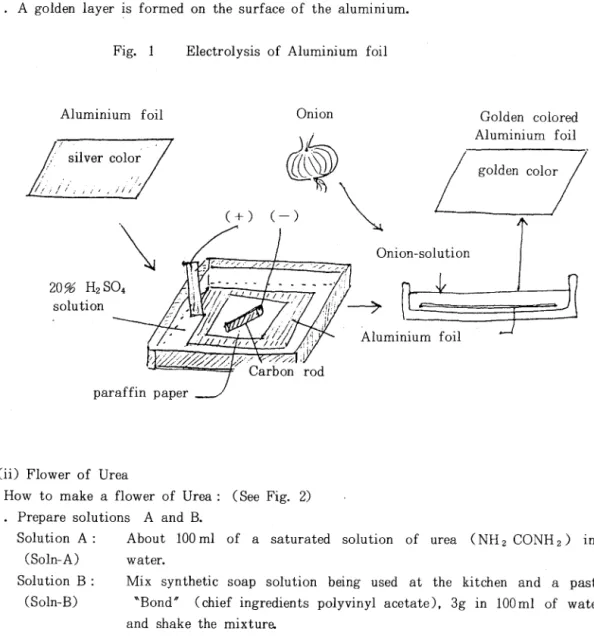
4. Set the apparatus as shown in Fig,1 to proceed with electrolysis using a carbon electrode (-) and an aluminium electrode (+) in 2096 H2 SO4 solution.
Carry on the electrolysis process for about 10 to 20 minutes.
5. Put the aluminium foil in water and soak for about five minutes to remove excess acid solution. Under a microscopic observation, the surface of the aluminium shows
many holes, and if hot water is used the surface of aluminium is more smooth.
Heat the onion skin in water for about 30 minutes, keeping the temperature of the mixture at 50°C•E (This is because the yellow pigment of onion skin only slightly dissolves in cold water.) At 50°C all pigments are contained in the solution since they dissolve in warm water.
Put the aluminium foil in the onion solution for about 10 to 15 minutes.
Soak the aluminium foil in hot water at 80°C for a few minutes to let the holes of the aluminium surface close up (as explained in Fig.l).
A golden layer is formed on the surface of the aluminium.
Fig. 1 Electrolysis of Aluminium foil
Aluminium foil Onion Golden colored
Aluminium foil
'4t//44Z'///.\s/-' vs/'\ å !
Carbon rod paraffin paper
(ii) Flower of Urea
How to make a flower of Urea: (See Fig. 2) 1. Prepare solutions A and B.
Solution A: About 100ml of a saturated solution of urea (NH2 CONH2) in
(Soln-A) water.
Solution B : Mix synthetic soap solution being used at the kitchen and a paste (Soln-B) *Bond" (chief ingredients polyvinyl acetate), 3g in 100ml of water
and shake the mixture.
Kazuko Ikeo •EHiroshi Iwasaki •EMasaie Ueda •ENoboru Torimoto•E Bunji Ikeo
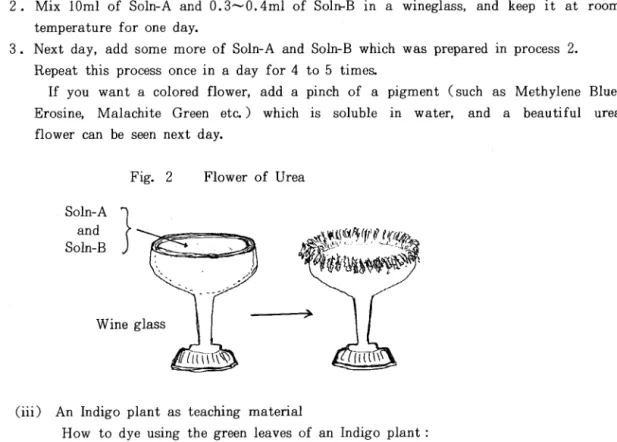
Mix 10ml of Soln-A and 0.3~0.4ml of Soln-B in a wineglass, and keep it at room temperature for one day.
Next day, add some more of Soln-A and Soln-B which was prepared in process 2.
Repeat this process once in a day for 4 to 5 times.
If you want a colored flower, add a pinch of a pigment (such as Methylene Blue,
Erosine, Malachite Green eta) which is soluble in water, and a beautiful urea
flower can be seen next day.
Fig. 2 Flower of Urea
Soln-A and Soln-B
Wine glass
(iii) An Indigo plant as teaching material
How to dye using the green leaves of an Indigo plant :
The traditional dyeing technique in Japan, using the indigo plant, is called Aizome. In Japan, the Indigo plant can be easily cultivated in a school flower- garden by the pupils. Most students are interested in dyeing processes. Thus a
simplified version of Aizome can be used as a multipurpose teaching project for chemistry, social studies, home-making, graphic arts, etc. The article outlines both the dyeing process and the chemistry involved.
1. Pick up some mature leaves of Indigo.
2. Prepare the dyeing material, such as a handkerchief or a shirt.
3. Prepare sufficient number of newspaper sheets to lay on the working table in order to avoid noise and to suck the liquid.
4. A handkerchief or shirt is put on the newspaper.
Put the mature leaves of Indigo on the shirt or another handkerchief. With a
wooden hammer, the covered mature Indigo are hammered until the pigments are
transferred to the shirt.
5. About 24 hours later, the shirt is washed with soap, and dried.
6. After washing it with soap and water, expose it to the air, the color changed gradually to darkgreen and eventually to blue.
7. Washing removes the chlorophyll, leaving the Indigo which dyed the cloth in the shape of the leaves. The blue color is stable and does not fade away even with repeated washing.
Fig. 3 An Indigo plant as Teaching Material The green leaves of the Indigo contains indican.
The leaves are crushed and the Indican is converted into Indoxyl by an enzyme. Air oxidation of the indoxyl prodeces Indigo. The reaction as follows :
:-ocjHuO, E"'-
m
[ndican
07
Iodigo
Fig. 3-1 Aizome
Table cloth dyed by the hammering process.
Fig. 3-2 Aizome
Handkerchief dyed by the extract of dried leaves.
J ^
"
.¥ ^
1 -KsJlgr
i r 1
i ^ . ^jtL^&n'^?jsy 2~.
^'?&*: >S°*?i^ w* v / K^v.ss å d
å m: ~* rf'N.
wis 7v =: '/r**5**
v -WMil.a/r r
; >;> ;v..-Q;:.t.:;;, å å ":v« -j-i:,u*y.s
L eaves of ban ana cover 1.8K g w a ter 5 L
N aO H 100 gram s (2 or 396 S olution ) A big vessel
C a (O H )2 few gram s C one H C 1 20m l
A big an d flat tub
M a ke a w ooden fram e w ith seive Sodium thio sulph ate (N a2 S 20 3) Starch (laundry use)
Kazuko Ikeo •EHiroshi Iwasaki •EMasaie Ueda•E Noboru Torimoto •EBunji Ikeo
(iv) Paper making by Banana cover (tree leaves) How to make Banana paper ;
1. Prepare materials needed ;
1.
ii.
iii.
iv.
v.
vi.
vii.
viii.
ix.
x.
2. Procedure
i. Boiling : Take the banana coverin a big vessel and add some water, just enough
to cover the banana leaves. Then add NaOH solution (about 2 or 3
96) and boil it for 1 to 1.5 hours.
Then stir it properly till the fibers in the cover can be seen.
ii. Bleaching : Take out the fibers from the vessel and take it in a plastic container
and add some water. Then put few grams of Na2S2O3 in order to
bleach the fibers. Add about 20ml of ConcHCI to fasten the chem- ical reaction (bleaching). Then keep it in sunlight for 30 minutes and keep on stirring the solution. Continue this process till the fibers become white.
iii. Washing ; Wash the fibers with water, then with Na2S2O3 to remove the
chlorine gas of the bleaching agent.
4. Mix the fibers with water properly. Then put the solution in a big tub and some laundry starch may be added to make the paper hard.
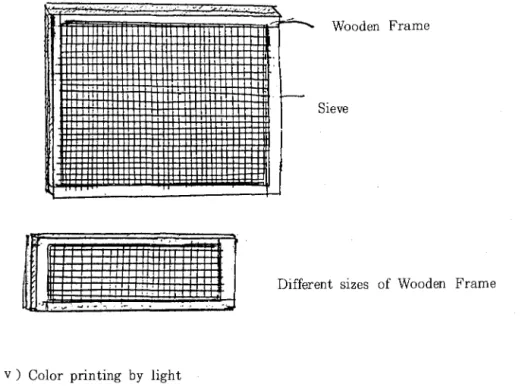
5. Framing : Wooden frame with sieve as shown in Fig.4 of different sizes may be used.
Dip the frame inside the solution and take it out slowly and let the solution filter.
The fibers will remain on the sieve. Take out the sieve with fibers slowly from the frame and put it on the wooden plank. The fibers must be in between the sieve and the wooden plank. Roll the small towel on the sieve to remove the water as well as to press. Press the fibers. Take out the sieve carefully and the paper will be ready. Let it dry for one or 2 days depending on the temperature.
Fig. 4 Framing For Paper Making
Hi
UH Wooden Frame
Sieve
W i i i
!^ H i
H i s 蝣蝣 I 蝣蝣蝣蝣蝣IIl l蝣蝣I蝣蝣I蝣蝣IIl lH i蝣蝣I蝣I IIl l蝣I I蝣蝣 I蝣蝣IIl l蝣蝣II*
i m i
3 1ta B I
!蝣蝣蝣蝣 蝣 蝣蝣I蝣蝣I蝣蝣I蝣蝣IIl l蝣蝣蝣Il lM lIl lIl l 蝣蝣I蝣蝣I蝣蝣I蝣蝣I蝣蝣 蝣蝣I蝣蝣1蝣蝣I蝣蝣蝣Il l蝣蝣IIl lIl limIl l 蝣蝣I蝣蝣蝣蝣蝣I IH I 蝣蝣I 蝣H IUH II 蝣IIl l蝣I I蝣蝣I 蝣蝣I蝣蝣IIB 蝣蝣I蝣蝣I蝣蝣I蝣蝣IIB
Different sizes of Wooden Frame
(v) Color printing by light
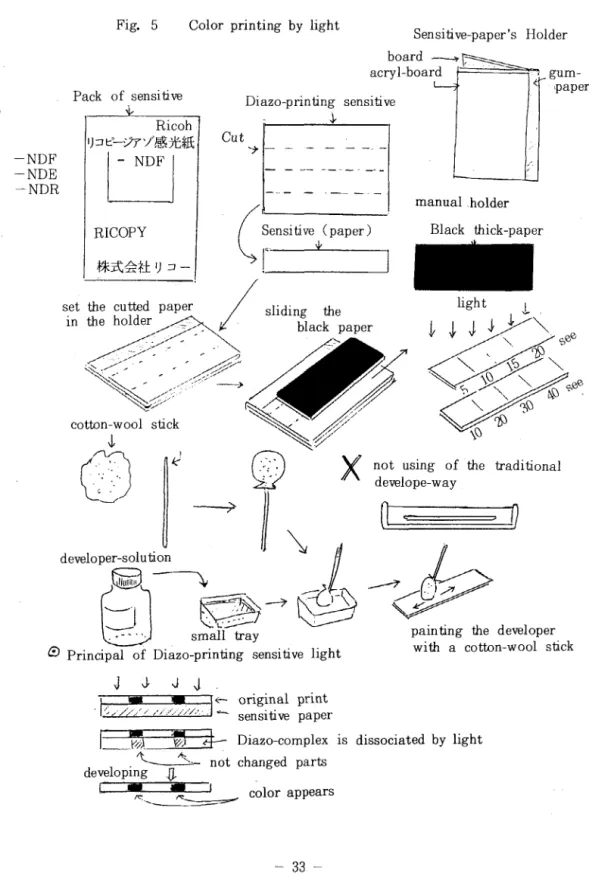
How to make color printing by light with Diazo-sensitive paper : Practical instruction for color printing
1. Prepare the commercial sensitive paper, Ricoh company's product, RICOPY diazo sen- sitive paper such as NDR, NDE and NDF.
Speed of the light-reaction is different between NDR, NDE and NDF. NDF is
fastest and NDE is slowest.
In elementary and junior high school science experimens use, NDR and NDE for the experimental work. University students' use NDE and NDF. (Paper size is of post- card.)
2. Prepare some kinds of developers : Yellow color developer
a) Acetamide 0.1 g
b)Na2CO3 1.0g
c) water 100 ml
Kazuko Ikeo •EHiroshi Iwasaki ' Masaie Ueda - Noboru Torimoto - Burvji Ikeo
Red-purple color developer
a) /?-naphthol 0.1 g
b)Na2CO3 1.0g
c) water 100 ml
Sepia color developer
a) oi-naphthol 0.1 g
b)Na2CO3 1.0g
c) water 100 ml
Orange color developer
a ) l-phenyl-3-methyl-5-pyrazolone 0.1 g
b)Na2CO3 1.0g
c) water 100 ml
Mixa), b) and c) and adjust the mixed solution at pH 10.
Store each solution in a bottle. Label the bottles yellow one, Red-purple, and so on.
3. Prepare some cotton-wool sticks. Set some cotton-wool at the top of a stick and tie it closely to the stick, as shown in Fig.5.
4. Prepare a test copy :
Cut a paper into 4 pieces. Use one of the four and expose to the light, step by step, sliding black-thick paper each 5 seconds and each 10 seconds.
After expose to the light, develop it with the developer, mentioned above.
Find the suitable exposure time, and start the experimental work.
5. About the light sources, we must chose from the sun light, electric light and ultraviolet ray's lamp, eta If it is fine day, the sun light is suitable for the expreimental work. If it is cloudy day, electric-light is fine.
6. The simple principal of how to make a color printing is explained in Fig. 5.
7. This experimental work in a science class in elementary and junior high school is very useful for pupils to develope an interest in science with many color reactions.
8. Show the application for teaching materials in Fig.5. It is a very effective way for learning the optical experimental works.
It is possible to make a simple exposure-meter.
9. How to develop the sensitive paper was developed by one of us. Use the cotton-wool stick, spread a developer-solution on the surface of the exposured sensitive-paper, instead of immersing it in the developer. It is very useful for the pupils to save the developer and to keep the work-table clean.
Fig. 5 Color printing by light
Pack of sensitive
i- .
-NDF-NDE -NDR
Ricoh Ij 3 t-v7- -/^7fcffi
-NDF
RICOPY Diazo-printing sensitive
_i_
Sensitive-paper's Holder gum-
å paper
board -^ir^
acryl-board
Cut
Sensitive (paper)
±
manual holder Black thick-paper
set the cutted paper in the holder
^v
sliding the black paper
cotton-wool stick
I
not using of the traditional develope-way
developer-solution mill*
small tray
® Principal of Diazo-printing sensitive light
painting the developer with a cotton-wool stick
J J- J J
•E"///' //å ////
original print sensitive paper
IMI '$1 «4- Diazo-complex is dissociated by ligh å ^s=~not changed parts
developing {j.
color appears
Kazuko Ikeo •EHiroshi Iwasaki•E Masaie Ueda •ENoboru Torimoto •EBunji Ikeo
(v i ) Simple Gas-generators
( a ) Simple Gas-generators for elementary school children How to make a simple gas-generator :
Prepare a plastic film case.
Make a hole on the sida
Put some zinc and 2M HC1 solution in the opening of the film case.
Prepare one water-vessel and a test-tube.
Immerse the plastic film-case containing zinc and HC1 solution into the water vessel, setting the hole upside.
Collect H2 gas using the test-tube, as shown as Fig. 6.
Fig. 6 Simple Gas-generator for Elementary School Children Film case
-opening
Hole
( b ) Simple gas-generator for school teachers How to make it:
. Prepare a wide mouth of the bottle.
. Prepare a rubber stopper suit for the mouth of the bottle.
. Cut the stainless board 8cmx15cm, and 8cmx 8cm.
. Prepare two pieces of stainless steel wires.
. Weld stainless-wire and cutted stainless boards respectively, as electrodes.
. Prepare the biscuit-cylinder as shown as Fig,7. Set both stainless bards the biscuit cylinder, so that the rubbler stopper fits for the wide-mouth bottle.
and
7. Prepare two curved glass tubes.
8. Bore the rubber stopper for biscuit cylinder and fix the curved glass tube through the boring hole.
9. Prepare 1M NaOH solution.
10. Add the NaOH solution into the wide mouth of the bottle and set everything as
as shown Fig. 7.
ll. Electrolysis the solution with 4 or 5 volts and 4 amperes in order to be able to collect 40 ml of H2 gas in a minute.
Pig. 7 Simple Gas-Generator for school teachers Wide-mouth
bottle
30cmT
Rubber Stopper
I ) Glass-tube
Stainless Steel Wire I ^
Iff Rubber-Stopper dfj-' Weldering 5 Wel d eri ng
cm -4 Second-used cofee Bottle Birdview
y.
Stainless Steel 8 cm x 8 cm Biscuit-Ware-Cylinder Stainless Steel
8cm x15cm
Kazuko Ikeo •EHiroshi Iwasaki•E Masaie Ueda•E Noboru Torimoto•E Bunji Ikeo
(vii) New ideal equipment for analytical chemistry
How to make an ideal equipment for analytical chemistry : 1. Prepare 3 sheets of acryl-boards 30 cmx8 cm.
Each sheet is named A. B and C.
2. Bore 6 holes on A sheet as shown as Fig.8.
3. Bore 6 different sizes of hole on B sheet as shown as Fig. 8.
4. On sheet C, there is no treatment.
5. Paste A, B and C closely.
6. Bore 6 holes on the sandwiched A, B and C sheets, and bore 5 holes on another
side of the sandwiched A, B and C respectively.
7. Prepare a glass tube fitted in the holes 5 and 6 both sides of them. (Instead of glass, acryltubes are available)
8. Put the glass tubes on the holes in ll holes and paste them.
9. Prepare 10 em's length chemical tubes and 5 em's ones.
10. Inside the chemical tubes, pack a small piece of cotton-wool.
ll. After packing the cotton-wool, connect the glass tubes by the chemical tubes in order.
12. Prepare the stopper for each 6 hole on the A sheet.
13. Put the stopper in the holes.
14. Prepare a injection-cylinder for medical use.
15. Connect the injection-cylinder to the end of the around 3 em's chemical tube.
16. Connect the around 3 em's chemical tube to the end of the glass tube.
17. After the stopper is fixed on the 6 holes, try the injection-cylinder to pull
and to check the inside pressure whether the pin hole is leaking the liquid out ornot.
18. After checking all parts, immerse it into water.
19. If no bubbling occurs, the equipment, mentioned above, for analytical chemistry ismade.
20. The procedure of this equipment can be seen through O. H. P.
21. By using this equipment, it is very usefull for separating and filltrating, in order to save time.
Fig. 8 New Equipment for Analytical Chemistry Bird-view
Hole Packing Chemical-tubes
,, with i
i-f
- -.30 cm
c
I
B '
A '
¥ T ? '> "‑><‑r ‑? T>ri H o le
O E O ""
8cm
/
Glass Pipes (Acryl Pipe)
Rubber c? o ct ft ft f\
Stopper 0 8 9 Q U U
A. B and C sandwitched Board Hole
For Example to use
S? : #P--';
Co1 *
Zn"
:"9*i
SX--V
_f \~s \
o\
,' n-_P
p.. DJ L\ C /i>}B<"
/"o"vf;
Injection Cylinder KLs
)&•E
Chemical Tubes
Cotton-Wool (as a filter) Cotton-Wool (as a filter)
3
1R Holder He;ating Tube
Kazuko Ikeo •EHiroshi Iwasaki•E Masaie Ueda•E Noboru Torimoto •EBunji Ikeo
( viii) Manual equipment for 02 gas-absorption
How to make new equipment for 02 gas-absorption cylinders : 1. Prepare an acryl pipe 3 cm in diameter.
2. Cut two pipes 30 cm length.
3. Cut 2 sheets an acryl board 5 cmX5 cm.
4. Prepare a chemical tube 7 mm in diameter.
5. Make a hole in each pipe, the size of the hole should be approx. 6mm in diameter.
6. Put the chemical tube in the 6 mm hole.
7. Measure the distance of two pipes and cut the chemical tubes suitably. Put the
cutting side of the tube in the other pipe's hole closely.
8. Paste the sheet of 5 cmx5 cm to toe bottom of both pipes without leaking any
liquid.
9. Prepare a scale on the paper-strip.
10. Print a scale on the paper-strip.
ll. Paste the printed paper of the 30 cm pipe.
12. Before using this equipment, test if water leaks out.
13. If this test is passed, prepare the stopper of one of the pipes.
14. At the center of this stopper, bore a small hole.
15. Prepare the stopper suited for the small hole mentioned in 14.
16. Name the pipe having a stopper A, and the other B.
17. Name the stopper described in 15 (a) and described in 13 (b).
18. Take off the (a) stopper, pour the solution which consists of 2M NH4C1, 2M
NaOH and 0.1 M CuSO4(volume ratio;5:1 :0.1).
19. Add some copper nails to the solution mentioned in 8.
20. Adjust the surface of the solution in the A pipe and B pipa
21. Because of the pipe A and pipe B is connected with the chemical tube, it is
easy to ajust the surface of the solution at the same level.
22. Measure the volume of air by the printing scale.
23. Between the bottom of the (b) stopper and the adjusted surface of the solution, air is occupied.
24. Seal the hole by (a) stopper, and measure the volume of the air.
25. Shake both pipes.
26. O2 gas in the air starts to be absorbed in the solution. Without shaking, one
or two days later O2 Sas m *ne air completely absorbed.
27. If shaking the pipes, after three minutes, O2 gas in the air has been absorbed still 20.8^ of the volume of the air is reduced. But the time of absorption is depending on the procedure of the shaking methods.
Fig. 9 Manual Equipment for 0 2 gas-absorption cylinders 3 cm
in diameter
(b) Rubber Stopper
Cu-nailes
^Chemical tube New equipment for 02 gas-absorption : See Fig. 10.
Instead of the pipes, we use the plastic measuring cylinders. Two measuring cylinders are more convenient for student's use. Making connected cylinders, using chemical tubes and other items are the same as the former ones. 100 ml measuring plastic cylinders are more suitable for gas-absorption experiments.
Fig. 10 Measuring-cylinders for a Gas-absorption ones.
3=w Cut off
^ Plastic measuring cylinders
Kazuko Ikeo å Hiroshi Iwasaki •EMasaie Ueda•E Noboru Torimoto •EBunji Ikeo
IH Conclusion
In the twentieth century, it is generally acknowledged that theories have directed the methods of experiments. In the twenty-first century, on the contrary, theories will be established, in accordance with their preceeding expriments. To tell the truth, the new trends of science education throughout the world are disliked by the students. We must consider ways interesting for science education. We have to solve this problem, in so far as manual and ideal equipment-materials, using everyday goods must be developed, so that students may have curiosity and can learn to enjoy making, and may raise the student's curiosity and interest in science-procedures. Science Education Research Project in Nara University of Education have been monthly workshops as inservice- training for more than fifteen years. Our projects-staff are continuously making efforts to create suitable teaching equipment-materials.
Using parts of this report, we made a presentation on the 10th International Conference
of Chemical Education at the University of Waterloo, Ontario, Canada, during the
summer of 1989.
R eferences
1. Kazuko Ikeo, Annual report of Educational Technology Center. Nara University
of Education. Vol. 12, page 71
2. Kazuko Ikeo, Proceeding of 10th International Conference of Chemical, Education Hiroshi Iwasaki jgog
& Bunji Ikeo.