Second Xeon processor installation
Second Xeon processor installation
HP xw6000/xw8000 series workstations w/LGA sockets
This document describes how to install a second Xeon processor in HP xw6000 or xw8000 series workstations with Land Grid Array (LGA) processor sockets.
Kit contents
The following components are included in your processor kit: ■ Xeon processor
■ CPU heatsink ■ Warranty
■ Installation instructions
Observe warnings and cautions
Å
WARNING: Any surface or area of the equipment marked with these symbols indicates the presence ofa hot surface or hot component. If this surface is contacted, the potential for injury exists. To reduce the risk of injury from a hot component, allow the surface to cool before touching.
Å
WARNING: Any surface or area of the equipment marked with these symbols indicates the presence ofan electrical shock hazard. To reduce the risk of injury from electrical shock, do not open any enclosed area.
Å
WARNING: To reduce the risk of electric shock or damage to your equipment:❏ Do not disable the power cord grounding plug. The grounding plug is an important safety feature. ❏ Plug the power cord in a grounded (earthed) outlet that is easily accessible at all times.
Second Xeon processor installation
Å
WARNING: To reduce the risk of serious injury, read the Safety & Comfort Guide. It describes properworkstation, setup, posture, and health and work habits for computer users, and provides important electrical and mechanical safety information. This guide is located on the Web at
http://www.hp.com/ergo and/or on the documentation CD if one is included with the product.
Ä
CAUTION: Static electricity can damage the electronic components of the workstation. Before beginningthese procedures, be sure you are discharged of static electricity by briefly touching a grounded metal object.
Ä
CAUTION: Installing the processor incorrectly can damage the system board. Have an HP authorizedreseller or service provider install the processor. If you plan to install it yourself, read all the instructions carefully before you begin.
✎
NOTE: HP accessories are for use in HP workstation products. They have been extensively tested forreliability and are manufactured to high quality standards. HP, therefore, warrants only those accessories that are manufactured or sold by HP.
Step 1—Gather your supplies
Ensure that you have all necessary supplies before you begin this procedure: ■ Processor option kit
■ Microsoft® Windows® operating system CD or Red Hat Linux box set ■ Printed copies of relevant workstation documentation, which can be found at
http://www.hp.com/support/workstation_manuals
■ Static-free mat (to prevent possible damage from static electricity) ■ Static strap (to prevent possible damage from static electricity)
Step 2—Upgrade the system BIOS
Before installing a second Xeon processor on your workstation, see
http://www.hp.com/go/bizsupport and verify that you have the latest BIOS installed on your
workstation. Also, ensure that your workstation has the latest service pack installed. This ensures that you have the necessary updates for your new processor to work properly.
✎
NOTE: Failure to install the latest BIOS could cause your workstation to fail when you install your newprocessor.
Step 3—Prepare the workstation
Your workstation documentation includes instructions for disassembling and preparing the workstation for installation, including powering down the workstation, disconnecting power from the workstation, opening the access panel, and removing components.
For product-specific information, refer to the Service and Technical Reference Guide for your HP workstation at http://www.hp.com/support/workstation_manuals.
Second Xeon processor installation
Step 4—Install the second processor
After you have prepared the workstation for installation, perform the following steps to install the processor.
Ä
CAUTION: To prevent damage to this system, observe the following Electro Static Discharge (ESD) precautionswhile performing the system parts removal/replacement procedures: ❏ Work on a static-free mat.
❏ Wear a static strap to ensure that any accumulated electrostatic charge is discharged from your body to the ground.
❏ Create a common ground for the equipment you are working on by connecting the static-free mat, static strap and peripheral units to that piece of equipment.
Ä
CAUTION: Failure to follow the workstation preparation instructions and these installation steps couldresult in an improperly installed processor, causing extensive system damage.
Ä
CAUTION: Processor socket pins are delicate and bend easily. Use extreme care when placing theprocessor in the socket.
✎
NOTE: The second processor must be of the same speed, cache, size, and type as the primary processor.1. Remove the processor socket protective cover.
Second Xeon processor installation
2. Raise the processor socket handle fully 1. Open the processor socket cover plate 2.
Figure 2 Open processor socket
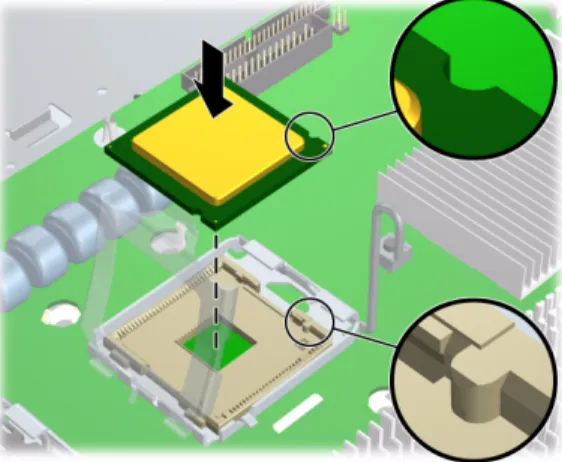
3. Remove the plastic cover from the processor. Align the notches in the processor base with the tabs on the socket. Seat the processor into the socket. Ensure that the underside of the processor is level with the top of the processor socket. Close the processor cover plate. Lightly press down on the processor cover plate while closing the socket lever.
Figure 3 Install processor
Step 5—Install the CPU heatsink
1. Remove and discard the thermal grease protective liner from the bottom of the new heatsink and set the heatsink over the processor.
Second Xeon processor installation
2. Align the heatsink posts with the holes on the system board 1. The fan must be facing toward the front of the workstation. Connect the heatsink wire to the second processor heatsink fan connector on the system board 2.
Figure 4 Install heatsink
3. Tighten the four heatsink screws. First, tighten all screws partially so that the heatsink remains level. Next, fully tighten one pair of diagonally opposite screws 1, then fully tighten the remaining pair 2. Tighten to 6 in.-lbs. of torque.
Figure 5 Tighten heatsink screws
Step 6—Reassemble the workstation
After installing the second processor and related components, reassemble the workstation using the instructions in the workstation documentation. The reassembly process involves reinstalling the side access panel and restoring power to the workstation.
Second Xeon processor installation
Step 7—Configure the operating system
Windows XP
After the workstation has undergone a software unbundling process, a Hardware Abstraction Layer (HAL) upgrade is necessary when installing a second processor. However, Windows XP detects the new processor and automatically performs the HAL upgrade. Follow the prompts under the Found New Hardware
message to reboot.
Red Hat Linux
All versions of Red Hat Linux automatically detect the new processor hardware. In addition, Red Hat Linux, as shipped with HP xw6400 and xw8400 Workstations, is preconfigured with an SMP kernel.
2 番目の Xeon プロセ ッ サの取り付け
2 番目の Xeon プロセ ッ サの取り付け
LGA ソ ケ ッ ト 付きの HP xw6000/xw8000 シ リ ーズのワーク ステーシ ョ ン
本書は、2 番目の Xeon プ ロ セ ッ サを Land Grid Array (LGA) プ ロ セ ッ サ ソ ケ ッ ト 付き の HP
xw6000 ま たは xw8000 シ リ ーズの ワー ク ス テーシ ョ ンに取 り 付け る方法を説明 し てい ます。
キ ッ ト の内容
プ ロ セ ッ サキ ッ ト には次の コ ン ポーネ ン ト が含まれてい ます。 ■ Xeon プ ロ セ ッ サ ■ CPU ヒ ー ト シン ク ■ 保証書 ■ イ ン ス ト ール手順警告 と 注意
Å
警告: この記号が貼付された装置の表面または内部部品の温度が非常に高 く なる可能性がある こ と を示 し ます。 この表面に手を触れる とやけど をする場合があ り ます。 表面が熱 く な っ ているため、 やけど を し ないよ う に、 システムの内部部品が十分冷めてから手を触れて く だ さ い。Å
警告: この記号が貼り付けられた装置の表面または内部部品に触れる と、 感電の危険がある こ と を示し ます。 感電防止のため、 カバーは開けないで く だ さ い。Å
警告: 感電または装置の障害を防ぐため、 次のこ と を守っ て く だ さ い。 ❏ 電源 コ ー ド の接地プ ラ グは必ず使用 し て く だ さ い。 接地プ ラ グは、 安全上重要な機能を果た し て います。 ❏ 電源 コ ー ド は、 いつで も容易にア ク セスで き る接地 さ れた コ ン セ ン ト に差 し 込んで く だ さ い。 ❏ 装置の電源を切るには、 電源 コ ー ド のプ ラ グ を コ ン セ ン ト か ら外 し て く だ さ い。2 番目の Xeon プロセ ッ サの取り付け
Å
警告: けがを防ぐために、 『Safety & Comfort Guide』 を読んで く だ さい。 このガイ ド では、 ワークス テーシ ョ ンの適切なセ ッ ト ア ッ プ方法、 ユーザーの作業方法、 および安全上重要な電気および機械関連 の情報を説明し ています。 このガ イ ド は、http://www.hp.com/ergo ( 英語 )、 またはド キュ メ ンテー シ ョ ンCD が製品に付属し ている場合は、 その中にあ り ます。Ä
注意: 静電気によ ってワークステーシ ョ ンの電子部品が損傷する こ とがあ り ます。 作業を始める前に必 ず、 接地されている金属に触っ て静電気を放電し て く だ さ い。Ä
注意: プロセ ッサを正し く 取り付けないと、 システムボー ド を損傷する こ とがあ り ます。 プロセ ッサの 取 り 付けは、HP 認定の販売代理店またはサービスプロバイダにお任せ く だ さい。 ご自分で取り付ける 場合は、 作業を始める前に注意深 く 説明書を読んで く だ さ い。✎
注記 : HP ア ク セサ リ は、 HP Workstation 製品に使用 し ます。 ア ク セサ リ は、 広範囲にわた る信頼性試験を 実施 し てい る と と も に、 高い品質基準に従っ て製造 さ れてい ます。 当社が保証 し てい る ア ク セサ リ は、 当 社が製造ま たは販売 し てい る も のに限 ら れます。手順
1 - 部品の確認
こ の手順をは じ め る 前に、 次の部品がすべて揃っ てい る こ と を確認 し ます。 ■ プ ロ セ ッ サのオプシ ョ ン キ ッ ト■ Microsoft® Windows® オペレーテ ィ ン グシ ス テム CD ま たは Red Hat Linux ボ ッ ク スセ ッ ト ■ 関連する ワー ク ス テーシ ョ ンの ド キ ュ メ ン ト 。 こ れ ら は、 http://www.hp.com/support/workstation_manuals ( 英語 ) でご覧になれます。 ■ 静電気防止マ ッ ト ( 静電気に よ る損傷を防止する ため ) ■ 静電気防止ス ト ラ ッ プ ( 静電気に よ る損傷を防止する ため )
手順
2 - システム BIOS のア ッ プグレー ド
お使いの ワー ク ス テーシ ョ ン に2 番目の Xeon プ ロ セ ッ サを取 り 付け る前に、 http://www.hp.com/go/bizsupport ( 英語 ) を参照 し て、 ワー ク ス テーシ ョ ンに最新の BIOS が イ ン ス ト ール さ れてい る こ と を確認 し ます。 ま た、 お使いの ワ ー ク ス テーシ ョ ンに最新のサー ビ ス パ ッ ク が イ ン ス ト ール さ れてい る か確認 し ます。 こ れ ら が確認で き れば、 新 し いプ ロ セ ッ サが正常に動作す る ために必要な ア ッ プデー ト が行われてい る こ と にな り ます。✎
注記 : 最新の BIOS が イ ン ス ト ール さ れていない場合、 新 し いプ ロ セ ッ サを取 り 付けた と き に、 ワー ク ス テーシ ョ ンが動作 し な く な る こ と があ り ます。手順
3 -ワーク ステーシ ョ ンの準備
お使いの ワー ク ス テーシ ョ ン に添付 さ れてい る マニ ュ アルでは、 ワー ク ス テーシ ョ ン の電源切 断、 ワ ー ク ス テーシ ョ ン か ら の電源供給切断、 ア ク セ ス パネルの取 り 外 し 、 お よ びコ ンポーネ ン ト の取 り 外 し な ど、 イ ン ス ト ールのための ワー ク ス テーシ ョ ン の分解 と 準備について説明 し てい ます。 製品に固有な情報については、http://www.hp.com/support/workstation_manuals ( 英語 ) にあ2 番目の Xeon プロセ ッ サの取り付け
手順
4 - 2 番目のプロセ ッ サの取り付け
取 り 付け る ワ ー ク ス テーシ ョ ン の準備がで き た ら 、 次の手順に従っ てプ ロ セ ッ サ を取 り 付け ま す。Ä
注意: システム部品の取り外し または交換のと きには、 システムの損傷を防ぐために、 次に示す静電気放 電(ESD) に対する予防措置を行っ て く だ さ い。 ❏ 静電気防止マ ッ ト 上で作業する。 ❏ 静電気ス ト ラ ッ プ を着用 し て、 身体に蓄積 し た静電気を確実にアースに放電 さ せる。 ❏ 作業対象の装置 と 、 静電気防止マ ッ ト 、 静電気ス ト ラ ッ プ、 および周辺機器ユニ ッ ト を接続 し て、 共通グ ラ ウン ド を形成する。Ä
注意: ワーク ステーシ ョ ンの準備手順と イ ンス ト ール手順に従わないと、 プロセ ッサが正し く 取り付け られずに、 重大なシステム損傷を招 く こ とがあ り ます。Ä
注意: プロセ ッサソケ ッ ト のピンは壊れ易 く て曲がり易いものです。 プロセ ッサを ソケ ッ ト に取り付け る と きは、 十分に注意し て く だ さ い。✎
注記 : 2 番目のプ ロ セ ッ サは、 速度、 キ ャ ッ シ ュ、 サ イ ズ、 お よび タ イ プが 1 番目のプ ロ セ ッ サ と 同 じ で なければな り ません。 1. プ ロ セ ッ サ ソ ケ ッ ト の保護カバーを取 り 外 し ます。 図 1 プロセ ッ サソ ケ ッ ト の保護カバーの取り外し2 番目の Xeon プロセ ッ サの取り付け 2. プ ロ セ ッ サ ソ ケ ッ ト のハン ド ルを完全に持ち上げます ( 図 1 参照 )。 プ ロ セ ッ サ ソ ケ ッ ト のカバープ レー ト 開 き ます( 図 2 参照 )。 図 2 プロセ ッ サソ ケ ッ ト の開放 3. プ ロ セ ッ サか ら プ ラ ス チ ッ ク カバーを取 り 外 し ます。 プ ロ セ ッ サのベース にあ る ノ ッ チを ソ ケ ッ ト 上の タ ブ位置に合わせます。 プ ロ セ ッ サ を ソ ケ ッ ト に置 き ます。 こ の と き 、 プ ロ セ ッ サの下面がプ ロ セ ッ サ ソ ケ ッ ト の上面 と 水平にな る よ う に し ます。 プ ロ セ ッ サカバー プ レー ト を閉 じ ます。 ソ ケ ッ ト レ バーを閉 じ なが ら プ ロ セ ッ サカバープ レー ト を軽 く 押 し ます。 図 3 プロセ ッ サの取り付け
手順
5 - CPU ヒ ー ト シン クの取り付け
1. 新 し い ヒ ー ト シ ン ク の底か ら 放熱グ リ ース の保護 ラ イ ナーを取 り 外 し て廃棄 し 、 ヒ ー ト シ ン ク を プ ロ セ ッ サの上に被せます。✎
注記 : CPU ヒ ー ト シ ン ク を扱 う と き に放熱グ リ ース に触れないで く だ さ い。2 番目の Xeon プロセ ッ サの取り付け 2. ヒ ー ト シ ン ク ポ ス ト を シ ス テ ム ボー ド の穴位置に合わせます ( 図 1 参照 )。 フ ァ ンは、 ワー ク ス テーシ ョ ン の前面を向いてい る 必要があ り ます。 ヒ ー ト シ ン ク のケーブルを、 シ ス テ ム ボー ド 上にあ る 2 番目のプ ロ セ ッ サ ヒ ー ト シ ン ク 用の フ ァ ン コ ネ ク タ に接続 し ます ( 図 2参照)。 図 4 ヒ ー ト シン クの取り付け 3. ヒ ー ト シ ン ク の 4 本のね じ を締め ます。 最初に、 すべてのね じ を途中ま で締めて ヒ ー ト シ ン ク を水平に保ち ます。 次に、 対角線上にあ る ペアーのね じ 1 を完全に締めてか ら 、 残 り のペアー 2 を完全に締め ます。6.9 kg-cm (6 in.-lbs) の ト ル ク で締め ます。 図 5 ヒ ー ト シン クのねじ締め
手順
6 - ワーク ステーシ ョ ンの組立
2 番目のプ ロ セ ッ サ と 関連コ ン ポーネ ン ト の取 り 付けが完了 し た ら 、 説明書に従っ て ワー ク ス テーシ ョ ン を組み立て ます。 こ の作業には、 サ イ ド ア ク セ ス パネルの取 り 付けお よ び電源の再 投入が含ま れ ます。2 番目の Xeon プロセ ッ サの取り付け
手順
7 - オペレーテ ィ ングシステムの設定
Windows XP
ワ ー ク ス テーシ ョ ンが ソ フ ト ウ ェ アのア ンバン ド ルプ ロ セ ス を完了 し てか ら 、 2 番目のプ ロ
セ ッ サ を取 り 付けた と き にHardware Abstraction Layer (HAL) のア ッ プグ レー ド が必要です。 た
だ し 、Windows XP は新 し いプ ロ セ ッ サを検出 し て自動的に HAL のア ッ プグ レー ド を実行 し ま
す。 「Found New Hardware」 と い う メ ッ セージの下に表示さ れる プ ロ ンプ ト に従って リ ブー ト し ます。
Red Hat Linux
すべてのバージ ョ ンのRed Hat Linux は、 新 し いプ ロ セ ッ サハー ド ウ ェ ア を自動的に検出 し ま
す。 さ ら に、Red Hat Linux (HP xw6400 と xw8400 ワー ク ス テーシ ョ ンにプ リ イ ン ス ト ール さ れ
て出荷) は、 SMP カーネルが イ ン ス ト ール さ れてい ます。
© 2006 Hewlett-Packard Development Company, L.P. The HP Invent logo is a registered trademark of Hewlett-Packard Development Company, L.P. Microsoft and Windows are U.S. registered trademarks of Microsoft Corporation. Linux is a U.S. registered trademark of Linus Torvalds.