SECTION 7: THE WORK OF THE DECORATIVE METAL FITTINGS ARTISAN (
kazari kanagu shi
)CONTENTS: INTRODUCTION:
A. Types of metal and placement on the butsudan: B. Treatment after completion:
Three ways of plating: C. Production method:
1. Handmade fittings:
2. Electroplated (EP) fittings: 3. Pressed fittings:
ABOUT THE ARTISANS:
7.1 BUTSUDAN STRUCTURE and PLACEMENT OF FITTINGS: Placement of kanagu on butsudan:
7.2 STYLE AND PATTERNS:
STYLES OF METALWORKING: Styles where heat is not used:
a) The line punching style (kebori) b) The embossing style (ukibori) c) The cut out style (sukashibori) Style where heat is used:
d) The sculpting style (jibori) PATTERNS
7.3. TOOLS:
TYPES OF BURINS (tagane): OTHER TOOLS and EQUIPMENT 7.4 MATERIALS:
Copper, Brass, Silver, Other materials: 7.5 TECHNICAL PROCESSES:
1. KEBORI KANAGU or metal fittings done in hairline engraving (punching):
2. UKIBORI KANAGU or metal fittings done in a cold embossing technique 3. SUKASHIBORI KANAGU or metal fittings done with a cutting-out technique
4. JIBORI KANAGU or carved and embossed metal fittings made using heat 4.a Process of HON JIBORI
4.b Process of HANA JIBORI 4.c Process of CHUU JIBORI CONCLUSION
Assembly (kumitate)
Cleaning and repair (sentaku) FOOTNOTES
INTRODUCTION: General:
As you know, throughout this website we have been using the production of a
butsudan to outline, as far as possible, traditional Japanese craft techniques. Although,
in today’s efforts to cut down on costs many of these skills are disappearing, we have tried to document as much as possible. Having discussed woodworking, lacquer skills and gilding, this 7th section, which details the work of the decorative metal fittings artisan (kazari kanagu shi), will complete the website, except for a brief account of assembly (kumitate). We hope this part will be useful for anyone who is interested in either traditional metalworking or the making of a butsudan.
For an overview of the whole website and its focus of traditional craftsmanship please look at the general introduction at the beginning. A further glance at the introduction to each of the six subsections will help with understanding exactly what a butsudan is (see Kin photos 01 & 02) and where metal fittings (kanagu) are applied.
Kanagu-making can be classified into two basic styles: those that use heat and those
that don’t. These are quite different techniques and are thus done by differently trained artisans. The kebori artisan works without heat and produces elaborately engraved designs simply by punching with burins (tagane). Variations on this can be done with slight embossing (ukibori) or by cutting right through the metal to give an open design (sukashibori).
Both of these styles, when placed in suitable positions on the butsudan, are beautiful in their own right. They will be discussed in greater detail in the next section. To understand the classification of metal fittings clearly, please consider the table:
A. The types of metal used and its placement on the butsudan, B. The treatment given to the pieces after completion,
C. Production method.
A. Types of metal and placement on the butsudan:
The pieces for the inside of the butsudan are made of copper, as are the decorative non-load bearing pieces on the outside.
This includes those on the top (kamidaiwa, gomitori) and the base (shimodaiwa) (see
Kin photos 01 & 02) and the door mechanisms of both amado and shouji. The hinges,
B. Treatment after completion:
After completion the copper and brass fittings are treated in the following ways to prevent tarnishing and to make them more beautiful.
1. Fittings for the outside are coloured with lacquer and then fired to harden them and increase their durability. This stops tarnishing and protects them from the atmosphere. It is called urushi yakitsuke and results in a shiny ‘painted’ look, which can be any colour but is most popularly reddish brown (see Kan photo 03).
With this treatment, kebori artisan Sawatari Masaaki worries a little because details of the engraving could disappear due to the rather thick lacquer applied before the firing process. “I only worry about the depth of the punching for door fittings, not for the pieces to be gilded. So I will do a little deeper punching for those.”
2. The parts destined for the inside of the butsudan are usually gold plated. However they can be silver-plated and treated with sulphur to give them a dull finish, then used in addition to or instead of the gold ones.
In this website, we are most interested in gold plating and Masaaki explains that there are three ways to do it. “Adding to the thickness with these processes is not a
problem because the plating is only a few microns thick,” he says. Three ways of plating:
The cheapest way is used for mass-produced kanagu and for this website is therefore a matter of only passing interest. “First,” says Masaaki, “the original copper piece is chrome-plated, then gold plate is put on top of that. Chrome plating is not very good because gold doesn’t stick onto it as well as it does onto a coppered base. And the colour isn’t very nice, because you can see the silvery colour of the chrome through the very thin layer of gold. And because it doesn’t stick well, the gold plating is uneven.”
The standard method of plating is to copper plate the punched kanagu initially and then gold plate it. “After copper plating gold will stick better onto the surface,” continues Masaaki. “Before gold plating, if the copper sheet is covered with copper plating any unevenness will be filled so the gold plating will be more even. Copper conducts electricity very well so it makes a good electrode. This is especially
important when the copper piece has some spots of solder (for example when kasane pieces, as in Kan figs. 21 & 23, have been attached with solder) because the gold can’t stick. But copper does stick so it is copper plated first.”
For very high quality items there is a third way of plating. “On top of the finished copper kanagu it is copper plated again, then silver plated and finally gold plated. “In this case the colour of the gold plating is very good. It has ‘deep taste’,” he says
meaning very elegant. “I guess silver conducts more easily than copper. The gold plate over silver plate sticks better than the gold directly onto copper plating.” (FN.1) C. Production method:
Along with the other butsudan crafts, modern cost-cutting methods are used to make
kanagu. Craftsmen like kebori artisan, Sawatari Masaaki and jibori artisan, Okamura
Masao still proudly resist this and do all their work by hand. However ‘pressing’ and ‘electro-plating’ are becoming viable alternatives. Throughout this website we have been discussing high quality traditional (dentouteki kougei hin – DKH) butsudan where cost cutting is not practised. Interestingly, in this one case (kanagu), mass-produced works are acceptable in some places on the butsudan and this will be discussed later.
Handmade metal fittings are quickly becoming a thing of the past. They are being superseded by both electroplated and pressed fittings. Although there is no absolute rule, electroplated (EP) fittings are most appropriate for the thicker more deeply carved and embossed jibori-type pieces while pressed fittings are more suitable for the engraved kebori style. Fortunately, however there are a few artisans who are carrying on the tradition of handmade pieces (tebori).
1. Handmade fittings:
Kebori artisan, Masaaki says, “The difference between the hand-made fittings and
‘pressed’ goods is that the machine punches the whole pattern: flower, stems and leaves, background texture (nanako), all at one time. The same pattern over and over, many mass-produced products, with no variation.” They make a template for this so it is not economical unless they can reproduce it many times. “In the case of handmade fittings,” continues Masaaki, “I can make an assortment of patterns, for example mixing open and half open flowers, buds, (see Kan fig. 07), even the backs of flowers. In the case of ‘pressed’ fittings, exactly the same pattern will be pressed onto all the fittings of a set. For example a set for nageshi (see Kan figs. 08 & 09.a & b and Kan photos 05 and 11) will have the same patterns. And in the case of hand made fittings, for example among a 5-piece set, I can change the design, size and proportion of the pieces. Sometimes I change them intentionally so people can see it is done by hand. With pressed pieces they all have the same length and same design. With handmade I can make the central piece a little bigger than the others. Or I can make some part of it a cut out design (sukashibori). Or make the flowers face in different directions such as the side two flowers facing the middle one.” However, sadly the following mass-produced items are becoming more and more popular:
2. Electroplated (EP) fittings:
The manufacture of EP items of jibori kanagu started 20 or 30 years ago. According to one source, a high quality jibori work produced by hand, is used as a prototype to make a template. Vinyl chloride resin is heated to between 200 and 300°C and run onto the template. When cooled and solidified the moulded item is separated from themetal. Then a solution of silver is sprayed onto the resin surface to act as a negative electrode. Ionic copper (purity 99.8%) is melted and used as the positive
of electroplating, the copper is thick enough and can be removed from the resin mould. The rough edges of the metal fitting are filed away.
The advantages of EP products are:
• A product exactly the same as the mould can be obtained.
• The material and colouring are exactly the same as hand-made jibori kanagu. • They are cheap.
• The supply is stable (you don’t have to wait for an overworked artisan). • Uniformity of products can be achieved. You always know what you are
getting.
The disadvantages of EP products are: • They lack individuality.
• Because they are a cast item, they are thinner and lack density. Therefore they are not used in places where a heavy load or frequent use is expected. They are used only on pillars, chuujiki, chuudan and nageshi.
Masaaki showed us an example of an EP fitting and gave his own similar but less technical description, “They make a thick plate of resin and while it is hot and still soft they press the finished jibori kanagu down into it. And they get a reverse-shaped mould. They connect the electrodes and copper collects on the resin surface until it reaches the right thickness. So the material of the finished product is pure copper. It is more bendy and not strong.”
The piece shown above was from a temple shumidan, where the front and side sections were joined and could be bent around the platform. It measured 28cm long and 4.8cm wide. “These days,” he explained, “for almost all portable shrines (mikoshi), festival floats (dashi) or inside fittings for temples, EP fittings are used. There is almost no market for such handmade ones anymore.” Up to about 20 years ago Masaaki was sometimes asked to do work for mikoshi, temples, shrines etc, but now things like this are machine made. “So now we have no chance,” he says rather dolefully. “Like everything, the manufacturer takes the fittings to China to be copied and then sent back to Japan.”
3. Pressed fittings:
About 20 years ago pressed fittings became common. Masaaki explains, “They can do the rough carving (arabori) process with machines. You can draw the lines with a computer and then the computerised machine does the work. If you feed it all the information, it will arrange everything about the design - computers can do anything! Machines can apply more pressure to the metals, so a greater variety can be used and there can be more impurities, making the metal cheaper. Pure copper bends easily so the more impure the metal, the better. Machine-made items are called ‘pressed’
kanagu.” “However,” he says, “pressed designs are more general and non-specific;
and the wrong patterns are sometimes used in the wrong places.”
ABOUT THE ARTISANS:
As mentioned previously, our aim here is to describe the handwork of these traditional craftsmen. And thanks to the many hours given to us by kebori artisan, Sawatari Masaaki we were able to get a comprehensive understanding of his particular skills. His workshop, a well-lit room at the front of his home, is on a street (Nanamagari) where, in the past, many butsudan artisans lived and worked.
Here, he sits on his cushion surrounded by tools, tapping busily on a piece of brass or copper, placed on a tree stump that was his father’s and his grandfather’s before that.
occasionally commenting and finally bringing us tea and sesame scones with homemade blueberry jam, when she thinks her husband has had enough. Masaaki says, “Mori (choukokushi – see part 3) warned me that, ‘you’ll get very tired’.”
Masaaki is talented, innovative (see kasane in Kan photo 05 and exhibition butsudan
Kan photos 23.a & b) and very independently minded. He says, “I'm doing my work
in my way. My way might be different from butsudan shops and also different from other metal artisans.” He says that devising new patterns that can’t be copied or mass-produced is the key. And it is true that even though the economic climate is not good for artisans he still has work coming in.
The most stressful part is measuring for the pieces and preparing the patterns. He works in monthly cycles and tends to do this planning at the beginning of each month. In this case, to calculate sizes, work out designs and draw the patterns for the three
butsudan he is working on concurrently is very demanding. Once all the planning is
done, he just has to do the punching and that is not so ‘mind-bending’. His wife seems more relaxed as well, joining into the talk and serving us ice cream, cake and coffee. When he works instinctively, he is as garrulous as the other craftsmen, reminiscing about the good old days when you could hear the ‘chinking’ of the metal workers far into the night. However, since the number of skilled artisans is decreasing with each generation, that is a thing of the past.
According to kanagu artisan, Tanaka Youichi, “It takes about five years to become ‘useful’ to your master, in other words when your skill is ‘not bad’. To become an independent artisan it takes seven or eight years and after 10 years training you can be called ‘full fledged’.” Thus you think twice before embarking on such a career. Typically, Masaaki feels concern at the drift of the modern generations away from the
understanding of what is involved in the making of their family butsudan. “I go to an elementary school once a year to talk about kanagu artisans’ work,” he explains. “I take a process board and give out an explanation sheet and explain everything. The 5th grade children learn about the local history and industry of the Hikone area. I teach them the history and how to make the kanagu.
“Drawing is important for a fittings artisan,” says Masaaki while using his coloured pencil, blue and red at opposite ends, to help us understand. “The mental activity or feelings needed for carving or punching patterns on metal fittings is the same as that needed for drawing pictures. I heard that my grandfather used to take his apprentices out to sketch flowers and plants. Drawing and carving have something in common. I think I should learn to draw,” he says with a suggestion of a smile. He uses the line drawing technique of making lines closer together and shorter, to suggest distance and farther apart and longer, for close up. Also objects such as leaves in the distance appear smaller.
Following our discussions with Masaaki, in order to appreciate the differences between his punching (engraving) techniques and the sculpting and embossing techniques of a jibori artisan, we interviewed Okamura Masao. Masao’s workshop is also a room connected to his house, which is slightly away from the centre of
butsudan activities. He contributes a lot to local artisan activities such as the yearly butsudan exhibitions. He very kindly prepared a piece of metal ready to demonstrate
all the processes. His wife was very helpful with the explanation. In fact, sometimes he asked her to, “let me do the talking...” She prepared tea for us several times and was helpful with bringing out samples of his work to show us.
7.1 BUTSUDAN STRUCTURE and PLACEMENT OF FITTINGS: How the fittings are ordered.
Metal fittings are divided into sets which fit for instance along the edge of a door (see
Kan fig. 11.i). The ‘set’ includes the pieces at the corners (sumi) and the ‘middle’
(naka) ones that are placed in between. The advantage of handmade items is that the proportion of the sizes to the numbers of pieces in the set as well as pattern details can be changed.
Butsudan shops ask the fittings artisans to make a certain numbered set for a certain
place on the butsudan, for example a set of seven for a shouji frame, or a set of five for nageshi (see Kan photo 11). The kind of work to be done for each part, such as
kebori, ukibori, sukashibori or jibori is negotiated. This is decided for each place,
according to the price of the butsudan ordered, taking into consideration, the kind of metal (copper or brass) and its thickness. “So I use thicker metal for higher quality ones. I use the thickest plate, sometimes up to 3.5 mm, for the sandan fittings (the three internal shelves – chuujiki, chuudan and nageshi: see Kan photo 10 & figs. 09.a & b) of the butsudan. The more important or obvious pieces and the load bearing pieces are thicker,” explains Masaaki, adding, “Although this may vary for different artisans.”
The shops may order all the fittings to be made of jibori or sometimes only sandan fittings are jibori, depending on the customers taste, priority or budget. The style of work is up the customer. Some want a consistent style throughout, such as only
kebori, while others might want different styles of kanagu on various parts of the
same butsudan. Sometimes, if the buyer wants the metal very thick (4mm or more) Masaaki uses 2 layers of 2mm each (cf. Kan fig. 20). He puts extra design pieces of 2mm on top of the main piece of 2mm. On the other hand, some customers will choose cheaper fittings because they want to emphasize something else, like makie instead of kanagu.
Here, we will describe where the decorative metal fittings can be found on the
butsudan. Their style and the placement is different depending on the butsudan
The number of metal fittings (kanagu) for a large Hikone DKH kin butsudan (see Kin photo 02) is about 350; and for a smaller one, (see Kan photo 10), is 250. A wider
butsudan has more. (FN.3) The time necessary to make these fittings for a large
Hikone DKH (see introduction) butsudan is about 1 and half months.
As mentioned before, the metalwork inside the butsudan is usually made of gilded copper. It is found on the pillars (large, medium and small), on the sandan (chuujiki,
chuudan and nageshi), on the small doorframes and drawer fronts, and on the outside
of the inner lattice door (shouji). When placed against shining black lacquer it
sparkles and makes a pleasing contrast. Against a gilded surface it appears subtle and sophisticated (see Kin photo 02).
The hinges and fastenings on the outside of the butsudan door (amado) have to be stronger and more weight bearing than those on the inside and are thus made of brass. To make them resistant to the atmosphere they are lacquered and then heated, giving them a ‘painted’ look, most commonly a shiny brown colour. Sometimes there are also decorative fittings at the corners of the doorframe and if so, these will be matched by fittings at the corners of the kamidaiwa and shimodaiwa (see Nuri photo 01 & Kan photo 03). These will usually be made of copper and treated with lacquer to match the hinges and opening mechanism.
“In the past,” says Masaaki, “the size of the rooms was always the same, that of the
butsudan was the same and thus the number of kanagu. Now there is more variety in
Placement of kanagu on butsudan:
For handmade pieces to be used on a DKH butsudan there are certain stipulations. The metal fittings for amado must be at least 1.0mm thick. For shouji the thickness must be at least 0.8mm. For inside items there is no limit for thickness.
A. Fittings for the three shelves (sandan):
As seen in previous photos, there are three prominent shelves inside the butsudan (see
Kan photo 10). Collectively called sandan, they include the upper nageshi, the middle chuudan and the lower chuujiki. Kanagu sets for these areas can vary but generally
Nageshi and chuudan sets have two for the corners and an odd number (one, three or
five) in between. “The number of the fittings for chuudan and nageshi is uneven,” says Masaaki, “because Japanese like uneven numbers. I discuss with the shop, how many to do, three or five or seven.
Generally, the number of fittings for chuujiki on a big butsudan is fixed at a set of four, because this balances well with the three daiwa drawers (just below the
chuujiki), each of which also has metalwork (see Kin photo 02 & Kan photo 03).
Note that on a smaller butsudan (see Kan photo 10) where there are two drawers, there is a set of three (two at the corners and one in the middle). End (sumi) fittings usually stop at the corner of the chuujiki, and then there is nothing on the side. For very expensive butsudan costing upwards of 20 million yen or more, they can be bent around the corner.
These pieces can be made in any of the four styles shown in Kan fig. 01: kebori,
ukibori, sukashibori or jibori. Even though the butsudan may be of high quality and
traditionally made (DKH), EP kanagu may be used. However ‘pressed’ or imported goods may not.
Nevertheless, there are variations, such as when the chuudan (see Kan figs. 09.a & b) is not straight across: here there may be 7 or more pieces to balance the 5 on the
nageshi (see Kan photo 05).
B. Fittings for Buddha pedestal (shumidan):
Because of its Buddhist icon, the Buddha pedestal (shumidan) is the focal point of the
butsudan and the fittings found here must always be handmade. Generally those at the
top are wider than those at the bottom, and even for a smallish butsudan there is usually one at each corner and three in between. Sometimes, but not always, equivalent pieces can be found on the joudan, as in the photo below. The kebori technique is ideal for these fittings because they are small and must be delicately made. Unfortunately, sometimes it is only these that the artisan is asked to make, while many of the others are pressed or EP.
C. Fittings for doors:
There are two types of fittings for the doors: those that are truly decorative and those that are functional and weight bearing. For a traditionally made butsudan (DKH) they cannot be either pressed or EP, they must all be handmade.
For the inner lattice doors (shouji) the fittings are made of either copper or brass with a minimum thickness of 0.8mm. A set of three brass hinges, visible from the inside, joins the frames of the individual door panels and allows them to be easily folded out of the way when opening and flattened again for closing. The decorative pieces are made of copper and are on the outside of the shouji frames. A set of seven is the highest number used. Corner pieces (sumi kanagu) are L-shaped because their function is to reinforce the joins between the horizontal and vertical frame (kamachi) sections (see Nuri photo 16).
One of the most beautiful pieces is the closing mechanism (meshi awase). It is divided in half, with a central vertical bar (jougi kanagu) attached to the right side. A latch or bolt passes through, to hold the door closed.
Sometimes there is a picture (makie) at the base of the shouji, in which case there will be metal fittings around the makie to set it off elegantly against the lattice door (see
Makie photo 29).
For the outer doors (amado), the metal must be at least 1.0mm thick and the hinges on the outsides are both functional and decorative. For a large sized butsudan usually there is a row of five brass hinges for joining two door panels: two at the corners and three in between. As with the shouji, the added function of the amado corner pieces is to strengthen the join in the corners of the kamachi (see Nuri photo 16). For a smaller
butsudan the corner pieces simply strengthen the join and only the three middle pieces
The door-closing mechanism (hassou) is made of copper sheet and will be treated with lacquer. The structure is virtually the same as meshi awase found on the shouji. It consists of a metal plate divided in half, with a loop on each side and a latch that passes through the loops. The vertical bar (jougi kanagu) is long and thus made of three pieces: top and bottom with a middle piece that overlaps both.
D. Fittings for pillars:
For a DKH butsudan, the kanagu on the pillars can be electro-plated but cannot be either imported or pressed. The fitting does not go all the way around the pillar. It is open at the back and usually covers 50% of the circumference or up to 70%, for high quality butsudan. “It is harder to do with kanagu that has a lot of cut out areas (sukashibori),” says Masaaki. “When we make sukashibori kanagu round, it tends to gape and doesn’t fit tightly onto urushi surface.”
Pipes of the same diameter as the pillar are used for rounding the kanagu. The
diameter of the small canopy (kuuden) pillars (kobashira) can be from 2.4 to 3.9cm (8
bu, 1 sun, 1 sun 2 bu, or 1 sun 3 bu). That of the large front pillars (oubashira) is
7.6cm (about 2.5 sun), depending on the size of the butsudan. (FN.4)
Metal fittings will be put on the upper, central and lower parts of each pillar. The style and number of fittings for small pillars is based on that of the large ones. For example, if there are three kebori-style kanagu on the big pillars there will also be three similar ones on the smaller pillars.
“When I make kobashira fittings with three pieces in each position (upper, central and lower), I make them in two overlapping layers for the central kanagu set, which is in the front and in a conspicuous position,” explains Masaaki. “The upper and lower
or three pieces, where three is highest quality. When I make a layered metal fitting, the thickness of each sheet is from 0.8 mm to 1.0 mm.” Between the metal and the pillar, I put stiff paper such as a post card.”
If, for some reason, such as a low quality butsudan or very thin pillars of less than 1
sun in diameter, only one layer is put on. However, it may be designed to look like
E. Around the drawers and small doors:
These pieces must also be handmade if the butsudan is to be certified as ‘traditionally made’ (DKH). The kanagu are shaped at the corners to match the shape of the
decoration on the drawers (see Kiji photos 13, 14 & 15 for the shapes of drawer decoration)
7.2 STYLE AND PATTERNS:
Masaaki’s attitude to style and patterns:
As with the other artisans, Masaaki has quite strong opinions about the butsudan industry in general and metalworking in particular. During our time with him, he expressed these opinions more and more openly and profusely. “We artisans have only a few opportunities to see our finished products installed on a butsudan. Other than contributions for exhibitions (see examples in the main introduction and below (Kan photos 23.a & b), our work is delivered directly to the customer’s house. But there are occasions when the shops take photos and give them to us,” he adds displaying a photo of a finished butsudan.
“Moreover,” he continues, “I want to show my personality in the punched pattern. For example though arabesque (karakusa) patterns are ordinary and used everywhere on
butsudan, I want to make the patterns individual so people will say ‘this can only be
Sawatari’s work’.” He wants his engraving to be distinctive, so that everyone recognizes that it is his. His personal characteristics are expressed in his work. “Most metal fittings will be gold or silver plated so I don’t know exactly what they will look like while I’m making them,” he continues. “I don’t know until after they are actually nailed onto the butsudan and displayed in the shop. I am very happy when people see them on the butsudan and say, ‘they are good’. And I’m happy when people say, ‘you made unique fittings’. When they see my work people have said, ‘these are done by Sawatari’ or ‘you made us fittings a little different from usual’. I think the manufacturers (toiya) expect me to make something a little unique when they order from me so I want to respond to their expectations. If someone says ‘it must be made by Sawatari because ‘it’s unique’ I am happy. I am making the works, thinking people are expecting something distinctive.”
Masaaki feels it is very important to keep thinking up new designs. “It doesn’t matter whether the work is jibori, ukibori or kebori,” he says, “but if an artisan makes the same pattern and the same shaped kanagu again and again, people get tired of it and the price will tend to go down gradually. Which means the value of the kanagu goes down, so in the end, the toiya cannot ask the price they want from the customer. Then the artisans will be out of work. If we continue thinking of something new and make better items than the butsudan shop expects, this kind of thing won’t happen. The artisan who can carry out the toiya’s request and then add just a little more can negotiate and get a good price. Carver, Mori Tesso (see choukoku section) makes that effort.”
Although it is important to keep making new patterns, they must also be suitable. Masaaki says, “In such places as Nijoujou [the Kyoto residence of Shogun Tokugawa Ieyasu], the handles of the sliding doors (fusuma) are designed to fit the image of the whole building so even after so many years, since it was built, we still feel they are good.” He showed us some door decorations he had made with a pine needle design (cf. Kan photo 05). Another of his ideas was to use a hanging pull instead of just a knob for a drawer or door. He keeps his imagination active by preparing both
he enters works into an exhibition held by the local butsudan cooperative (kumiai) and usually wins a prize.
However, for the most part, he does his own work without reference to what the other artisans are doing. Unity of theme, as discussed in the choukoku section, is not such an important concern with Masaaki as it is with choukokushi, Mori Tesso. That being said, the case of a butsudan being prepared for a national exhibition, as described below, raised certain issues.
Naturally, there is not always agreement between toiya and artisan. Of course, the artisan keeps his feelings to himself, and he does not necessarily know the pressures the manufacturer is under, but is glad to have an outlet for his frustration once in a while. One day, when we arrived, Masaaki started talking about it almost before we got into the house.
“A toiya ordered a set of metal fittings for a butsudan from me,” he explained. “But I couldn’t accept the order because I was busy with others. And he asked me to make designs for the fittings for the pillars. And I made the patterns and gave them to him. Another artisan made the fittings and I did only the last punching process (see Kan photos 23.a & b). The large pillars of this butsudan are lacquered using the raden technique, where pieces of lustrous pearly shell (aogai) are embedded in the lacquer (see makie section), thus the metal fittings are the ‘cut out’ style (sukashibori) so that the raden (of cherry petals) will show through the holes in the kanagu. The designs are variations of diamond and hexagon shapes, like a turtle shell. The diamond design goes on the lower part of the pillars and the hexagon design goes on the upper part. These are also kimono patterns. The borders of these patterns are unique.”
“When doing a single pattern such as petals or leaves, it is important to makes them different: double or overlapping or twisted or bent (see Kan fig.07). Otherwise, they are not natural. This wasn’t done,” he said with a sigh. “What’s more, before making metal fittings I handed the drawings and patterns for the designs to toiya and
recommended him to put them onto the pillars and to put aogai cherry petals in such a way that they could be seen through the sukashibori holes.”
“Toiya asked me to do the kanagu, before the lacquering and aogai were finished. So we were kind of working blind. We discussed it before but we hadn’t seen each other’s finished work. So I was disappointed with the end result and I couldn’t see very many petals through the fittings. I’m not attacking toiya, but I’m entitled to my opinion aren’t I?” asked Masaaki hardly hiding his regret that his beautiful designs weren’t used to full advantage.
This particular butsudan highlights another issue already touched on in the carving section, that of unity of theme throughout the butsudan. Masaaki wanted his gold plated kasane pieces to match the carvings done by the choukokushi. The ‘treasures’ (takara zukushi) pieces were placed on the nageshi and chuudan near the carvings with the same topic (see Kan photo 05) (also see Chouko photo 04 and Kin photo 48). This was done more or less as he wanted and he was happy. He wanted the pine needles to go on the chuujiki to match the plant themes in the lower parts of the
butsudan. Again, with this, he was content.
STYLES OF METALWORKING:
There are four commonly used styles or methods of metalworking. The main difference is that for three of them heat is not used. These are the line punching or engraving style (kebori), the embossing style (ukibori) and the cut out style
(sukashibori). Training for these techniques is quite different from that for the final sculpting style (jibori), which requires heat to soften the metal so it can be carved and deeply embossed without difficulty. Thus there are two distinct types of artisans using four different methods. These methods are outlined below and more details are given in the section on processes.
Styles where heat is not used:
a) The line punching style (kebori): in this case the kanagu is flat. The rim, the ground and all the design parts are on the same level. Here, lines with different textures (ridged or smooth) and patterns (straight, curled or swirled) are punched to make the design. Sometimes another layer of kanagu can be fixed on top to give extra depth. Further, more removable pieces can be added, which are called kasane (see
Kan figs. 23 and30.a & b). If the kasane is a different colour than the lower piece, such as gold kasane on a silvered base (see Kan photo 05), or vice versa, it gives a very pleasing appearance.
b) The embossing style (ukibori): in this case the kanagu is embossed, but only slightly because the metal is not heated so it is not very malleable. The rim and the ground are on the same level, punched as in kebori style, while parts of the pattern are raised. Ukibori fittings can be used in place of jibori fittings (see Kan photo 01.b) because with a cursory glance they look the same. Ukibori style was devised in Hikone. Since it requires less skill than jibori and can be done more quickly and cheaply, it is popular with today’s emphasis on cost cutting. This technique, used by
kebori artisans, does not require the carving skills used by jibori artisans. As an
example of the way these styles could be used for pillar kanagu, Masaaki says, “This is my honest opinion. An ukibori fitting with 3 layers of 0.8 mm can be made to look like a jibori fitting of 2.4 cm with three carved out steps (gradations).
c) The cut out style (sukashibori): this is where some of the pattern details of the
kanagu are cut out completely so the background, such as black lacquer or gilding,
shows through (see Kan photo 21). Sometimes the cut out areas are larger so more background shows (see Kan photos 23.a & b) and sometimes yet another layer (kasane) is put on top to accentuate the pattern.
Style where heat is used:
d) The sculpting style (jibori): this kanagu is both embossed and carved. The rim is left untouched, the ground is dug out and the patterns are raised. Then internal design details, like leaf veins, are punched in using the kebori method. The metal is thicker and heat is required to soften it and increase malleability. The heated metal plate is fixed in a bed of resin (yani) for ease of working. This technique requires special skills taught by a jibori master and is not done by kebori artisans.
Although the characteristics of these four styles overlap somewhat, clearly the main differentiating feature is whether or not they use heat. Having considered the kinds of metalwork that can be done, and before discussing techniques, let us look in detail at some aspects of the patterns.
PATTERNS:
The concept of patterns can be divided into two categories: those that form the internal designs of the piece and those used for the background. There are a few standardized patterns used to fill the ‘ground’ space behind the motif and the skill comes in choosing the size and type of ground pattern to maximize the whole effect. It is said that the background decoration can make or break the basic design. Therefore, let us look at this ‘ground’ punching first before going on to the internal motifs.
Ground punching:
1. Fish roe punching: After the designs are finished a simple, repeated pattern is punched into the background. Whatever the style, some artisans might consider this ground punching the most important part of their work. The standard way is to set off the pattern with a granular background, a little like fish roe (nanako). Traditionally it was done with a single-tipped burin (tagane) making a tiny depressed ring with a raised area (nib) in the middle. Recently though, multiple-tipped tagane, producing diagonal lines of nibs, make this job easier. The burins have a waffle-like appearance and, when punched, produce rows of tiny ‘mountains’ or ‘nibs’.
In any case, as jibori artisan, Okamura Masao says, “We have to punch nanako perfectly, clearly, beautifully even though our skill of pattern punching or carving is a little lower. Nanako is most important. If nanako is rough, the carved or punched patterns will die. It is important to punch with even strength to get even depth. I make the nibs in a line on the straight and the diagonal. And they should all be the same level.” Punching each time at exactly the same pressure requires speed as well as confidence with placing the burin.
“This is just like the background scenery in a picture,” comments Masaaki, “and it makes the clouds or other design features stand out. Depending on the kind of patterns or the size of the fitting I use various sizes of nanako.”
“Usually,” he continues, “I use a punch with 4 x 4 points (= 16), or perhaps 4 x 6 (= 24). The size of a point varies. I use a single point nanako burin only for high quality fittings. With this I can put nanako even into the tiny spaces between the intricate parts, such as leaves or petals, so the main patterns seem even more neat and clear. I never use the single point with the combined point burin. So if I use the single point for some parts, I have to use it all over. I put nanako on the fittings for the inside (uchi
mawari) of the butsudan, but rarely on the fittings for the outside (soto mawari). The
outside fittings, seen when the doors are closed (see Kan photo 03), do not have ground patterns.”
All artisans do this nanako style of punching, but in addition Masaaki has some other background patterns of his own devising, especially triangles and variations of the
shippou design.
2. Triangle punching: He makes the triangle design with 2 tagane. First he punches a ‘V’ shape and then he punches a triangle inside it. This is his original idea.
3. Seven treasures pattern (shippou) punching: “I learn about patterns by looking at kimono and ceramics,” explains Masaaki. “The shippou pattern is used for kimono or Arita yaki.”
The standard shippou design is made using 3 punches: a tiny circle using a punch like a single-nib nanako tagane, a flower and an oval plane punch. First he punches the flower, then the tiny circle. Most artisans then leave the area between the circles rounded up. However, he then does an additional punch, where he pushes that area down.
He also does square shippou where the patterns are squared rather than diamond shaped, and the lines between the circles are straight. [
Shapes and internal motifs:
As mentioned before, even though artisans tend to specialize in certain types of design, Masaaki feels a real need to develop new designs. However, generally there are certain expectations about what kind of patterns are best suited to the upper, middle and lower parts of the butsudan. “For the fittings on the upper part of the
butsudan, such as nageshi,” says Masaaki “I will put suitable patterns, such as clouds.
In principle things related to high places, such as the sky, go at the top. On the upper parts we find flowers of lotus, heavenly creatures, such as floating women, clouds, cranes, phoenix. In the middle position I put things concerned with the ground such as plants and flowers. On the lower positions you can find things connected with water, such as waves, lotus leaves, plovers, rabbits in the waves and mandarin ducks. Those patterns are decided for those places and they would not be put in another place.”
We will consider two aspects of the patterns: both the external shape of the metal piece and the internal design, which will be punched, carved or embossed onto the piece. When Masaaki plans the design he has an all-over picture in his mind and which style will suit best.
“The butsudan has Buddha inside,” he explains, “so the kanagu should have a peaceful or spiritual focus. Traditional designs are good. The crane and phoenix are
butsudan. Always flowers should point up. And of course birds must be up. But other
than that, the position and patterns are relatively flexible. I often produce new patterns for the works, looking for new designs, such as what I see on kimono, pottery etc. Patterns are stylised to a certain extent (not realistic) but I can change them more freely than you might expect. I observe the basic rules, but vary them as I want. For example, swirling arabesque patterns (karakusa) come from the design for grape leaves. After the tendrils are drawn, leaves can be put on in interesting ways (see Kan fig. 07).”
His favourite pattern is lotus, because it has so much variety and it stands out. Also it means enlightenment. “I like both flowers and leaves,” he says. “Lotus petals like the silver and gold tinted paper ones the Buddhist monks scatter amongst the audience during ceremonies, pictures of them in their natural state in the water, full bloom lotus flowers, half open flowers, buds, all of these are nice.”
Generally, if the external shape is intricate, Masaaki balances this with a simple, easily made internal design, and vice versa. As an example, the door opening mechanism (hassou) kanagu for amado may be circular, square or hexagonal (see
Kan fig 12). For the hassou and meshiawase pieces for shouji, he makes a core pattern
using arabesque swirls drawn freehand. He includes leaves, sometimes seen from the side view and perhaps with variegated edges. The more branches and leaves the arabesque has, and the more intricate the design becomes, the more cut-away parts there will be. The very complex shape balances his preference for a simple engraved inner design, without nanako (cf. Kan photos 04 & 18).
Pieces that are longer than they are wide, such as those on the shelves or the inner lattice doors (shouji), either point inwards (iribana) or outwards (debana) at the ends (see Kan fig.08). “Debana,” explains Masaaki, “is the shape at the top of the newel post (giboshi) on the shumidan railings (kouran) surrounding the pillars (see kuuden figs. 09.b & c). Iribana is a mirror image of the debana, so these patterns repeat themselves throughout the butsudan. Usually the corner pieces point inwards while the middle pieces point outwards (see Kan photos 05 & 11). An exception to this might be chuujiki pieces that are generally all iribana shaped. To make the shape of
iribana, the debana is cut in half and turned over to make the shape of the iribana.
After deciding on the shape of the piece and making the pattern with thick brown slightly waxed paper like that used for kimono stencilling, either he or his wife copies it onto the metal. Then he draws the pattern, freehand with a wax pencil, onto the copper or brass. “About 80% of all patterns are in my head,” says Masaaki. His designs are so well fixed in his mind that he sometimes doesn’t even need a rough sketch.
When he makes a 5 or 7-piece set of shouji kanagu, (see Kan fig.11.ii) he uses different flower patterns for each level. On a sanpoubiraki butsudan (see kiji section) with six door panels, the same pattern will follow horizontally, but vertically they will be different. For example, he could have lotus at the top (corner), then, moving
downwards, cherry blossom, housouge (imaginary flowers on swirling arabesque patterns), followed by Chinese bell flowers and finally, at the bottom perhaps
To illustrate the concepts given above, let us consider the designs and shapes as found on kanagu for a set of large pillars (oubashira).
a) The top layer has a ridged border above a section with birds and clouds.
c) The bottom layer has a repeated background design of triangles.
The CENTRAL FITTINGS are in 4 separated layers (see Kan figs. 29. b & c and 30.a & b):
a) The top (t) layer repeats the triangle pattern (see Kan fig.29.c). b) The middle top (mt) layer has a design of flowers (see Kan fig.29.b).
c) The middle (m) layer has nanako background topped by medallion (kasane) pieces with birds and flowers.
d) The middle bottom (mb) layer has a design of flowers (see Kan fig.29.b). e) The bottom (b) layer repeats the triangle patterns (see Kan fig.29.c).
a) The top layer is the cut out style (sukashibori) with a 7 treasurers (shippou) ground.
b) The middle layer has a traditional pattern of plovers and waves with a punched
nanako ground (see Kan fig.31.b).
These layers when combined have the following appearance.
These pictures show some interesting points about Masaaki’s style. Firstly, the
kanagu for the lower part of the pole tends to have more cut work. Secondly, although
some of the shapes appear the same, the proportions are slightly different, for example the swirl-edged designs with birds and flowers.
Having dealt with the important aspects of the patterns, let us move on to a brief outline of tools and materials and then finish with a discussion of the processes involved. For this final section we will particularly concentrate on the kebori and
7.3. TOOLS:
“The principle of decorative metal working is the use of the punch or burin (tagane),” explains Masaaki. “Theoretically you can make any pattern or any line using a tagane with one sharpened tip. Because of course, a series of dots (….) will eventually make a line (__). But it takes too much time. Various kinds and sizes of tagane are
produced to make better patterns more quickly. For example the pattern of plum (ume), the size of the flower pattern can vary from small to large. Anyway, I have about 800 tagane now. Some of them were used by my father before me, and by my grandfather before that.” Therefore, because artisans used to work with just 1 or 2
tagane, Masaaki feels that having so many is cheating a bit. But it makes the work a
lot easier. One reason why it is helpful to have so many is that when he makes a set, say, of five pieces of kanagu shouji, he uses different flower patterns for each level (see Kan figs. 11.i & ii and 28). Also if the size of the area for placement of the pieces varies slightly, he keeps the same number of pieces, but adjusts the sizes and
proportions of the designs. Moreover, it was clear from his demonstration that he could do the old style of punching very skilfully. When he sees old metal fittings, he can guess the kinds of tagane they used. He can see that they used only 1 or 2 types.
“My father used to both buy and make tagane,” he continues. “I don’t make them. I sometimes buy a new style. When I want a very special shape, to make a new design on a butsudan fitting, I prepare a prototype from the soft metal remains of an old
tempered steel, using my model.” For instance, he has recently devised a ‘shippou’ pattern for ground punching (see Kan figs. 25.a, b& c). For this he needed a new burin. So he used an old one and made the exact size and shape. Then took it to the burin maker to copy. This needs to be hardened steel and he cannot fire it himself. Thus it can be seen that for an artisan setting up in his own business, tools are a major consideration. According to one artisan, “the setting up cost is very high but usually he inherits tools from his father or master. He buys tagane one by one when it is necessary; or buys all the tagane from a retiring artisan. But then he gets some that are near the ends of their lives; or ones he doesn’t want. But the price is cheap.” He described his equipment as follows: “I have about 600 tagane and the average cost of one is around 20,000 yen. There are 30 tagane for cutting out (kiritori), costing, on average 3,000 yen each. I have fine-tipped detail (sube) tagane for engraving inner details. And there are six types of fish roe (nanako) tagane with 1, 2, 3, 9, 16, and 20 points and each type has five sizes from small to big. I also have a reserve set. So I have 30 nanako punches and a reserve set of 30, because when the tip is flattened by a lot of punching, I send it for repairs so I need a reserve. Each nanako tagane costs from 4,000 - 5,000 yen.” On the other hand Massaki prefers to buy new ones when necessary.
Before going on to a discussion of these tagane, let us have another look at Masaaki sitting on his two cushions, with pieces of kanagu laid out beside him.
The zelokova tree stump, which belonged to his father, and which is easy to sit cross-legged in front of, has a split that he uses as a handle to turn the stump around when he wants to use a particular shaping groove. On top of stump, he has a cloth to
stabilize the metal block and stop it damaging the surface of the wood. Then on top of the cloth sits his metal block.
We have already looked at this arrangement for kebori work (cf. Kan fig. 04). However when greater pressure has to be applied, such as in ukibori embossing, he adds other features. “Some artisans,” says Masaaki, “do embossing directly on the tree trunk. When deep embossing is done, plywood is sometimes used because it is softer. But I don’t like it. I use a harder wood, such as zelkova (keyaki). He puts this
keyaki block on top of the metal one and then a piece of rubber made from a tyre inner
tube. Instead of a rubber sheet, some artisans use a zinc sheet under the copper.
“I use rubber sheeting to prevent the upper surface of the copper from being damaged while I’m punching it from the underside. It prevents the wood grain from showing on the design. And it makes a smoothly curved embossed pattern when I hit the metal with the burin - especially when using a rounded one. It also stops the worked parts from getting too thin and even breaking through. And it stops the copper from slipping,” explains Masaaki.
“When I hit the burin I concentrate my attention into the top of it,” he continues. “There is a knack to hitting it, not necessarily strongly, but to prevent it from slipping. With my left hand I control the angle and prevent slipping. So my left wrist
with the metal hammer, so it doesn’t ache.” As he works he keeps the most important
tagane on his lap for easy access.
TYPES OF BURINS (tagane): General:
Punches or burins (tagane) come in different sizes, shapes and styles. Using these
tagane, whole designs, such as a complete leaf, can be punched or composite designs
can be done with each part (leaf, midrib and veins) being punched separately. Also there are special tagane for punching the grainy texture (nanako) of the ground design.
Masaaki uses the burins pictured above for his style of work. These are more or less the same for all kinds of metal work. Generally the artisans, such as Sawatari
Masaaki, who work without heat, for kebori, ukibori and sukashibori, punch directly downwards using the sharp point to indent or cut the metal. The jibori artisan, such as Okamura Masao, uses these skills too, but has an additional type of tool, which is punched at an angle and pushed along scooping out the heated metal rather more like carving. The table below gives an overview of the types of tagane these artisans use: TABLE of BURIN TYPES:
Burins used for all types the metal work (used by both Masaaki and Masao):
1. Pattern-making burins (hori tagane) – this is a general name for the following three kinds: (see Kan photo 28)
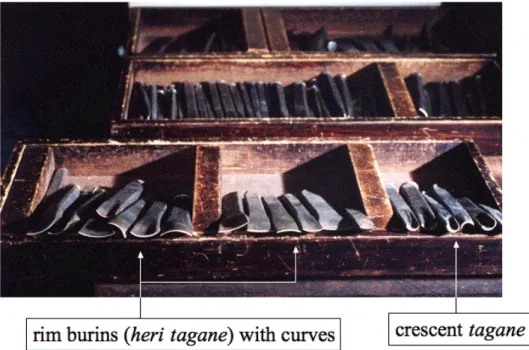
a. Rim burins (heri tagane)
Straight rim burins (see Kan photo 32) Curved rim burins (see Kan photo 27.b) b. Detail burins (sube tagane)
For making straight and curved lines inside the main pattern shape c. Whole pattern burins (moyou tagane) (see Kan photos 29.a & b)
Flower patterns (eg chrysanthemum, cherry blossom, Chinese bell flower, peony, lotus, lotus petal – see Kan figs. 28 and 34.a, b & c)
Leaf patterns (see Kan fig. 34.b) midrib and veins (see Kan fig. 34.b)
2. Fish roe burins (nanako tagane) (see Kan photo 31) 3. Cutting out burins (kiritori tagane) (see Kan photo 32) 4. Inward pattern burins (iribana tagane) (see Kan photo 33.a) 5. Embossing burins (see Kan photo 34)
In addition to the ones listed above, Masao uses other special tagane for his jibori work:
6. Sculpting burins (suki tagane) (see Kan fig. 37) 7. Embossing burins for jibori (see Kan fig. 38) 8. Side burins (soba tagane) (see Kan fig. 39) 9. Flattening burins (see Kan fig. 40)
Now let us consider these in greater detail, looking first at those used by Masaaki. 1. Pattern-making burins (hori tagane): These are used to make lines, outlines of patterns, or details inside the pattern (subeire). They are made of soft tempered steel with an iron handle. Masaaki has two types: those with plain non-ridged cutting edges and those with ridges.
The kinds of hori tagane other artisans have are without ridges in most cases,” explains Masaaki. “Ordinary ones have no ridges. I have an assortment of hori tagane with ridges and without, in various sizes and various curves. That’s why the number of tagane is as many as 800. For every hori tagane I have with ridges, I have an identical one without ridges. I use the ridged ones with big designs. Ridged lines sparkle more after they have been gilded. But in a small design, the ridges spoil the design.
a. Rim burins (heri tagane): There are two types of heri tagane. Mokko tagane have a curved edge and the angle of the curve is different. Ichi monji is a tagane with a straight edge and the length of the line differs from 3mm to 1.2cm. Rim burins are used for punching both rim lines and straight or curved lines inside the pattern. An artisan will have about two dozen, and they can cost around 4,500 yen each. (See Kan photo 28 - top row)
b. Small detail burins (sube tagane): “Small hori tagane, below 3mm, are called
sube tagane and they don’t have ridges,” says Masaaki. For punching small details
(subeire) he mostly uses smaller tagane with no ridges. They give sharper, finer detail. Rim burins may also be used for subeire.
c. Whole pattern burins (moyou tagane): These are a kind of hori tagane that give a complete design in one punch. They are also called ikkoku mono meaning one punch tool and, understandably, are especially expensive. For example, a tagane of a chrysanthemum or peony flower costs about 40,000 yen. This is compounded by the fact that for one kind of flower there are several designs: open, half open, buds, backside and front side in several sizes, so just one tagane would never been enough. They are suitable for small (under 2cm) and complex patterns such as chrysanthemum and plum flowers. If you punch a pattern bigger than 2cm it cannot be punched
evenly. The larger the tagane, the more difficult it is to place flat, and the resultant pattern is not beautiful. Thus if the pattern is big, Masaaki does each line by hand. Even though most artisans have many of these moyou tagane, they hardly ever use them. “To be honest I don’t like to show these to other people, because in a sense these are for mass-production.”
He made a copper plate to demonstrate some of the burins (see Kan figs. 32 & 34.a, b & c).
A. Small chrysanthemum patterns are too tiny to punch well using individual
segments (Kan fig. 34.a). Therefore they are punched as a whole (A.i & ii & iii). The more complex the pattern, the harder it is to punch skilfully and thus it may need two strikes. Then leaves may be added in different ways. Tiny leaves are produced using a crescent burin (A.i).
Sometimes the whole leaf is done as one (B.i) and sometimes the leaf, midrib and veins are each done separately (B.ii). There are two kinds of leaf pattern tagane. One is a single leaf and the other is a 3 lobed leaf. Both are used for chrysanthemums (E).
B. There are two kinds of cherry blossom (sakura) patterns (Kan fig. 34.b). “For
sakura petals, I like the one with the rounded petals better than the pointed one,” he
explains demonstrating on the copper plate with the two kinds. “So I usually use this rounded one (B.ii).” Sometimes the whole flower including the centre is one burin (B.i). And the leaves are also one (B.i) In this case the stem is the crescent burin again. However, sometimes the flower and centre are separate. This is the case in B.ii and the centres of the petals use the crescent burin. The leaves are three separate punches, leaf, midrib and veins. In B.iii each of the three petals is separate as is the centre. So this background flower takes 7 punches, including the crescent on each petal. In B.iv, the flower petals are one punch while the centre is a second one.
C. The Chinese bellflower (C) and lotus (D) tagane are large (Kan fig. 34.c), so they need to be punched twice to make them deep and even. The larger designs take two hits to make the pattern stand out enough on the back for the embossing to be done well. The largest pattern that works satisfactorily is just under 2cm. The lotus is punched with one pattern tagane while the Chinese bellflower requires two: one for all the petals and another for the flower centre.
Newel post burins (giboshi tagane): Some tagane have the newel post (giboshi) pattern on a single punch, in other words they are a kind of moyou tagane. They are usually in five sizes from 6 to 18mm (2 to 6 bu). They are used at the ends of pieces that run horizontally or vertically and are called outward or debana designs as opposed to inward or iribana designs.
2. Fish roe burins (nanako tagane): As mentioned previously, fish roe (nanako) burins come in different end sizes with different numbers of depressions per end (see
Kan fig. 22). For a very high quality ‘TH’ item, instead of the multiple nanako burins,
Masaaki will use a single punch for all the ground punching. He never combines the use of a single one with a multiple one. Using the single one allows him to put a single ‘nib’ between delicate parts of the pattern.
3. Cutting out burins (kiritori tagane): These are used to cut off the extra metal around the edge of the piece or from the cut out patterns (sukashibori) (see Kan photos 01.a & 19 & 21) (also see processes). The tips of these burins are well-tempered steel. As with the rim burins, there are two kinds, those with straight edges of various lengths and those with curved edges of various angles. They also come in an iribana shape to cut the ends of the pieces when they are finished (see Kan photo 49).
4. Inward pattern burins (iribana tagane) – (see Kan fig. 27): These tagane are used to make the inward pointing ends of the pieces on the door and drawer frames such as in Kan photos 15& 22 and 49. After drawing the parallel cutting lines, Masaaki punches the iribana ends, cutting them almost completely through (see Kan photos 47 & 48).
5. Embossing burins (uchi dashi tagane): For Masaaki’s ukibori work these are rounded single-tipped burins used for punching the design from behind to make it stand out from the front. The tips of the burins are smoothly rounded, of various sizes from 2mm to 1.2cm. Masao’s jibori embossing tagane will be discussed later.
The jibori artisan uses most of those tools mentioned above, but also has some special ones for carving and sculpting the warmed metal. Special tools used by jibori artisan Okamura Masao:
6. Sculpting burins (suki tagane): When the metal has been heated to soften it and embedded in the resin to hold it steady, this tool can be used to gouge out the background thus raising the pattern. The burin is moved towards the artisan while banging the end with a hammer.
7. Embossing burins (uchi dashi tagane): special embossing tagane for jibori work are flat and come in different shapes and sizes from 2mm to 1cm.
8. Side burins (soba tagane): These burins are used to define the borders of the pattern making them stand out more clearly. The tagane is slightly curved and the tip is slanted. When the background metal is hit next to the pattern, the tip undercuts the pattern slightly making it stand out.
9. Flattening burins: After scooping out the background, Masao uses narashi tagane to flatten the work. Then, when the patterns are finished, he uses various other tagane to smooth the surfaces. The surfaces become a little flattened and the edges become clear.
Before we go on to discuss other tools used in metal working, let us look briefly at the grinding process used to sharpen the tagane mentioned above. “Only once a year,” says Masaaki, “I grind 2 or 3 blunt kiritori tagane at the same time.” Since these are cutting tagane they get the hardest wear and need to be sharpened most often. About 3mm at the edge of the burin, which is tempered steel, needs to be ground.
Sharpening of tagane:
1. Masaaki uses an electric grinder for the initial rough grinding of tagane. 2. Middle grinding is done with half round and flat files covered with the tiny particles of industrial diamonds. “I think we can grind even ceramics, with these,” says Masaaki. These are similar to those used for filing the edges of the finished
kanagu (see Kan fig. 43).
3. Finishing grinding is done with two types of whetstone (toishi). To grind the inside of the half-round tagane the edge of the rounded edge of the stone is used.
a) The rough whetstone (ara toishi) is used for the intial grinding process; b) The fine whetstone (abura toishi) is used for the final grinding. Masaaki’s stone was grooved, because of years of grinding the outside surface of tagane.
“But basically,” concedes Masaaki, “I buy both hori tagane and kiritori tagane which are already ground by the tagane shop. Or where necessary, without using electric grinders, I grind lightly using only a file and whetstones. If the tip of the tagane is broken, I don’t grind it, I get a new one. I buy all burins from a factory in Nagoya. All metal artisans in Hikone buy them from this shop.”
OTHER TOOLS and EQUIPMENT:
Electric drill: To make nail holes in the finished piece Masaaki uses an electric drill (see Kan photo 19). The drill is fixed onto a wooden working table and he drills vertically to make tiny holes, with the metal piece resting on the wood.
Rulers: Masaaki uses wooden and metal rulers with the traditional sun (1 sun = 3.03 cm) and bu (1bu = 3mm) divisions. However, recently orders in metric measurements are increasing. Sometimes he gets an order by fax and then the measurements are usually in mm. “I guess many customers are younger than before,” he says, “and they put orders through to the butsudan shops, in metric. But basically, in most cases, we measure the size of the butsudan or its parts using the traditional Japanese
measurements, shaku (30.3cm) or sun (3cm). As Hikone butsudan are made using the ‘assembly’ system, the pieces are slotted together and not nailed permanently. They make the parts of the frame to fit rather loosely with pegs and tenons and grooves, so that they can be put together or taken apart easily. So it isn’t necessary to measure the size so accurately using millimetres. In butsudan you don’t worry about tiny