Creative Sound Blaster X-Fi card installation
HP xw Workstation series
This document describes the hardware and software installation of the Creative Sound Blaster X-Fi. For more information, refer to the Installation and Application CD.
Kit contents
● Sound Blaster X-Fi audio card ● Installation and Application CD
● Front audio adapter cable (for HP xw6000 or xw8000 series workstations, see the system requirements section)
● Regulatory compliance notices
● Cable clip ● Warranty information
● Support arm
System requirements
● HP xw Workstation series (except the HP xw3100 Workstation)
● Microsoft Windows XP® Service Pack 1 (SP1) or newer operating system
● Optical drive
● Empty PCI or PCI-x slot (see Note on page 4)
Warranty information
Any warranty information is superseded by the HP warranty term provided in the warranty document.
© 2007 Hewlett-Packard Development Company, L.P. The HP Invent logo is a registered trademark of Hewlett-Packard Development Company, L.P. Microsoft and Windows are U.S. registered trademarks of Microsoft Corporation. Printed in the U.S.
Warnings and cautions
WARNING! Any surface or area of the equipment marked with these symbols indicates the presence of a hot surface or hot component. If this surface is contacted, the potential for injury exists. To reduce the risk of injury from a hot component, allow the surface to cool before touching.
WARNING! Any surface or area of the equipment marked with these symbols indicates the presence of an electrical shock hazard. To reduce the risk of injury from electrical shock, do not open any enclosed area.
WARNING! To reduce the risk of electric shock or damage to your equipment:
— Do not disable the power cord grounding plug. The grounding plug is an important safety feature. — Plug the power cord in a grounded (earthed) outlet that is easily accessible at all times.
— Disconnect power from the equipment by unplugging the power cord from the electrical outlet.
WARNING! To reduce the risk of serious injury, read the Safety & Comfort Guide. It describes proper workstation, setup, posture, and health and work habits for computer users, and provides important electrical and mechanical safety information. This guide is located on the Web at http://www.hp.com/ ergo and/or on the documentation CD if one is included with the product.
WARNING! If a product is shipped in packaging marked with this symbol, , the product must always be lifted by two persons to avoid personal injury due to product weight.
CAUTION: Static electricity can damage the electronic components of the workstation. Before beginning these procedures, be sure you are discharged of static electricity by briefly touching a grounded metal object.
CAUTION: Observe the following cautions when removing or replacing a processor:
— Installing a processor incorrectly can damage the system board. Have an HP authorized reseller or service provider install the processor. If you plan to install it yourself, read all of the instructions carefully before you begin.
— Failure to follow the workstation preparation instructions and these result in an improperly installed processor, causing extensive system damage.
— Processor socket pins are delicate and bend easily. Use extreme care when placing the processor in the socket.
CAUTION: To prevent damage to this system, observe the following Electro Static Discharge (ESD) precautions while performing the system parts removal/replacement procedures:
— Work on a static-free mat.
— Wear a static strap to ensure that any accumulated electrostatic charge is discharged from your body to the ground.
— Create a common ground for the equipment you are working on by connecting the static-free mat, static strap and peripheral units to that piece of equipment.
NOTE: HP accessories are for use in HP workstation products. They have been extensively tested for reliability and are manufactured to high quality standards. HP, therefore, warrants only those
accessories that are manufactured or sold by HP.
Step 1—Preparing the workstation
Your workstation documentation includes instructions for preparing the workstation for component installation.
To prepare the workstation for component installation:
1. Power down the workstation.
2. Disconnect power from the workstation.
3. Open the access cover.
For product-specific information, see the Service and Technical Reference Guide for your HP workstation at http://www.hp.com/support/workstation_manuals.
Step 2—Installing the card and software
1. Open the PCI card retainer and remove the rear PCI metal slot cover of the PCI slot where you install the sound card. The audio card can be installed in any PCI or PCI-x slot, but HP recommends installing the card in an available 32-bit slot.
NOTE: When the sound card is installed in a 64-bit slot, the entire 64-bit bus runs at 32-bit mode. This action can degrade the system performance if another 64-bit device is installed on the same bus. However, if there is no 32-bit slot available, use PCI-X 133 since it is an isolated 64-bit bus slot. PCI-X is only available on xw8000 and xw9000 series workstations.
2. Install the Sound Blaster card and secure the PCI retainer.
3. Disconnect the front audio cable from the front audio header on the system board.
4. Connect the front audio cable disconnected in step 3 from the system board to the front audio connector on the Sound Blaster card.
5. If your system came with a CD audio cable that connects the optical drive to the system board, disconnect the cable from the system board. Leave the other end of the cable connected to the optical drive.
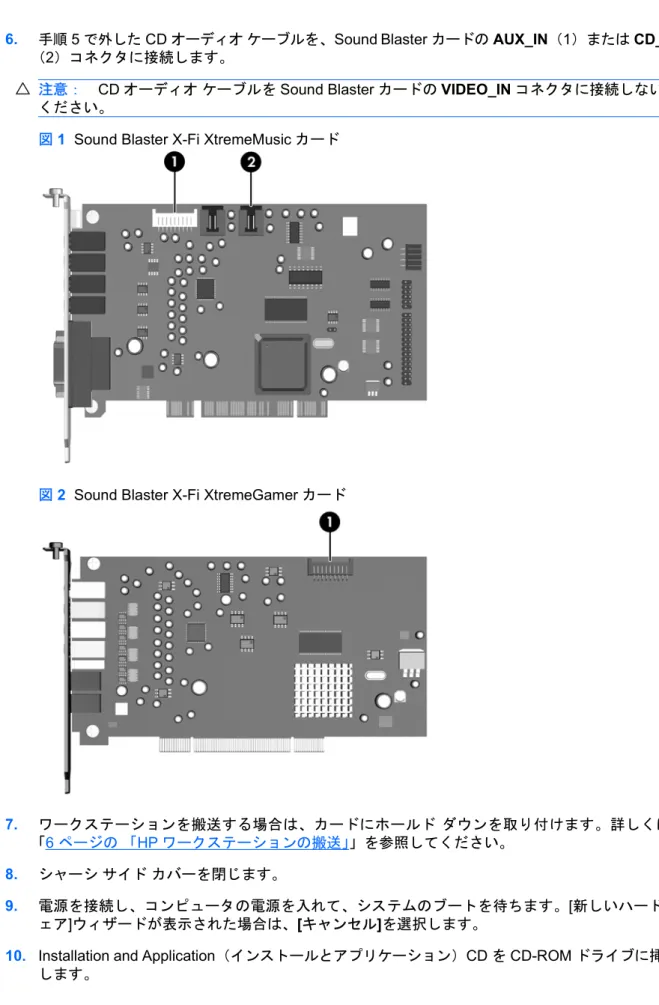
6. Connect the CD audio cable disconnected in step 5 to the AUX_IN (1) or CD_IN (2) connector on the Sound Blaster card.
CAUTION: Do not connect the CD audio cable to the VIDEO_IN connector on the Sound Blaster card.
Figure 1 Sound Blaster X-Fi XtremeMusic card
Figure 2 Sound Blaster X-Fi XtremeGamer card
7. If you ship your workstation, install a hold down on the card. See Shipping your HP workstation on page 6 for details.
8. Close the chassis side cover.
9. Connect the AC power, turn on the computer, and wait for the system to boot. If the New Hardware Found wizard appears, select Cancel.
10. Insert the Installation and Application CD into the CD-ROM drive.
11. When the installation software starts, follow the onscreen instructions to install the driver and applications for the sound card. Restart the system when prompted to do so.
If the application does not start, double-click the setup.exe file in the Installation and
Application CD.
NOTE: To check the availability of newer drivers for your workstation, go to http://www.hp.com.
12. After you have installed the software, see your speaker manufacturer documentation for instructions on how to connect the speaker to your system.
NOTE: When the sound card is installed in the system, the internal chassis speaker only functions for diagnostic beeps and does not play any other sound. The rear audio connectors on the system board are also disabled when the X-Fi sound card is installed. Use the audio output from the X-Fi sound card for audio connection to the external audio device.
Shipping your HP workstation
When shipping your HP xw6000, xw8000, or xw9000 series workstation, install the shipping support arm.
For standard desktop use, the shipping support is not required.
NOTE: Your workstation might look different than the one shown graphics below.
Adding support arm to card support assembly (HP xw8000/xw9000 series
workstations only)
1. Add a new arm and insert it from bottom of the housing. The new arm must support the X-Fi card, so choose the correct location. Your workstation might have other support arms already installed over other slots (not shown in picture).
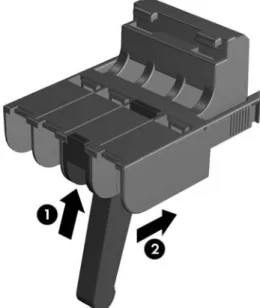
2. Push the arm into the housing (1). Slide the arm back to lock it in place (2).
Figure 3 Preparing the support arm
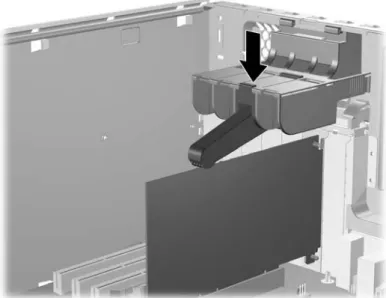
3. Engage the hooks in the openings along the edge of the rear of the chassis.
Figure 4 Engaging the support hooks
4. Rotate the support arm down, and compress the spring of the arm until it snaps into place.
Figure 5 Installing the support arm
Installing the HP xw6000 series workstation support arm
1. Insert the arm by engaging the hooks in the openings along the edge of the rear of the chassis.
Figure 6 Engaging the support hooks
2. Lower the arm over the card.
Figure 7 Lowering the support arm
Creative Sound Blaster X-Fi カードの取り付
け
HP xw シリーズ ワークステーション
このマニュアルでは、Creative Sound Blaster X-Fi のハードウェアおよびソフトウェアの取り付けに ついて説明します。詳細については、Installation and Application(インストールとアプリケーショ ン)CD を参照してください。
キットの内容
● Sound Blaster X-Fi オーディオ カード ● Installation and Application(インストール とアプリケーション)CD ● フロント オーディオ アダプタ ケーブル(HP xw6000 またはxw8000 シリーズ ワークステーション用、シス テム要件のセクションを参照) ● 規制準拠に関するご注意 ● ケーブル クリップ ● 保証書 ● サポート アーム
システム要件
● HP xw シリーズ ワークステーション(HP xw3100 ワークステーションを除く)● Microsoft Windows XP® Service Pack 1(SP1)以降のオペレーティング システム
● オプティカル ドライブ ● PCI または PCI-x の空きスロット(ページ 4 の注記を参照)
保証に関する情報
保証に関する情報は、保障に関するドキュメントに記載されたHP の保障に関する条件によって置き 換えられます。 JAWW HP xw シリーズ ワークステーション 1警告および注意
警告! 装置の表面または領域にこの記号が貼付されている場合は、高温の表面または高温の部 品が存在することを示しています。この表面に触れると、火傷をするおそれがあります。高温の部品 による火傷の危険を防ぐため、必ず、表面の温度が十分に下がってから手を触れてください。 警告! 装置の表面または領域にこの記号が貼付されている場合は、感電のおそれがあることを 示しています。感電によるけがを防ぐため、カバーは開けないでください。 警告! 感電または装置の損傷の危険がありますので、次の点を守ってください。 — 必ず電源コードのアース端子を使用して接地してください。アース端子は重要な安全機能です。 — 電源コードは、製品の近くの手が届きやすい場所にあるアースされた電源コンセントに差し込んで ください。 — 電源コンセントから電源コードを抜いて、コンピュータの電源を切断してください。 警告! 操作する人の健康を損なわないようにするため、『快適に使用していただくために』をお読 みください。正しい作業環境の整え方や、作業をする際の姿勢、および健康上/作業上の習慣について 説明しており、さらに、重要な電気的/物理的安全基準についての情報も提供しています。『快適に使 用していただくために』は、HP の Web サイト(http://www.hp.com/ergo/)から[日本語]を選択して 参照できます。また、製品にDocumentation CD(ドキュメンテーション CD)が付属している場合 は、このCD にも収録されています。 警告! 製品の出荷パッケージに の記号が付いている場合は、製品の重さによるけがを防ぐため に、製品は必ず2 人で持ち上げてください。 注意: 静電気の放電により、ワークステーションの電子部品が破損することがあります。作業を始 める前に、アースされた金属面に触れるなどして、身体にたまった静電気を放電してください。 注意: プロセッサを取り外すか交換するときは、次の注意事項に従ってください。 — プロセッサを正しく取り付けないと、システム ボードを損傷することがあります。プロセッサの取 り付けは、HP 認定の販売代理店またはサービス プロバイダにお任せください。自分で取り付ける場 合は、開始前に、すべての操作手順を注意深くお読みください。 — ワークステーションの準備手順に従わないと、プロセッサが適切に取り付けられず、システムの大 きな損傷を招く原因となります。 — プロセッサ ソケットのピンは壊れ易くて曲がり易いものです。プロセッサをソケットに取り付ける ときは、十分に注意してください。注意: システムの損傷を防ぐため、システム部品の取り外し/交換の手順を実行する際は、静電気 (ESD)に関する以下の注意事項を守ってください。 — 静電気防止マットの上で作業をしてください。 — 静電気ストラップを着用して、蓄積されたすべての静電気が確実に身体から地面に放電されるよう にしてください。 — 作業対象の装置に静電気防止マット、静電気ストラップ、および周辺装置を接続して、装置共通の アースを作成してください。 注記: HP オプション製品は、HP ワークステーション製品用に設計されています。また、徹底した 信頼性検査が行われ、高い品質基準において製造されています。このため、HP では、自社で製造販 売したオプションのみ品質保証します。 JAWW 警告および注意 3
手順
1:ワークステーションの準備
ワークステーションのマニュアルには、部品を取り付ける際のワークステーションの準備手順が記載 されています。 部品の取り付けのためにワークステーションを準備するには、次の手順に従ってください。 1. ワークステーションの電源を切ります。 2. ワークステーションの電源コードを外します。 3. アクセス カバーを開きます。 製品固有の情報については、http://www.hp.com/support/workstation_manuals(英語サイト)からお 使いのHP ワークステーションの『Service and Technical Reference Guide(サービスおよびテクニ カル リファレンス ガイド)』を参照してください。手順
2:カードの取り付けとソフトウェアのインストール
1. PCI カードリテイナを開き、サウンド カードを取り付ける PCI スロットの背面の PCI メタル ス ロット カバーを外します。オーディオ カードは、どの PCI または PCI-x スロットにも取り付け られますが、空いている32 ビットのスロットに取り付けることをおすすめします。 注記: サウンド カードを 64 ビットのスロットに取り付けると、64 ビット バス全体が 32 ビッ ト モードで動作します。このような取り付けを行うと、同じバスに別の 64 ビット デバイスが取 り付けられている場合、システムのパフォーマンスが低下することがあります。ただし、32 ビ ットのスロットが空いていない場合、PCI-X 133 は独立した 64 ビット バス スロットなのでそれ を使用します。PCI-X は、xw8000 および xw9000 シリーズのワークステーションでのみ使用で きます。
2. Sound Blaster カードを取り付け、PCI リテイナを固定します。
3. フロント オーディオ ケーブルを、システム ボードのフロント オーディオ ヘッダから外します。 4. 手順3 でシステム ボードから取り外したフロント オーディオ ケーブルを、Sound Blaster カー ドのフロント オーディオ コネクタに接続します。 5. オプティカル ドライブをシステム ボードに接続する CD オーディオ ケーブルがシステムに付属 している場合は、そのケーブルをシステム ボードから外します。オプティカル ドライブに接続 されている他のケーブルの端子はそのままにしておきます。
6. 手順5 で外した CD オーディオ ケーブルを、Sound Blaster カードの AUX_IN(1)または CD_IN (2)コネクタに接続します。
注意: CD オーディオ ケーブルを Sound Blaster カードの VIDEO_IN コネクタに接続しないで ください。
図 1 Sound Blaster X-Fi XtremeMusic カード
図 2 Sound Blaster X-Fi XtremeGamer カード
7. ワークステーションを搬送する場合は、カードにホールド ダウンを取り付けます。詳しくは、
「6 ページの 「HP ワークステーションの搬送」」を参照してください。
8. シャーシ サイド カバーを閉じます。
9. 電源を接続し、コンピュータの電源を入れて、システムのブートを待ちます。[新しいハードウ
ェア]ウィザードが表示された場合は、[キャンセル]を選択します。
10. Installation and Application(インストールとアプリケーション)CD を CD-ROM ドライブに挿入 します。
11. インストール ソフトウェアが起動したら、画面の指示に従ってサウンド カードのドライバおよ びアプリケーションをインストールします。システムの再起動を要求されたら再起動します。 アプリケーションが起動しない場合は、Installation and Application(インストールとアプリケー ション)CD の setup.exe ファイルをダブルクリックします。 注記: お使いのワークステーションで使用可能な新しいドライバを確認するには、 http://www.hp.comにアクセスしてください。 12. ソフトウェアをインストールしたら、システムへのスピーカーの接続手順をスピーカーのメーカ ーのマニュアルで確認します。 注記: システムにサウンド カードを取り付けた場合は、内部シャーシのスピーカーは診断用 のビープとしてのみ動作し、他のサウンドは再生しません。また、X-Fi サウンド カードを取り 付けた場合は、システム ボードのリア オーディオ コネクタは無効になります。外部オーディ オ デバイスへのオーディオ接続には、X-Fi サウンド カードからのオーディオ出力を使用します。
HP ワークステーションの搬送
HP xw6000、xw8000、xw9000 シリーズ ワークステーションを搬送するときは、搬送用のサポート アームを取り付けます。 デスクトップで標準的な方法で使用している場合は、搬送時のサポートは必要ありません。 注記: お使いのワークステーションは、下図と異なる場合があります。カード
サポート アセンブリへのサポート アームの追加(HP xw8000/xw9000
シリーズ
ワークステーションのみ)
1. 新しいアームを追加し、ハウジングの底から挿入します。新しいアームによってX-Fi カードを 支える必要があるので、正しい位置を選択します。ご使用のワークステーションの他のスロット に、既に別のサポート アームが取り付けられている場合があります(図には示されていませ ん)。 2. アームをハウジングに押し込みます(1)、アームを後ろにスライドしてロックします(2)。 図 3 サポート アームの準備3. フックをシャーシの背面のエッジに沿って開口部に引っ掛けます。
図 4 サポート フックの取り付け
4. サポート アームを下に回し、パチンと止まるまでアームのばねを縮めます。
図 5 サポート アームの取り付け
HP xw6000 シリーズ ワークステーションのサポート アームの取り付け
1. フックをシャーシの背面のエッジに沿って開口部に引っ掛けて、アームを挿入します。
図 6 サポート フックの取り付け
2. アームをカードの上まで下げます。
図 7 サポート アームを下げる