WPS Workbench
user guide
"To help guide you through using the
WPS user interface (Workbench) to create,
edit and run programs"
Version: 3.1.5 Copyright © 2002-2017 World Programming Limited www.worldprogramming.com
Contents
Introduction...6
About This Guide...6
About WPS... 6
Users of SAS® Software... 7
Getting Started... 9
Workbench Basics... 9
WPS Components... 11
Cheat Sheets... 12
Concepts... 17
Eclipse...17
Workbench... 17
Perspectives...17
WPS Perspective... 18
View Stack... 19
Views...20
Help View...20
Project Explorer View... 20
Link Explorer View...21
Properties View...23
Outline View...23
Output Explorer View...24
Results Explorer View...25
File Explorer View...26
WPS Server Explorer View... 28
Editor and Output View... 30
Progress View...30
Bookmarks View... 31
Tasks View... 32
Search View...32
Console View... 33
Projects... 33
Project Definition File...33
Working with Multiple Projects...34
WPS Link... 34
Host Connection...34
WPS Server... 34
Workspace... 36
Programs...36
Program Names...37
Working with Multiple Programs...37
Program Colours and Layout... 37
Program Writing and Editing... 38
Local History... 39
Running a Program... 39
Managing ODS Output... 40
Analyser Tools...41
Analysis Reports... 41
Markers... 42
Bookmarks...42
Tasks... 42
Context-Sensitive Help... 43
Dialogs... 43
File System Operation... 43
Tasks...45
Working with Workbench Views... 45
Opening a View... 45
Closing a View...45
Resizing a View... 45
Moving a View... 45
Using a Detached View... 46
Minimise a Window...47
Maximise a Window...47
Restore a Window... 47
Working with Perspectives... 48
Resetting a Perspective...48
Saving a Perspective...48
Deleting a Perspective...48
Opening a Perspective... 48
Closing a Perspective...49
Switching Between Open Perspectives...49
Work the Way You Want... 49
Working with Projects... 49
Creating a New Project... 49
Copying a Project... 50
Deleting a Project... 50
Closing and Opening a Project... 50
Exporting A Project...51
Importing Files or Archive Files...51
Importing an Existing Project...52
Switching to a Different Workspace... 52
Migrating Existing Programs or Projects...53
Migrating from Previous Versions of WPS... 53
Migrating from SAS® Software...53
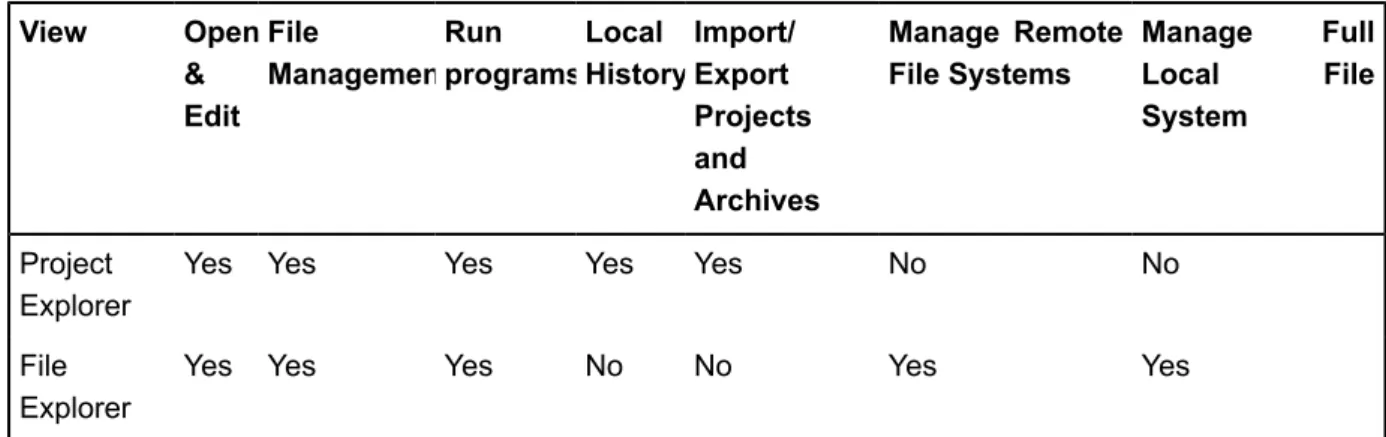
Project Explorer File Management... 55
File Explorer File Management... 57
Working with Editors...61
Opening editors with Project Explorer...61
Opening Editors with File Explorer...62
Working with Programs... 63
Creating a New Program...63
Opening a Non-Project Program... 63
Opening a Project Program...64
Getting Help While Writing Programs...64
Running Programs... 65
Restart Server...70
Linking the Active Program with the Project Explorer view...71
Working with WPS Links... 71
Creating a New Remote Host Connection... 71
Creating a New Local WPS Server...73
Creating a New Remote WPS Server...74
Exporting Host Connection Definitions to a File...75
Exporting WPS Server Definitions to a File... 76
Importing Host Connection Definitions from a File...76
Importing WPS Server Definitions from a File... 76
Selecting the Default Server Connection... 77
Working with Program Output... 77
Working with Logs... 77
Working with Listing Output...79
Working with HTML Output... 80
Clearing the Results Output... 81
Working with Data Sets... 81
Analysing Programs and Language Elements...82
Analysis Restrictions...82
Analyse Mainframe Programs... 82
Analyse Program Compatibility...83
Analyse Language Usage...83
Opening Analysis Reports... 84
Navigating Analysis Reports...84
Export Analysis Results to Excel...85
Working with Markers... 85
Working with Bookmarks... 85
Working with Tasks...86
Working with Local History...87
Compare with Local History... 87
Replace with Local History... 87
Restore from Local History...88
Local History Size and Duration...88
WPS Tips and Tricks... 89
Reference... 90
License Key... 90
Applying a License Key...90
Viewing Your Applied License Details... 90
Preferences...90
Preference Filter...91
General...91
General Local History... 91
General Text Editors... 92
General Text File Encoding... 92
WPS... 93
WPS Code Injection...94
WPS Code Templates...94
WPS Data Set Viewer... 95
WPS File Explorer... 95
WPS Result Options...95
WPS Syntax Coloring... 95
WPS Log Syntax Coloring...95
Backing Up Your Preferences... 96
Editing and Navigating...96
Undo and Redo Your Edits...96
Find...96
Navigate Back and Forward... 96
Go To Your Last Edit... 96
Next and Previous Annotation...97
Host Connection Properties...97
Local Host Connection Properties...98
Remote Host Connection Properties...98
WPS Server Properties... 99
Local WPS Server Properties...99
Remote WPS Server Properties...100
WPS Server LOCALE Setting... 101
WPS WORK Location...102
Using ODBC... 102
Command Line WPS...103
Configuration Files...105
AutoExec files... 108
Welcome Pages...109
Legal Notices... 111
Reporting problems... 112
Introduction
About This Guide
Overview
This user guide is intended to help you get started with the World Programming System (WPS). It is designed to guide new users through the user interface of WPS, with which you can create, edit and run programs written in the language of SAS.
This user guide is not designed to train you in the use of the language of SAS. If you are not familiar with the language of SAS there is a wide range of educational and reference material available from many sources.
It is not the intention of this guide to teach you every option within WPS. Once you have worked through this guide you should be sufficiently familiar with the system to write your own programs and to begin processing and analysing data.
Notation
Whenever you need to type in code the guide will show it like this:
/* Hi - here is some code */ PROC OPTIONS;
RUN;
In general this guide will use menu options when suggesting you need to interact with WPS, but there are also toolbar buttons and context-menu options for many of these options. Menu and button options will be shown with a font like this. An example of a menu item could be File > New > Project. This means you should click on the menu option 'File', then the option 'New' and then 'Project'.
About WPS
Overview
The World Programming System (WPS) fundamentally consists of two components:
• a Graphical User Interface (GUI)/Integrated Development Environment (IDE) known as WPS Workbench.
• a compiler/interpreter. This can be run from the command line (CLI) and is used to execute existing programs (sometimes referred to as running WPS in batch mode). When using WPS Workbench the compiler is run as a server process (known as WPS Server) and is used to process and execute programs.
WPS Server
WPS Server provides the ability to read and run programs. WPS Server cannot be launched directly; it is launched by WPS Workbench during operation.
WPS Workbench
The GUI/IDE, known as the Workbench, provides facilities to manage, create and edit programs and then to run programs with the WPS Server.
The Workbench uses Eclipse, originally written by IBM and now part of an open source project, as the framework for the GUI.
WPS Workbench is an extension of Eclipse specially designed to allow users to edit and run programs written in the language of SAS. It is worth noting that WPS intentionally leaves the Eclipse environment open for advanced users to plug-in other third-party tools and facilities for source control, Java development, C++ development, XML editing, and a wealth of other uses.
Some of the features mentioned in this guide are actually built-in features of Eclipse, but are referred to as features of WPS for simplicity. WPS not only inherits functionality from Eclipse but also has specially designed features and controls to aid program development and use.
WPS and SAS® Software
WPS supports programming language elements from the language of SAS. This means that programs developed in a SAS® software environment may be run, edited, shared and saved in WPS and vice versa. Besides a familiar programming language, WPS provides a wealth of other features for Users of SAS® Software already familiar with using products from the SAS Institute Inc.
Users of SAS ® Software
Overview
If you are accustomed to using other products related to the language of SAS such as software produced by SAS Institute Inc, you will find that the language support in WPS is familiar. You can expect to find many of the same syntax and options for procedures, formats, macros, DATA Steps, etc.
WPS will also provide other recognisable features and objects such as logs, data sets, WORK library, etc. Other features may be new to you, such as the Workbench environment itself and the way it handles, or displays objects. You will find that the Workbench has help and reference material to assist you in migrating to WPS.
Compatibility with SAS® Software
Besides being able to read programs written in the language of SAS, WPS is also able to read and write from and to data files used by SAS software. WPS has a wide selection of library engines to allow you to connect to many leading third-party databases.
WPS also uses a proprietary data file format known as WPD. As the default data set library engine, WPD datasets are used for the WORK library. Because it is the native data set library engine to WPS, it has the most complete feature support. For example the WPD engine supports indices.
Supported Language Elements
WPS does not support every element in the language of SAS. The Workbench has Analyser Tools to help determine if any existing language of SAS programs you have contain unknown or unsupported language elements.
Please refer to the help guide entitled WPS Reference for Language Elements for details on the syntax of the language elements that are supported by this release of WPS.
Existing Programs in the Language of SAS
WPS uses the name program to refer to a program written in the language of SAS. To use existing programs within WPS Workbench, you should refer to the Migrating from SAS® Software section in this guide.
Getting Started
Workbench Basics
Overview
The term Workbench is used to describe the whole desktop development environment.
The layout of the Workbench can be changed to suit your preference. These layouts are called Perspectives and they contain different views, editors and control what appears in the menus and tool bars. A perspective can be changed by, for example, moving or removing views, resizing views and so on. The default WPS perspective is depicted in the figure below:
WPS uses the concept of Projects to hold the files and folders that relate to each other. For example, you might have a project containing programs still under development, another project for monthly reporting applications, and so on.
Projects are folders that are themselves held in a parent folder that is referred to as the Workspace. If you would prefer to simply access the file-system directly to manage programs (rather than using
Views Displayed in the WPS Perspective
Project Explorer : Displays in a tree structure all the projects in your workspace. It allows you to open files for editing and manages the programs and other files contained in a project. More about the Project Explorer View
File Explorer: Displays local and remote Host Connection file systems in a tree structure. You may use this instead of the Project Explorer to manage files if you wish. More about the File Explorer View Editor and Output: Displays the contents of a program and allows you to edit it. It can also display the output generated by a program such as data sets, logs, HTML, etc. More about the Editor and Output View
Outline : Displays either the structure of a program (e.g. globals, data steps, procedures and macros) or log (e.g. errors, warnings) that you have open in the Editor and Output view. More about the Outline View
Properties : Displays the details of objects like project folders, programs, libraries, data sets, variables, etc. More about the Properties View
Output Explorer : Displays in a tree structure the output (logs, HTML output, listing output) generated from running a program. It also allows you to open the output into the Editor and Output view. More about the Output Explorer View
Results Explorer : Displays in a tree structure links to every ODS item generated to the various destinations (e.g. HTML or listing) from running a program. Each individual element can be clicked on to see that particular output in the associated Output view. More about the Results Explorer View WPS Server Explorer : Displays in a tree structure the servers, libraries and their contents (e.g. data sets, libnames, etc) that have been used by a program that has been run. More about the WPS Server Explorer View
Link Explorer: Displays in a tree structure the Host Connections and local and remote WPS Servers. More about the Link Explorer View
Progress: Displays the name of the program that is currently being executed or the names of programs that are queued up, waiting to run. You can also use this view to stop a program running or to remove queued up programs. More about the Progress View
Console: Displays any output produced on standard output or standard error by a remote WPS Server locally in the Workbench. More about the Console View
Help: This view is not open by default. If you need help on any particular item in the user interface, context sensitive help is usually available by pressing F1, or by using the Help > Dynamic Help menu option. Note that once you have navigated away from the dynamic help page (identified by the title Related Topics), the help view will no longer dynamically update as you move around the user interface. However you can always get context sensitive help on the current item by pressing F1, or by using the Related Topics link at the top of the Help view. More about the Help View.
WPS Link: WPS Link is the collective term for the technology used to provide a client/server facility. It comprises of Host Connections and WPS Servers. More about WPS Link.
WPS Components
Objects Managed by the Workbench
Projects: These are the fundamental unit of organisation for resources you wish to use in the Workbench. Typically you would put related programs together in a project. For example, you might have a project for applications under development, another for monthly reporting jobs, and so on. Programs: You can create and edit programs using the WPS program editor. This editor uses colour
coding to highlight different language elements as well as syntax errors. WPS recognises a program as a file with either the extension .sas or .wps.
Log: When you run a program inside the Workbench, the information generated is stored in the log file. This file can be viewed, printed and saved from within the Workbench. The log generated by WPS is cumulative and contains the results of each program that has been run since WPS Workbench was launched, the WPS Server was last restarted, or the log was last cleared.
Listing Output: This contains the printed output from any programs that you have run. For example, this could be a table of data generated by a PROC PRINT statement in a program. Listing output can be viewed, printed and saved from within the Workbench. The listing output generated by the WPS Server is cumulative and contains the output from each program that has been run since WPS Workbench was launched, the WPS Server was last restarted, or the listing was last cleared. HTML Output: These are the physical HTML files that a program may generate. For example, they
could be a series of HTML files that show the results of analysing some data, and that have been generated as a result of an ODS HTML statement in a program. HTML output can be opened and viewed within the Workbench.
Managed ODS output: As described, the ODS (Output Delivery System) can be used to produce text listing and HTML output. Each program can specify when and where its output is stored but it is also possible to have the Workbench manage the process automatically. The default option is for the Workbench to produce managed HTML output.
Libraries: These hold the temporary files, data sets, catalogs, etc that are created as a result of running a program.
Data Sets: The data generated from running a program is stored in data sets. You can view the contents and properties of a data set through various views within the Workbench.
Host Connection: A Host Connection defines a computer, local or remote, that Workbench has access to.
WPS Server: The WPS Server is the engine responsible for executing programs and generating the resulting output, such as the log, listing output, HTML result files and data sets. A WPS Server is
associated with one Host Connection. The WPS Server also maintains an environment of assigned libraries and filerefs, defined macros and macro variables and so on with which all of the running programs interact.
Shortcut Directory: A Shortcut Directory defines a directory on a computer file system (local or remote), and is available in the File Explorer View for easy access to that directory and others below it.
Cheat Sheets
About
The Workbench is supplied with tutorials that are known as 'cheat sheets'. They are designed to help you get started with using WPS by introducing you to certain tasks and features. A cheat sheet is laid out as a sequence of steps that you undertake. As you progress from one step to the next, the cheat sheet has a help button that you can select to display a related help topic that discusses or guides you through that particular step.
Cheat Sheets Types
Cheat sheets can be one of two different types, simple, or composite.
A simple cheat sheet is a list of tasks designed to be performed one after another. It has an introduction to set the scene, and then a number of tasks follow, as below:
These cheat sheets appear as a simple list in the Workbench user interface.
A composite cheat sheet is really just a collection of simple cheat sheets. They break down a large complicated topic, made up of lots of tasks, into smaller manageable groups. Each of these groups has its own introduction and conclusion as below:
Composite cheat sheets have two panes in the user interface. One shows the groups of tasks, while the other allows you to work through the tasks in each group.
Normally the groups pane is above the tasks, although maximising the view will move it to the left. Launching a Cheat Sheet
Cheat sheets can be launched either from the Welcome pages or from the Workbench's main menu. Launching a Cheat Sheet from the Welcome Pages:
1. Open the Welcome page by selecting the menu item Help > Welcome. 2. Select the Tutorials page.
3. From the list of available cheat sheets, click on the one you wish to open. Launching a Cheat Sheet from the Workbench Menu:
1. From the main menu select Help > Cheat Sheets....
2. From the list of available cheat sheets, double click on the one you wish to open. Cheat Sheet Quick Toolbar
If you launch a cheat sheet from the Workbench menu (not from the Welcome pages), you will get a quick toolbar of buttons specifically for use with the cheat sheet. If you launch a cheat sheet from the Welcome page, you will not get this toolbar.
The buttons available in the cheat sheet quick toolbar and tab are listed below:
• Collapses all the expanded steps except the current step or expands steps to the last expanded state. Click to toggle between these two states.
• Allows you to select and open another cheat sheet. If you already have a cheat sheet active, its completion status is automatically saved and then the new selected cheat sheet is opened. Only one cheat sheet may be open at a time.
• Minimize the cheat sheet view.
• Maximize the cheat sheet view.
• This button is in the tab of the cheat sheet view, and as well as closing the view, it saves the status of the active cheat sheet so that your position is not lost.
Starting the Cheat Sheet
Each cheat sheet has a sequence of steps that always begins with an Introduction step. When you launch a fresh cheat sheet, the Introduction step is expanded so that you can read a brief description about the selected cheat sheet.
For simple cheat sheets, to start working with the cheat sheet, select Click to Begin at the bottom of the Introduction step. The next step is expanded and highlighted. You should also see action buttons at the bottom of the next step, such as Click to Complete. You can now progress through each step in the cheat sheet.
For composite cheat sheets, after reading the introduction you can start the first sheet by clicking the Goto to link at the bottom. You will then get the introduction for the first group of tasks, and you may
then click on the Start working link to begin. From this point on, the task group behaves very much as a simple cheat sheet.
Progressing Through the Steps
With simple cheat sheets, when you have finished working with a particular step, you should select Click when Complete to move to the next step. The next step is automatically highlighted and it becomes the active step. A check mark appears in the left margin of each completed step.
Composite cheat sheets behave in much the same way, until you complete all the sheets in the group you are on. Composite cheat sheets have a conclusion, and also the option to 'Review' the task, or to progress onto the next group of tasks (by clicking on the 'Go to' link). Starting the next task will put you in the introduction for the next group.
Getting Related Help Information
To get detailed instructions or related information for a particular step, select the Open Related Help icon in the upper right of that step. The related help will open in a separate Help window.
Open Any Step
You can open any step out of sequence whether it is marked as completed or not by simply selecting its expand icon. Any step opened in this way will not change from its completed or uncompleted state. Also notice that steps after the active step do not have a Click to Complete icon. Click on the Collapse All Items but Current button at the top of the cheat sheet view to collapse back to just the current active step waiting to be completed.
In composite cheat sheets, you may go back to any task group to review it by simply clicking on the group in the task group pane. You will be placed back to wherever you were when you left that group last, so if you completed it, you will be able to see the conclusion. You may not, however, start another task group until you have completed the tasks in the proceeding groups.
Restarting the Cheat Sheet
At any time you can restart from the first step. To do this, first open the first step (Introduction) by clicking on its expand icon and then select the Click to Restart icon at the bottom of that step. Any objects (e.g. programs, projects, etc) that you have already created are not deleted when you restart a cheat sheet. Composite cheat sheets allow you reset task groups. Right-click on the task group in the groups pane, then select Reset from the menu. You will then see a confirmation dialog. Click Ok and the introduction for the group is then shown in the task pane.
Completing the Cheat Sheet
With simple cheat sheets, when you finish the last step, it automatically goes back to the first step (Introduction). You can either click on the first step's Click to Restart icon or just close the cheat sheet. Composite cheat sheets are considered complete when all task groups are completed. If this is the case, then all groups will have a check mark next to them in the groups pane. You may then restart all the task groups if you wish by right clicking the top level item in the groups pane and selecting Restart all tasks.
Closing the Cheat Sheet
You can close the active cheat sheet by selecting the Close icon in the cheat sheet's tab. The active cheat sheet saves its completion status when it is closed so that you can continue where you left off when you next re-open it.
Concepts
Eclipse
WPS utilises the Eclipse platform as the basic framework for providing the Workbench user interface. Eclipse is an open-source tool originally developed by IBM. It provides an environment for editing and managing files and tasks. It is designed to accommodate plug-ins to perform specific tasks, such as XML editing, Java Development, source control, etc. WPS Workbench is an example of the Eclipse environment supplied with a suite of plug-ins suitable for editing programs written in the language of SAS and running them with the WPS Server (see WPS Server).
Because the Eclipse platform can accommodate other plug-ins, WPS Workbench has some features that it does not presently utilise but they are included to allow users to add other Eclipse-based plug-ins and extensions.
For more information about Eclipse and other available plug-ins, please visit the web site at www.eclipse.org
Eclipse Features Not Used by WPS
• Under the Project menu, none of the Build or Clean menu items are used by WPS.
• The Help > Software Updates menu item will not retrieve updates for the WPS software. These menu items will only retrieve updates to the Eclipse platform itself or other new or updated third-party plug-ins.
Workbench
The term Workbench refers to the Integrated Development Environment (IDE). This environment utilises the Eclipse platform as the basic framework to provide the Graphical User Interface (GUI). IDE and GUI can be used interchangeably.
The customisable layouts that can be utilised in the Workbench are known as Perspectives.
As well as the visible objects that the Workbench manages such as Views and the WPS Components, there are other features that the Workbench handles such as the Local History and WPS Servers.
Perspectives
The position of available views, windows, view stacks, menu items, and toolbar buttons displayed and the general layout of the WPS Workbench is known as a perspective.
A perspective can be customised to look the way you want by moving, resizing, adding or removing different windows and views. The Workbench allows you to save customised perspectives and to switch
between different perspectives. Refer to the Working with Perspectives section in this guide for more details about changing the layout of the Workbench.
All available perspectives, including any customised perspectives you save, can be opened from the Window > Open Perspective menu.
WPS Workbench is supplied with several different perspectives. Only the WPS perspective is described in this section of the guide because it is the only one designed specifically for use with programs.
WPS Perspective
A WPS perspective is specifically intended for the task of creating, managing, editing and running Programs.
This perspective is the default used when you first install WPS Workbench. Its layout is depicted in the figure below.
You cannot delete or rename the WPS perspective. However, you can save your own screen layout under the same name, thus replacing the original layout.
Noteworthy Features
By default, this perspective has the following features specifically for tasks concerned with managing or using programs:
• Extra toolbar buttons concerned with running programs.
• The WPS main menu item.
• Views for locating and opening program output files. To Display this Perspective
Select the menu item Window > Open Perspective > Other... > WPS .
View Stack
Views are organised in Perspectives by being members of a view stack. A view stack is a collection of views that are all allocated the same area in a perspective.
For example, the view stack below contains 2 views:
When opening a view, it is opened in the view stack of which it was last a member. This is recorded in the perspective for each view. For example, opening the Progress View will add the view to our example view stack.
View stacks are an important concept to understand when it comes to moving, minimizing, maximising and restoring views.
Views
The layout of the items with the WPS Workbench application is known as Perspectives and comprises individual windows that contain one or more views. These views display specific types of information and provide specific functions. Many views also have specific toolbars located in the top right of each view. In the Working with Workbench Views section of this guide you can find out how to add, remove, resize or dock individual views in any position on the Workbench.
Help View
As you select different views of the Workbench you can automatically display relevant help items in the context-sensitive Help view.
To Display this View
To add this view to the current perspective, select the menu item Window > Show View > Other… > Help > Help. Alternatively, you can press F1 on your keyboard to open this view.
Help View Controls
As you navigate about by clicking on the various links and buttons in this Help view, you will see numerous different controls available:
• Related Topics: If you follow any of the links in the Help view while it is docked inside the Workbench, ensure you click on the Related Topics link (at the bottom of the Help view) to jump back to the actual context-sensitive page. Otherwise the Help view will not automatically update as you continue to use the Workbench.
• Show in External Window: This will open a Help window outside of the Workbench with a contents tree view of all available topics. this external view is not context-sensitive.
• Show in All Topics: This will synchronise the help topic you are looking at with its position in the contents tree view of all available help topics.
• Bookmark Document: You can add a bookmark to any help page so you can navigate immediately to that topic again. All your bookmarks are listed via the Bookmarks link in the Help view.
• Search:Use this facility to search help for specific keywords.
Project Explorer View
The files and folders that can be edited and managed by the Workbench can be displayed in a tree structure in the Project Explorer view.
To Display this View
To add this view to the current perspective, select the menu item Window > Show View > Other… > General > Project Explorer.
The Files and Folders Displayed
The main file and folder objects that the ProjectsExplorer displays are:
• Open projects
• Closed projects
• Folders
• Programs (i.e. any file with the extension .sas or .wps)
• Other Files (text or unknown file extensions)
• Any type of file can be put in a project and listed by the Project Explorer. If your computer system recognises the file type, then the appropriate icon is displayed (e.g. a DOS batch file).
Note: The Project Explorer only displays projects that are in your current Workspace. Working with Projects
The items in a Project represent objects within the filesystem under the project home directory. For more information about the Workbench tools available for manipulating projects please refer to the Working with Projects section in this guide.
Working with Files and Folders
For more information about the Workbench tools available for manipulating the various objects displayed in a project, please refer to the Project Explorer File Management section in this guide.
Alternatives
File system objects can also be managed using the File Explorer View. Refer to Working with Files And Folders for help on choosing which view to use.
Operating System Tools
As well as the Workbench's tools, you can use your operating system facilities to delete, cut, copy and paste objects into a project. You may need to use the Workbench's refresh tool to refresh the Project Explorer to ensure that objects manipulated in this way are displayed (right mouse click on the project and from the popup menu, select Refresh).
Note: If you do use the operating system tools instead of the Workbench tools, you will NOT have the added benefits that Local History provides.
Link Explorer View
The Link Explorer allows you to manage Host Connections you have configured, and also any WPS Servers on these connections.
To Display this View
To add this view to the current perspective, select the menu item Window > Show View > Other… > WPS > Link Explorer.
Objects Displayed
There are only two node types visible in this view:
• Connection Node: The root node that represents a connection to a host machine. One or more servers can be running on a connection. The connection can either be a local connection or a connection to a remote machine. There can only be one local connection, but many remote connections.
• Server node: This node represents the WPS installation where you are running your programs. Properties
With the exception of a local Host Connection, if you select any other item in the Link Explorer view, you will see information about that item displayed in the Properties View.
You can also get more detailed properties about certain items in the Link Explorer view. Right mouse click on an item and from the popup menu, select the Properties option if it is enabled (i.e. there are properties available for the selected item). Below are the items that this option works with, and the sort of information you can expect to see.
Host Connection Properties
• Remote Connection Options: Hostname, credentials and startup options for the connection.
• Shortcut Directories: A shortcut directory is a shortcut to a path on a file system. WPS Server Properties
• Environment: Details of the server's environment (working directory, process id & environment variables).
• Launch Options: Local servers only.
• License Information: Full details about your license key.
• Macro Variables: The list of all automatic and global macro variables used by the server.
• Software: Information about the WPS software such as the version number.
• Startup Options: Auto-start, installation directory (for remote servers), initial directory and startup system options.
• System Options: The currently applied system options. For more information about this topic, please refer to the Configuration Files section in this guide.
Commands
• Collapse All Collapse the Connection Tree down to show the primary Host Connection nodes.
• New Remote Connection Add a new remote connection. Only one local connection can exist.
• Import Connection Import a connection definition file. Drag and Drop
• A WPS Server can be dragged and dropped onto a different Host Connection. A simple drag and drop operation on a WPS server will move the server from its current Host Connection to the target host connection. Holding down the Control key whilst dragging will copy the WPS Server. To maintain unique names, the copied server will be renamed automatically. The server can be renamed manually by right-clicking the server and selecting Rename from the context menu.
• Host connections can be imported by dragging Connection Definition Files (*.cdx) onto the Link Explorer view. For further information on importing connections, see Importing Host Connection Definitions from a File.
• Servers can be imported by dragging Server Definition Files (*.sdx) onto a Host Connection node in the Link Explorer View. For further information on importing servers, see Importing WPS Server Definitions from a File.
Properties View
You can display properties of various objects by using the Properties View. The properties that appear in this view dynamically change depending on the item that is currently selected.
To Display this View
To add this view to the current perspective, select the menu item Window > Show View > Other… > General > Properties.
Views that Interact with the Properties View
If you click on an object in one of the views listed below, you will see the appropriate properties for that object displayed in the Properties view:
• Project Explorer View
• WPS Server Explorer View
• Search View
• File Explorer View
• Link Explorer View
Note: Not all objects in the views listed above have viewable properties. The WPS Server properties include the following information about a License:
• Expiry Date
• Grace Period
• Licensed Operating System
• License Number
Outline View
To assist in navigating programs, logs, listing or HTML output the Workbench displays structural elements contained in these files in the Outline view. If you click on a structural element in this view, the relevant line in the file will be highlighted.
Opening or giving focus to a program, log, listing or HTML result file will make the Outline view automatically refresh to display the structural elements that are relevant to the file that has focus.
To Display this View
To add this view to the current perspective, select the menu item Window > Show View > Other… > General > Outline.
Program Structural Elements
Opening Programs will make the Outline view display these structural elements:
• Global Statement
• DATA Step
• Procedure
• Macro
You can control which structural elements are displayed in the program's Outline view. In the quick tool bar at the top of this view you will see icons with a diagonal line through them representing structural elements. These buttons will toggle off and on the relevant structural element in the Outline view.
Log Structural Elements
Viewing the Log will make the Outline view display these structural elements:
• An individual log entry and the parent node for errors and warnings
• Error
• Warning
Listing and HTML Structural Elements
Viewing the Listing Output or Viewing HTML Output, will make the Outline view display these structural elements:
• Results parent node
• HTML tabular output
• Listing Tabular output
Output Explorer View
The output files generated from running a program, are listed by, and can be opened from, the Output Explorer view.
Note: To view hierarchical lists of results, grouped by server, please use the Results Explorer View. While the Workbench is open, the output from previous runs is not automatically deleted. In order to clear previous output, you can use the WPS > Clear Log or WPS > Clear Results or the relevant toolbar buttons or context menus.
Alternatively you can use the Restart Server feature.
To Display this View
To add this view to the current perspective, select the menu item Window > Show View > Other… > WPS > Output Explorer.
Output
Output items are associated with, and listed underneath the server on which they were generated. The following output items is always shown under each server whether any programs have been run yet or not:
• Log output
The following output items may be shown under a server if that server has run programs that have generated output of one or more of the following types:
• Listing output
• HTML output
Once you run a program that generates output of one of the above types, you will see the related output nodes appear below the WPS Server they were generated by.
There will only ever be at most one node shown for each type of output under each registered WPS Server. This represents all the cumulative output of that type generated by that particular server.
Double clicking on one of the output nodes will open the associated output of that type for that WPS Server in its relevant editor. If the output type is anything other than log output then at the same time as the output is opened in the editor, you will also see the individual result elements listed in the Results Explorer View which you can use to navigate the output.
Working With Program Output
For details about listing, opening, printing or saving the logs or results output please refer to Working with Program Output.
Results Explorer View
This view contains hierarchical links to all the results from every program that has been executed, grouped by server, since the last time that server was started or restarted
Note: To view all output, including the log, please use the Output Explorer View. To Display this View
To add this view to the current perspective, select the menu item Window > Show View > Other… > WPS > Results Explorer.
Output
Once a program is run an entry will appear under the relevant server for every proc that produced output. For example PROC PRINT will produce an entry named "The print procedure." Expand this link to find links to each type of output specified. Output types can be:
• WPS managed HTML output
• WPS managed Listing output
• Manually managed HTML output
• Manually managed Listing output
For more information about what WPS managed and manually managed results means please see: Managing ODS Output
To change which outputs are produced by default please see: WPS Result Options Working With Program Output
For details about listing and opening data sets, please refer to Working with Program Output.
File Explorer View
The files and folders that can be edited and managed by the Workbench are displayed in a tree structure in the File Explorer view.
To Display this View
To add this view to the current perspective, select the menu item Window > Show View > Other… > General > File Explorer.
File Explorer Objects
The main file and folder objects that the File Explorer displays are:
• Connections: The root node that represents a connection to a host machine. Can be either local or remote.
• Shortcuts: A directory on a filesystem selected for management in the File Explorer.
• Directory: A child directory of a Shortcut or another child directory.
• Programs Any file with the extension .sas or .wps.
• Other Files: Text or unknown file extensions
• Symbolic linked file: A file that points to another file in the file system via a symbolic link.
• Symbolic linked directory: A file that points to another directory in the host file system via a symbolic link.
• Failed link: A link that points to a file or directory that does not exist.
Files are shown with an icon appropriate to the file type, governed by the operating system, where available.
Note: The File Explorer only displays connections that are open.
Working with Connections and Shortcuts
It is only possible to view files on remote systems when you have an open Host Connection. Host Connections can be opened from Link Explorer View, and connections are also opened when starting WPS Servers in the WPS Server Explorer View.
Each Host Connection is configured to have one or more Shortcut Directories, that permit access to the files and folders on the file system.
When a Host Connection is opened, then the Connection will appear in the File Explorer View. Closing a connection will remove it's node from the File Explorer View.
Host Connections expand into Shortcut Directories in the File Explorer View. Shortcut Directories that are invalid are shown with an Invalid Shortcut icon. This means that the path configured for these shortcuts is not available on the file system for that connection.
Properties
Selecting items in the File Explorer View will reveal information about that item displayed in the Properties View. Note that the properties differ when using local or remote Connections.
Connection Properties
• Remote Connection Options: Hostname, credentials and startup options for the connection.
• Shortcut Directories: A Shortcut Directory is a shortcut to a path on a file system. Local Shortcut Directory, File and Folder Properties
• Modified date & time.
• Is Link, which is 'Yes' if the currently selected item is a symbolic link.
• Name of the item.
• Size of files (directory sizes are not shown)
• Link details (if the item is a symbolic link, such as the link path).
Additionally, on a remote system, the following properties are also available. Remote Shortcut Directory, File and Folder Properties
• Accessed date and time.
• Group and user id's.
• Permissions
Working with Files and Folders
It is possible to perform the following operations on files and folders within the File Explorer:
• New: Create a new Shortcut Directory, Directory or File.
• Cut: Selected files and directories will be moved if the user uses Paste.
• Copy: Selected files and directories will be copied if the user uses Paste.
• Paste: Performs a Copy or Cut operation.
• Run On: Run any selected programs on a WPS Server.
• Refresh: Refresh the currently selected node in the File Explorer from the file system.
• Rename: Rename the currently selected file or directory.
• Analyse: Analyse the contents of programs and folders containing programs (see Analysis Reports). These options are available from the context menu within the File Explorer, and also from the main menu. For more information about performing operations, see File Explorer File Management.
Progress
Progress of the current operation can be seen in the Progress view. For more details on working with the Progress view, please use the following sections of this guide:
Progress View Running Programs
Programs can be run by selecting a program (or a number of programs), right-clicking and moving the mouse cursor to the Run On menu option in the context menu. The menu will then expand to show the list of servers the program can be run on. Choosing a server will then run the program on that server. For more information on running programs please see the following sections of this guide:
Running a Program Alternatives
File system objects can also be managed using the Project Explorer View. Refer to Working with Files And Folders for help on choosing which view to use.
WPS Server Explorer View
All file references, libraries, catalogs and data sets that have been generated as a result of running a program are listed by, and can be opened from, the WPS Server Explorer view.
While the Workbench is open, the file references and library contents from previous runs are preserved. In order to clear the state of a server, you need to use the Restart Server feature.
To Display this View
To add this view to the current perspective, select the menu item Window > Show View > Other… > WPS > WPS Server Explorer.
Objects Displayed
Assuming you have run a program, you should see a simple hierarchy displayed:
• WPS Server node: The root node that represents the WPS installation where you are running your programs. This is probably a Local installation of WPS.
• Libraries: A parent node for individual library items.
• Library: A collection of catalogs and/or data sets.
• Catalog: A collection of user defined items such as formats and informats.
• Data Set: A data file containing numeric and/or character fields.
• Data Set View: A data set that is created by executing a view in the source data.
• Numeric Data Set Field: A data set field that contains numeric values.
• Character Data Set Field: A data set field that contains character values.
• FileRefs: The parent node for fileref items.
• FileRef: An individual reference to a file.
You may see a library node called WORK. This represents the default temporary library used if one is not specified in a program. If you use the LIBNAME statement in a program to specify your own library name, then you will see a library node with the specified name listed in the WPS Server Explorer view. Working With Program Output
For details about listing and opening data sets, please refer to Working with Program Output. Properties
With the exception of the Libraries and FileRefs nodes, if you select any other item in the WPS Server Explorer view, you will see information about that item displayed in the Properties View. You can also get more detailed properties about certain items in the WPS Server Explorer view. Right mouse click on an item and from the popup menu, select the Properties option if it is enabled (i.e. there are properties available for the selected item). Below are the items that this option works with and the sort of information you can expect to see.
Server Properties
• Software: Information about the WPS software such as the version number.
• License: Full details about your license key.
• System Options: The currently applied system options. For more information about this topic, please refer to the Configuration Files section in this guide.
Library Properties
• General: The Name, Engine and Physical Location values together with Readonly and Temporary flags.
• Members: A table of information about the members of the catalog showing the member name and member type.
Catalog Properties
• Entries: A table of information about the entries in the catalog showing the entry name, entry type and description.
• General: Name of the catalog. Catalog Entry Properties
• General: Name, type, description, creation and modification time of the entry.
Data Set and Data Set View Properties
• General: The field count and number of observations.
• Columns: A table of information about the data set fields including name, type, length, label, format and informat.
Editor and Output View
When you open any type of file in the Workbench e.g. programs, logs, output, data sets, text files, etc, they are opened as tabs in the Editor view. The Editor is always open and cannot be closed. However, you can close individual files that are open in the Editor.
Because the editor cannot be closed and is always available, the Editor view is not listed under the Window > Show View menu.
It is possible to split the Editor view so that you can view and/or modify two or more files at once. This is useful for comparing contents of two files for example.
Once a file has been opened in the Editor you may or may not be allowed to edit (make changes to) it depending on the type of file it is, and how or from where it was opened.
• You cannot edit logs and output files opened from the Output Explorer View.
• You cannot edit a data set opened from the WPS Server Explorer View.
• Files opened from the Project Explorer View can normally be edited. You can even select which editor to use when opening the file as discussed in the Working with Editors section of this guide.
• You can also open files for editing from the File Explorer View. Some file types will open inside the workbench and will be opened in the Editor view.
Progress View
When you are Running a Program, it is listed as executing in the Progress view. Also, operations performed in the File Explorer View are also visible here (both operations that are in progress, and those that are complete).
While a program is executing, and during File Explorer operations, there is also a progress indicator displayed in the lower right hand corner of the Workbench. This indicator is displayed regardless of whether you have the Progress View open or not.
To Display this View
To add this view to the current perspective, select the menu item Window > Show View > Other… > General > Progress.
File Explorer Operations
An operation performed from the File Explorer View will remain in the progress view until another operation is performed. This allows you to see the results of the operation, if desired.
An example of a successful operation is below:
An unsuccessful operation will appear as follows:
Clicking on the link will reveal the File System Operation Dialog, showing you more detailed information about the operation.
Working with the Progress View
For more details about working with the program's Progress View, please refer to the following sections in this guide:
• Stopping a Run
• File System Operation
Bookmarks View
You can add Bookmarks on any line inside a program, or indeed inside any file that you can open and edit with the Workbench via the Project Explorer View. To list and navigate between your bookmarks, you need to use the Bookmarks view.
Note: This view will list all bookmarks regardless of whether the programs are open or not. However, it will not list bookmarks from programs in a closed project.
Note: It is not possible to create bookmarks on files opened from the File Explorer View, unless they are members of a project . This is because files opened outside of Projects may be anywhere in the filesystem, and bookmarks can only be set on files that are members of a workspace project. To Display this View
To add this view to the current perspective, select the menu item Window > Show View > Other… > General > Bookmarks.
Tasks View
You can add Tasks (reminders) against any line in a program that has been opened from the Project Explorer View, and associate them with notes and a priority level. To list, update and navigate between any tasks you have added, you need to use the Tasks view.
Note: The Tasks view will list tasks regardless of whether the programs are open or not. It will not list those from programs in a closed project.
Note: It is not possible to create tasks on programs opened from the File Explorer View, unless they are members of a project. This is because programs opened this way may be anywhere in the filesystem and tasks can only be set on files that are members of a workspace project.
To Display this View
To add this view to the current perspective, select the menu item Window > Show View > Other… > General > Tasks.
Search View
The results of performing a search are displayed in the Search view. You can use this view to open the file right where the item appears.
To Display this View
To add this view to the current perspective, select the menu item Window > Show View > Other… > General > Search.
Types of Search
The main menu option Search > Search is a flexible tool that provides a wide variety of functionality:
• Search for a text string contained in any file in any open project in the Workbench. You can use wild cards in the search pattern.
• Search for files of a certain pattern contained in any open project in the Workbench.
• Search and replace text contained in any file in any open project in the Workbench. Note: The Search view opens automatically to display the results of a search.
Console View
The Console view is not currently used if you are only running programs on a local server. In this situation it will remain blank.
It can, however be extremely useful if you are running your programs on a remote WPS Server. In this scenario, all standard output and standard error output produced by the remote WPS Server will be echoed into the Console view. An example of its use could be to run an X statement in your program on the remote server which might be requesting a listing of the contents of a particular directory. In this case the output from running the X statement will be displayed in the Console view. It is also extremely valuable when a remote server fails to start, or terminates abnormally. In this situation error text is typically displayed in the Console view.
To Display this View
To add this view to the current perspective, select the menu item Window > Show View > Other… > General > Console.
Projects
As far as the Workbench is concerned, a project is a parent folder that contains other objects such as Programs, files, folders, etc. This parent or project folder is defined by a project definition file called .project.
The items in a Project represent objects within the filesystem under the project home directory.
There is no limit to the number of projects you can have open within WPS Workbench or to the number of folders and files a project may contain. Files may also be of any type.
More information about using files, folders, projects, etc can be found in the Working with Projects section of this guide.
All projects belong in a Workspace. You can only work with one workspace at a time within the Workbench but you can switch between different ones as desired. The Project Explorer View is used to display and manage the current workspace and the projects it contains.
Project Definition File
In the root directory of a project is a project definition file called .project. This file contains information about the project that is used internally by the Workbench.
This file is not normally displayed by the Project Explorer View. If you look at the project folder outside of the WPS Workbench, you will see this file.
Caution:
• Do not move this file from the root directory of the project folder
• Do not delete or edit this file
• Do not copy, move or import this file into another project folder
Working with Multiple Projects
More than one project can be open at any one time in the Workbench. There are many ways to end up with multiple projects in the Workbench:
• Creating a New Project
• Importing an Existing Project
• Copying a Project
Note: You can move, copy, cut and paste items between projects. For more information about using these facilities in the Workbench, please refer to the Working with Files And Folders section in this guide.
WPS Link
WPS Link is the collective term for the technology used to provide a client/server facility. Using the WPS Workbench GUI on your local PC (the client) you can connect to a networked computer (the server) to manage and run programs on that remote server. WPS Link involves using concepts we refer to as Host Connection and WPS Server.
Host Connection
Host connections allow users to access computers, either for running programs (via a WPS Server) or for managing files and folders.
Local Host Connections are available if the local WPS Server component is installed. This allows you to have one or more local servers for running programs written in the language of SAS. The ability to have multiple WPS Server nodes can be a useful way to setup different options or locale settings to use when running your programs.
Remote Host Connections allow you to connect to remote computers. They have additional properties that must be configured when they are created, so that the Workbench can communicate with them. WPS Servers can only be added to Host Connections. A program can only be run on a WPS Server and cannot be run on a Host Connection alone.
Management of files and folders on remote systems is possible via the File Explorer View.
WPS Server
In order to run a program (see Running a Program), the Workbench requires a connection to a WPS Server. The term Server here is used to refer to a server process. The process may be running on the local workstation machine (a local Host Connection), or may be running on an installation of WPS on a remote machine (a remote Host Connection). Servers running under the local connection are termed Local Servers. Servers running under a remote connection are termed Remote Servers.
With a typical workstation installation of WPS there will be a single Host Connection called 'Local' and a server called 'Local Server'. This server will be started by default when the Workbench is started. Further
local servers can be created if required (see Creating a New Local WPS Server) or the local server can be deleted. Deleting all local servers, where there are no remote servers, will render users unable to run programs.
Creating multiple local servers requires no further licensed WPS products and the only restriction on the number of local servers that can be created is the local machine resources. One reason that you might want to create multiple local server connections is to configure them with different startup options, for example different values of LOCALE or ENCODING.
The term Remote Server refers to a WPS Server running under a Host Connection on a remote machine. Such a set up will require a licensed WPS Server installation on the remote machine. Setting up remote server connections gives the user the ease of use of the Workbench at their local workstation while giving them access to the processing power of a remote server machine. Multiple servers can run under a single remote Host Connection. Once a connection to a remote machine is authenticated, one or more WPS Servers can be started without the need for further user authentication. Multiple users can have remote connections configured to the same machine, with the only restriction being the resources on that machine. Remote connections can be created by following the steps in Creating a New Remote WPS Server The list of servers that are defined is stored within the Workspace, so changing your workspace will load a new list of servers, which may differ. It is not possible to edit this list directly, but it can be maintained with the Link Explorer View.
For convenience, when moving between workspaces, or to share server definitions within a work group, server definitions can be exported to an external file (see Exporting WPS Server Definitions to a File) and imported from a file previously created in such a way (see Importing WPS Server Definitions from a File). The WPS Server Explorer View and Link Explorer View will show the list of servers (Server Explorer) or connections and servers (Link Explorer) that are currently defined in the Workbench. Through the Link Explorer View you can define new connections, new servers, edit their properties, delete connections and servers and export and import connections and servers.
The Default WPS Server
One of the defined servers is always set as the default server. There will only be one default server for all connections. This server is shown in bold in the WPS Server Explorer View and the Link Explorer View. The default server is the one that is acted upon by default when, for example, you run a program using the Run toolbar icon. The toolbar icons Run, Stop, Clear Log, Clear Results and Restart Server and their associated keyboard shortcuts all act on the default server.
WPS Server Environment
The environment maintained by a server is initialised on startup of the server. A typical workstation installation of WPS Workbench will come with a single local server configured that is launched when the Workbench is opened and is terminated when the Workbench is closed down.
All libraries, datasets and macro variables are persistent. This means that once they are assigned during the execution of a program, they are available to other programs that are run during the same workbench session.
Log output is cumulative and shows information and any errors from each program that has been run during the current session. It can be cleared using the Clear Log option.
Listing output, like log output, is cumulative and shows the results of every program run in the current session. HTML output similarly shows the results of programs but is not cumulative. Listing and HTML output can be cleared using the Clear Results option.
The server itself can also be restarted, using the Restart Server option. This will clear the log as well as any listing and HTML output. It will also delete any temporary files and deassign all libraries, datasets and macro variables etc that may have been set up on the server.
Viewing the Output Generated by the WPS Server
The Output Explorer View will display all the log, listing output and HTML result files that have been generated.
The Results Explorer View will display a hierarchical list of listing and HTML output.
The WPS Server Explorer View will display all the libraries, data sets and file references that are being maintained in the WPS Server environment.
Workspace
The term Workspace refers to the container that holds your Projects. It is possible to use any folder on any drive that your computer can access as a workspace.
The workspace must have a physical location. However, projects within a workspace can, but do not necessarily have to reside beneath the parent workspace folder.
On Windows, the default location of the workspace when WPS is first installed is your 'My Documents' folder with the following directory structure:
WPS Workspaces\Workspace1
On UNIX and Linux platforms the default location of the workspace is the directory that your $HOME environment variable is set to, again with the following directory structure:
WPS Workspaces\Workspace1
Please refer to the section in this guide called Switching to a Different Workspace to see how to change the workspace location.
Programs
A program is a program written in the language of SAS.
You can create and edit programs in the Workbench using the SAS Editor. This editor uses colour coding to highlight errors and to help distinguish the various keywords, variables, values etc that make up a program.
To assist navigation the Workbench displays the structural elements of a program in the Outline View. Quick Difference Indicators
As you modify a program, quick difference indicators automatically appear in the left hand white border of the program. They show that something is different in that line of code from when it was last saved.
• A change has been made to the line of code. If you hover your mouse over this coloured indicator in the left hand border it will display the section of code as it was before you made the change.
• A new additional line of code.
• The position where one or more lines of code have been deleted.
Note: When you save a program the quick difference indicators will be cleared from the margin. You can navigate between quick difference indicators in an individual program by using the Next Annotation and Previous Annotation controls.
Program Names
A program can have any name you desire (subject to your operating system's restrictions) but it must have a file extension of .wps or .sas. Files with either of these extensions are handled the same way by WPS and indicate that the file contains a program written in the language of SAS.
When Creating a New Program, the Workbench will automatically suggest a new name but you can type in any name you desire. If you do not specify an extension the program will automatically be created with the extension .sas.
Working with Multiple Programs
You can have as many projects open in your Workbench as you like and each of these projects can contain any number of programs.
You can open any number of programs and other files from the different projects in the Editor window. For each program that is open, a corresponding tab is displayed in the top of the Editor window. An open program can be given focus in the editor window by clicking on its tab.
Program Colours and Layout
Colours used to display language elements in a program and various other display and file controls are all Workbench preferences that can be viewed and modified.
Colour Coding of Language Elements
The colours used to display language elements in a program are controlled by the WPS Syntax Coloring preferences.